Installing an LG washing machine correctly ensures optimal performance, reduces noise, prevents leaks, and protects your investment. Whether you’re setting up a front loader, top loader, All-in-One washer dryer, or an LG WashTower, proper installation involves more than just plugging it in. From choosing the right location to leveling the unit and connecting water and drain lines, every step matters.
This guide covers everything you need to know for a successful LG washing machine installation, based on official specifications and best practices. You will learn how to prepare your space, connect utilities safely, avoid common mistakes, and run a test cycle with confidence.
Choose the Right Installation Location
Ensure a Level, Solid Floor
Place your LG washer on a hard, level surface such as concrete, tile, or sealed hardwood. Avoid soft or uneven flooring like carpet or warped wood, which can cause vibration, noise, and even structural damage during high-speed spins.
Use anti-vibration pads under each foot to minimize movement and protect delicate floors. These are especially helpful in apartments or upper-floor installations.
Avoid Extreme Environments
LG washers must be installed in a dry, indoor environment. While a covered balcony is acceptable, it must be sheltered from direct rain and sunlight, well-ventilated, and free from freezing temperatures.
Never install in unheated garages or outdoor areas where temperatures drop below zero degrees Celsius. This risks frozen pipes and internal damage to the machine.
Confirm Clearance Requirements
Proper spacing ensures airflow, access for maintenance, and safe door operation.
Front load models require minimum 2 cm on sides, 10 cm at the back, and 5 mm to 5 cm at the top. Allow full 180-degree door swing.
LG WashTower units require 5 cm on sides, 10 cm at the back, and at least 177 cm height clearance. Verify your floor can support the combined washer-dryer weight.
All-in-One washer dryers require 2 cm on sides and 10 cm at the back.
Also ensure a minimum 80 cm wide pathway for delivery and positioning.
Verify Electrical and Water Supply
Install a Dedicated G-Type Outlet
LG washing machines require 220 to 240 V, 60 Hz power via a grounded G-type outlet. This outlet must be located near the machine within reach of the power cord, used exclusively for the washer, and installed by a licensed electrician if not already present.
Never use extension cords, multi-plug adapters, or power strips. These can overheat and create fire hazards due to the machine’s high power draw.
Position Water Taps at Correct Height
Water supply connections must be easily accessible and at the correct elevation.
For front load washers, position the cold water tap 60 to 90 cm from the floor. Most models only connect to cold water, as internal heating handles warm and hot cycles.
For top load washers, position hot and cold taps 90 to 120 cm from the floor. Connect red hoses to hot inlets and blue hoses to cold inlets.
Always use new hoses provided with the unit. Old hoses may crack or leak. Ensure rubber washers are in place at both ends to prevent drips.
Remove Transit Bolts Before Use

Locate and Extract Shipping Bolts
Transit bolts secure the drum during transport. Leaving them in will destroy the suspension system and void your warranty.
To remove them, access the rear panel where bolts are visible. Use a 12 mm wrench to loosen each bolt by turning counterclockwise. Pull out completely, which may require slight wiggling. Insert plastic hole caps into empty slots to seal the chassis.
Save Bolts for Future Moves
Store transit bolts, spacers, and retainers in a labeled bag. You will need them if relocating the machine. Reinstall them before moving to protect internal components.
Running the washer with bolts in place causes loud thumping, severe vibration, and permanent damage to the machine.
Connect Cold Water Supply Correctly
Use Proper Hoses and Fittings
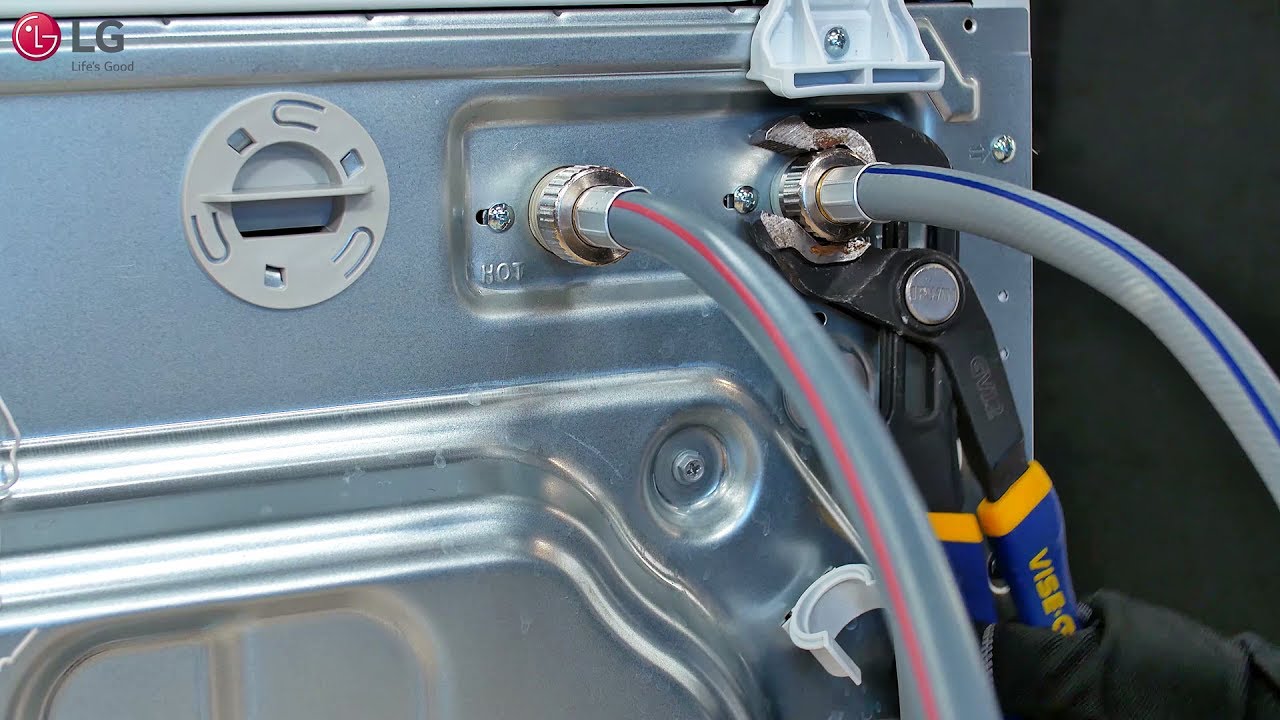
Always use new, high-pressure LG-approved hoses. Check that rubber washers are seated inside connectors, hoses are straight with no kinks or sharp bends, and connections are hand-tightened only. Overtightening damages seals.
Adapt to Your Tap Type
For threaded taps, screw the hose nozzle directly onto the tap by hand. Do not use tools. Hand-tightening is sufficient.
For smooth non-threaded taps, use the included quick-connect adapter. First remove the guide plate by loosening four screws. Slide the adapter onto the tap, ensuring the rubber seal contacts the opening. Re-tighten screws evenly to clamp the adapter. Reattach the ring plate. Push the hose connector into the adapter until it clicks. Hand-tighten the nozzle.
Always test for leaks before proceeding to the next step.
Set Up Drain Hose at Correct Height
Follow Drain Height Rules
Improper drain height causes siphoning or pump overload.
For front load models, position the drain hose between 60 cm and 90 cm from the floor. Never exceed 1.8 meters, as this exceeds pump capacity.
For top load pump models, position the drain hose 90 to 120 cm from the floor.
Install Using One of Three Methods
For standpipe or wall drain installation, insert the drain hose into the vertical pipe. Leave a small air gap. Do not seal tightly. Secure the hose with a tie strap or elbow bracket to prevent popping out.
For sink or tub edge installation, attach the elbow bracket to the hose end. Hang over sink, tub, or laundry tray. Fasten securely with a tie strap to faucet base or edge. Ensure the hose end is not submerged in water.
For direct wall connection, remove the elbow bracket. Insert the hose directly into the wall drain. Secure with a tie strap to prevent dislodging.
Level the Machine to Prevent Vibration

Adjust Feet and Lock Nuts
An unlevel washer vibrates, walks, and wears prematurely.
Place a spirit level on top of the machine, checking both front-to-back and side-to-side. Loosen the lock nut above each foot. Rotate the adjustable foot clockwise to raise the corner or counterclockwise to lower it. Adjust until all four feet touch the floor and the bubble is centered. Tighten lock nuts firmly against the base.
Test for Stability
Push diagonally on opposite top corners. No wobble should occur. If the machine shifts or rocks, recheck leveling, confirm all feet are fully tightened, and verify transit bolts are removed.
Also ensure the door opens smoothly without hitting walls or cabinets.
Run a Test Cycle Before First Use
Complete Final Pre-Check
Before powering on, confirm transit bolts are removed and holes are capped, water hoses are connected and leak-free, drain hose is secured at correct height, machine is level and stable, power is plugged into a grounded outlet, and all packaging is removed.
Start a Rinse Plus Spin Cycle
Turn on water supply valves. Plug in the machine. Select Rinse Plus Spin or Test Mode if available. Run with an empty drum.
During operation, listen for unusual noises like grinding or thumping. Watch for leaks at hose connections or drain. Observe drum spin, which should be smooth. Check if the machine moves or vibrates excessively.
If issues arise, stop the cycle and troubleshoot using the error code. IE indicates water inlet problems, while OE indicates drainage issues.
Stack Washer and Dryer Safely

Use an LG Stacking Kit
Only stack compatible LG dryers on front load washers. Never stack on top loaders.
Use an official LG stacking kit that includes brackets and often a shelf. First level the washer. Attach stacking brackets per kit instructions. Carefully place the dryer on top. Secure with provided fasteners. Install backflow cover to block lint. Attach pull-out shelf for convenience.
Maintain 10 cm clearance around stacked units for ventilation.
Never stack without the kit. This risks collapse and injury.
Install LG WashTower Units Properly
Handle as a Single Heavy Unit
The LG WashTower combines washer and dryer in one vertical unit with a central control panel.
Key considerations include requiring 177 cm vertical clearance, needing reinforced flooring due to combined weight, connecting to one water supply, one drain, and one power source, and featuring smart coordination where the dryer preps based on washer cycle.
Follow the same water, drain, and power rules as standard models, but ensure the entire unit is level after placement.
Prevent Leaks and Errors Post-Installation
Avoid Common Connection Mistakes
Overtightened hoses crush rubber washers. Hand-tighten only. Always check washers at both ends of supply hoses. Kinked drain hose restricts flow and causes error codes. Submerged drain hose triggers siphoning. Keep the hose end above water level.
Decode Installation-Related Error Codes
IE means water not filling. Check tap, hose kinks, or filter blockage. OE or DE means not draining. Verify drain height, hose loop, or clogs. UE means unbalanced load, often due to improper leveling. Re-level the machine and redistribute laundry. FE means overfilling. This indicates a faulty pressure switch requiring a technician.
Refer to your user manual for model-specific codes.
Maintain Your Washer After Installation
Monthly Care Routine
Extend lifespan and performance with simple habits. Run Tub Clean cycle monthly with LG-approved cleaner or white vinegar. Clean the detergent drawer weekly by pulling out and rinsing. Wipe the door seal dry after each use to prevent mold. Check the drain pump filter monthly for coins, lint, and debris.
For All-in-One washer dryers, empty the condensation water tank regularly. Clean the lint filter after every cycle. Descale the heat exchanger as recommended.
When to Use Professional Installation
Free First-Time Setup
LG offers free first-time installation for eligible products. To qualify, keep your tax purchase invoice required for service. Confirm water, drain, and power are ready at the site. Be present during the appointment.
Re-Installation Fees Apply
Moving or reinstalling later costs 285 EGP for washing machines. Dishwasher re-installation is also 285 EGP. TVs under 65 inches cost 445 EGP. OLED or 65-inch and larger TVs cost 771 EGP.
Request Installation via Official Channels
To schedule professional installation, call 19960 or message via WhatsApp. Provide your model number and delivery confirmation. Verify the installation site is ready. Choose a date and time slot. Confirm charges if re-installation applies.
LG responds within 24 hours to confirm scheduling.
Self-installation is allowed if you follow all guidelines. This does not void your warranty.
Final Checklist: Is Your LG Washer Ready
Before doing your first load, confirm transit bolts are removed and stored safely, water supply is connected and leak-tested at correct temperature, drain hose is secured between 60 and 90 cm for front load, machine is perfectly level with all feet touching, power is plugged into a grounded outlet with no extension cord, test cycle is completed with no errors or leaks, door opens and closes freely without obstructions, and all packaging and foam are removed.
Once all boxes are checked, your LG washing machine is ready for daily use.
Frequently Asked Questions About LG Washing Machine Installation
Can I install an LG washing machine myself?
Yes, self-installation is allowed and does not void your warranty, provided you follow all official guidelines in the user manual. However, professional installation is recommended for complex setups.
What happens if I forget to remove transit bolts?
Running the washer with transit bolts in place destroys the suspension system, causes loud thumping and severe vibration, and voids your warranty. Always remove these bolts before first use.
What height should the drain hose be for a front load LG washer?
The drain hose must be positioned between 60 cm and 90 cm from the floor. Never exceed 1.8 meters in height, as this exceeds the pump capacity.
Do I need a special outlet for my LG washing machine?
Yes, LG washers require a dedicated grounded G-type outlet with 220 to 240 V, 60 Hz power. Never use extension cords, multi-plug adapters, or power strips.
How much does LG washing machine re-installation cost?
The re-installation fee for washing machines is 285 EGP. This applies when moving or reinstalling the unit after the initial free installation.
Can I install an LG washer on a balcony?
A covered balcony is permissible if it is perfectly level, protected from direct rain and sunlight, well-ventilated, and maintained above freezing temperatures. Never install in unheated outdoor areas.
Key Takeaways for Successful LG Washing Machine Installation
Proper LG washing machine installation prevents the majority of early failures and ensures quiet, efficient, and long-lasting performance. The most critical steps include removing transit bolts before use, leveling the machine correctly to prevent vibration, connecting water and drain hoses at proper heights, and running a test cycle before your first laundry load.
Always use a dedicated grounded outlet, hand-tighten hose connections, and follow clearance requirements for your specific model. Whether you choose professional installation or DIY, these guidelines protect your investment and maintain your warranty coverage.
Consult your model-specific user manual for exact specifications, and keep your tax purchase invoice for warranty and service needs.