Water pooling around your LG washing machine is more than just a mess. It is a warning sign that demands immediate attention. A leaking LG washer can damage flooring, increase humidity in your laundry room, and even lead to mold growth if ignored. The good news is that most leaks stem from five common, fixable components that you can address without professional help.
This guide walks you through exactly where to look, how to identify the source, and step-by-step fixes based on real-world diagnostics. Whether water drips during the fill cycle, gushes during spin, or leaks when the machine is off, you will learn how to stop it fast and save hundreds in service fees.
Locate the Leak Source First
Before disassembling anything, you need to pinpoint where and when the leak occurs. This single step narrows down the culprit and saves hours of unnecessary work.
Check Leak Timing
Watch carefully when water appears during a cycle. Leaks during the fill cycle point to inlet valves, dispenser hose, or high water pressure problems. Leaks during wash or spin cycles typically indicate door boot seal issues, tub-to-pump hose damage, or an unbalanced load. Leaks during the drain phase suggest drain pump failure, bellows hose issues, or external drain hose problems. If water pools when the machine is off but the water supply remains on, the inlet valves are likely failing.
Identify Leak Location
The position of water pooling tells you exactly where to focus. Water at the front corners typically means drain pump seal failure. Water at the center bottom suggests tub-to-pump bellows hose or shock absorber wear. Leaks at the top rear indicate water inlet valve or dispenser hose problems. Water at the front door edge means gasket debris or tears. Water from the back of the machine usually signals safety air vent overflow from excessive suds.
Run a dry test using a Rinse + Spin cycle with no laundry. Watch closely for when and where water appears to confirm your diagnosis.
Fix the Drain Pump Assembly

The drain pump is the number one cause of bottom leaks, accounting for approximately 40% of all LG washing machine leaking cases. This component sits at the bottom-left corner behind the service panel.
Signs of Pump Failure
Watch for water pooling under the front feet after drain or spin cycles. Listen for humming or grinding noises during drainage. Check for rust on motor windings visible when you tilt the machine. These symptoms indicate the pump housing is cracked, the impeller is damaged, or the motor shaft seal is failing.
Clean the Pump Filter
Unplug the washer and turn off the water supply before starting. Tilt the machine back carefully, as LG washers are heavy and you may need assistance. Locate the filter access panel on the lower front-left corner. Place a towel underneath since some water will spill when you open it.
Twist the filter cap counter-clockwise to remove it. Pull out the filter and clean away debris such as coins, hair, lint, and detergent residue. Use a soft brush and warm water to scrub the housing thoroughly. Reinstall the filter and hand-tighten only. Over-tightening cracks the housing and creates a new leak problem.
Clean the filter monthly to prevent clogs and overheating that shorten the pump life.
Replace the Pump If Cracked
If the housing is cracked or the shaft seal is leaking, replace the entire pump assembly. Patches and glue do not hold on vibrating machinery. The part costs between $25 and $100. The repair takes 30 to 45 minutes with basic tools including a screwdriver and pliers.
Remove the front lower panel first. Disconnect the pump hoses and electrical connector. Unscrew the mounting bolts. Install the new pump and reconnect all parts. Test with a rinse cycle before returning the machine to service.
Repair the Tub-to-Pump Bellows Hose
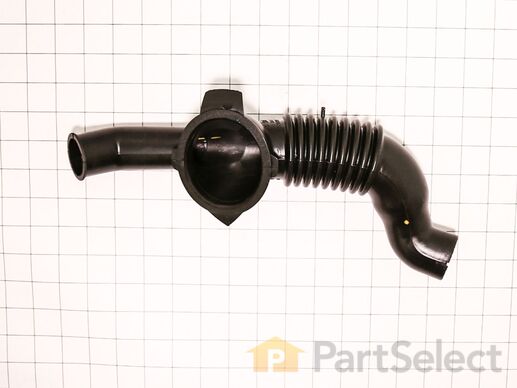
This accordion-style rubber hose connects the washing tub to the drain pump and fails in about 25 percent of bottom leak cases. The hose sits centrally or toward the front-right underside of the machine.
Why It Fails
Vibration damage from worn shock absorbers causes the drum to rub against the hose, creating holes or tears. Sharp objects like bra wires, nails, or zippers puncture the rubber folds. Constant flexing leads to dry rot and cracking over time.
Inspect the Hose Properly
Tilt the washer back with assistance. Shine a flashlight along the entire length of the hose. Squeeze gently to open the folds and look for pinholes or tears you might otherwise miss. Check all clamps for looseness or corrosion.
Critical inspection step: examine the shock absorbers at the same time. If they leak grease or feel loose, replace them first. Installing a new hose on a machine with failing shocks causes the new hose to fail within weeks.
Replace the Hose Correctly
The hose part costs $15 to $40. The difficulty is moderate because spring clamps can be tricky to remove and reinstall. Never patch this hose. Vibration will rip any repair apart within days.
Disconnect power and tilt the machine. Use pliers to remove spring clamps at both ends. Pull off the old hose and slide on the new one. Reattach clamps securely. Replace worn shock absorbers if needed.
Replace Faulty Water Inlet Valves
:max_bytes(150000):strip_icc()/repair-washing-machine-water-inlet-valve-1824606-03-3cb389ab4b214126995bcf693e4ced71.jpg)
Leaks from the top rear during or after the fill cycle point to inlet valve problems. These components sit behind the top panel at the back of the machine.
Symptoms of Valve Failure
Watch for dripping from the top rear when the machine is off but water supply taps remain open. Look for rust or calcium buildup on the valves themselves. Notice overflow during the fill cycle or continuous filling that never stops.
Test and Clean the Valves
Remove the top panel by unscrewing two bolts on each side. Look for active drips from the solenoid valves. Check for corrosion or mineral deposits. Remove the inlet filters using needle-nose pliers. Soak and scrub them with warm water to remove buildup.
If valves are cracked or continue leaking after cleaning, replace the entire assembly. Individual valves cost approximately $20, while sets run $30 to $35. The repair takes about 20 minutes with a screwdriver and pliers.
Turn off water and disconnect hoses first. Unplug electrical connectors. Remove mounting screws. Install the new valve and reconnect everything securely.
Use HE detergent only to reduce strain on the inlet valves and prevent premature failure.
Clean or Replace the Door Boot Seal

Water leaking from the door edge usually means the gasket needs attention. The door boot seal surrounds the front door opening and creates the watertight barrier during cycles.
Common Causes of Seal Leaks
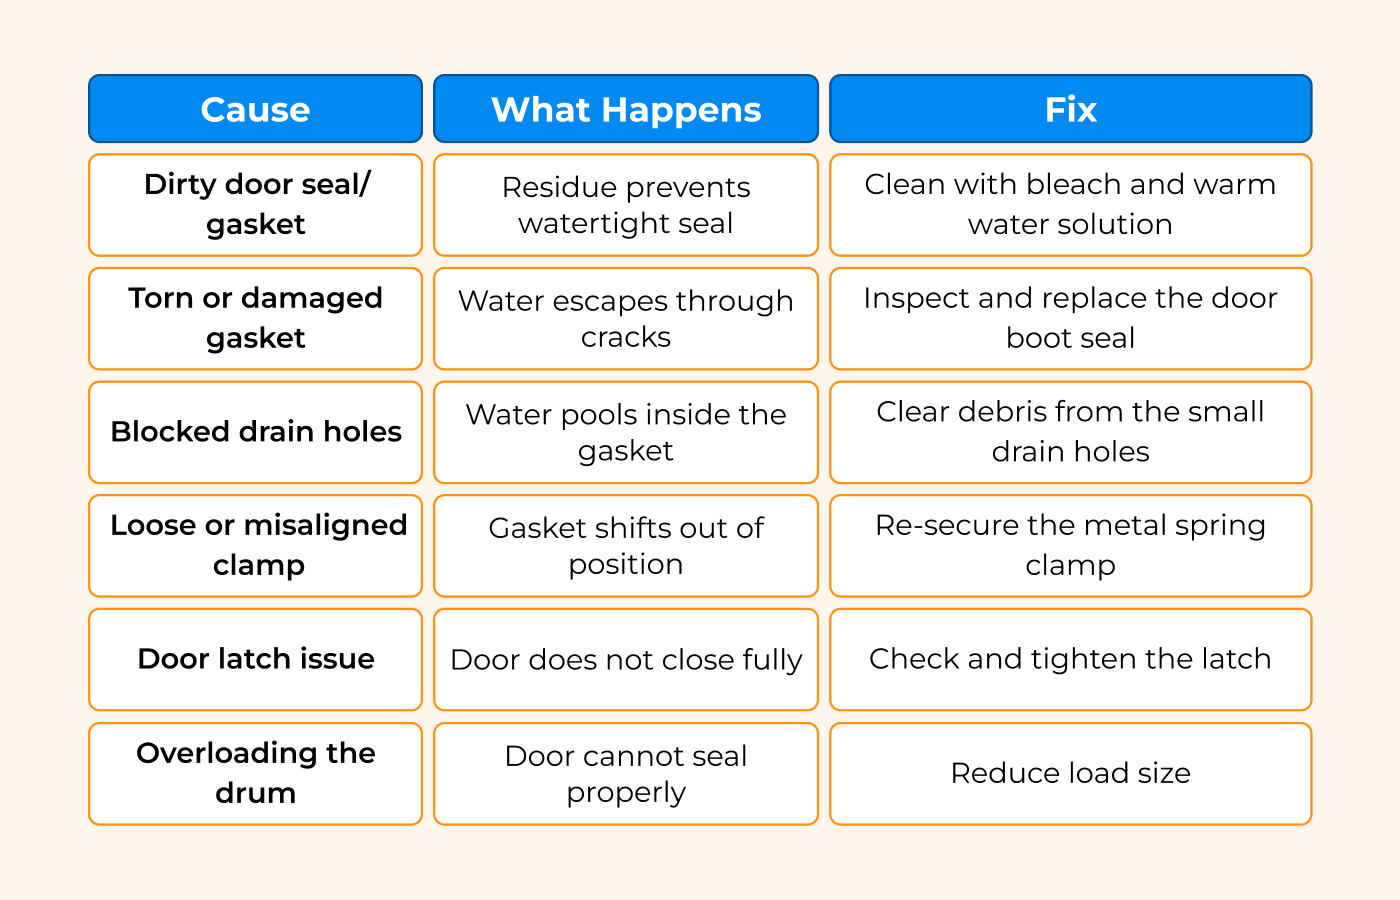
Clogged drain holes at the bottom of the seal cause water to overflow the lip. Tears or cracks from sharp objects like zippers damage the rubber. Detergent or mold buildup prevents the seal from closing properly.
Inspect the Gasket Thoroughly
Open the door and pull back the rubber lip. Check the lower right section as it is most prone to damage. Run your fingers inside the seal and feel for soft spots or holes. Look for trapped debris such as hair, coins, or small objects.
Clean the Gasket Safely
Mix three-quarters cup of vinegar or bleach with one gallon of water. Wipe the seal from top to bottom gently. Use a pipe cleaner to clear the drain holes at the base of the gasket. Dry thoroughly before running a cycle.
Never use straight bleach. It degrades rubber over time and causes more problems than it solves.
Replace If Torn
A torn boot must be replaced completely. This repair costs $60 to $140 for the part. The difficulty is high because you need a spring expansion tool to manage the retaining ring. Plan for one to two hours of work.
Unless you have experience with appliance repair, hire a professional for this job. Improper installation voids warranties and creates additional leaks.
Fix the Dispenser System
Leaking during the fill cycle from the top-left front area means checking the detergent drawer and dispenser system.
Why It Leaks
Clogged compartments cause water to overflow instead of draining properly. Cracked internal hoses from vibration allow water to escape. Water pressure exceeding 116 psi forces too much water into the dispenser.
Clean the Drawer
Pull out the drawer fully. Press the push button between bleach and softener compartments to release it. Wash all compartments with warm water and a soft brush. Wipe the cavity with a damp cloth. Dry completely before reinserting the drawer.
Replace the Dispenser Hose
If the internal bellow hose is cracked, remove the top panel first. Locate the hose connecting the drawer to the tub. Disconnect it and replace with an OEM part. The hose costs $25 to $40. This is an easy repair for most homeowners.
Check Water Pressure
Use a pressure gauge on a laundry faucet to test home water pressure. The ideal range is 14.5 to 80 psi. The maximum safe threshold is 116 psi. If pressure exceeds this, install a pressure-reducing valve to prevent future leaks.
Inspect Drain Hose and External Plumbing
External plumbing issues cause overflow or backflow that appears as a machine leak. Check the drain hose connection at the rear of the unit.
Set Correct Hose Height
The drain hose must be 35 to 47 inches above the floor. Too low causes siphoning that leads to continuous filling. Too high causes poor drainage and backup.
Do not seal the hose into the standpipe. This creates a vacuum that siphons water. Use a high-loop method by draping the hose over the countertop edge. Ensure the hose is not kinked or crushed.
Clear External Clogs
Disconnect the hose from the standpipe. Pour one gallon of water into the drain. If it backs up, a clog exists in the home plumbing. Use a liquid drain cleaner or call a plumber.
Replace cracked or brittle hoses immediately. Inspect hoses every few months for early signs of wear.
Stop Air Vent Leaks
Water or suds coming from the back vent indicate oversudsing problems. This is not an internal leak but a user error that mimics a leak.
Causes of Air Vent Leaks
Using too much detergent creates excess suds that overflow. Using non-HE detergent in a front loader causes massive foam problems. Detergent buildup in the tub creates recurring suds issues.
Fix the Suds Problem
Switch to HE detergent immediately. Reduce your dosage. Most loads need only one to two tablespoons, not the capfuls recommended on some detergent bottles. Run a Tub Clean cycle monthly to remove residue buildup.
Prevent Future Leaks
Regular maintenance prevents most LG washing machine leaking problems before they start.
Monthly Maintenance Tasks
Clean the pump filter to prevent clogs. Wipe the door gasket and detergent drawer after each use. Check all hoses for loose connections. Look for early signs of wear or moisture.
Long-Term Care Schedule
Replace inlet and drain hoses every five years. Inspect shock absorbers for wear. Check the door boot seal for cracks or hardening.
Smart Usage Habits
Do not overload the machine. Clothes need room to tumble freely for proper cleaning and water distribution. Balance loads by mixing large and small items. Leave the door slightly ajar after use to dry the gasket and prevent mold.
Pay attention to error codes. A UE code means the load is unbalanced. Redistribute laundry and restart the cycle.
When to Call a Professional
DIY fixes resolve approximately 90 percent of LG washing machine leaking issues. However, certain situations require a certified technician.
Call a professional if the drum seal or tub bearings are leaking. These are rare but serious problems that indicate internal mechanical failure. Call if the leak persists after replacing all likely parts. Call if you are uncomfortable tilting or disassembling the unit. Call if the washer is still under warranty, as some DIY repairs void coverage.
LG offers 24/7 chat support and video guides at lg.com/support for additional help.
Key Takeaways for Fixing Your LG Washing Machine Leak
Most LG washing machine leaks are simple to diagnose and fix once you know where to look. Start with the drain pump filter, which accounts for 40 percent of all bottom leaks. Then check the bellows hose, inlet valves, door gasket, and dispenser system in that order. With basic tools and parts costing under $100, you can save hundreds in service fees.
The most common mistakes are over-tightening the pump filter, failing to replace worn shock absorbers when fixing the bellows hose, and using too much detergent. Address these issues and your LG washer will run dry for years.
Frequently Asked Questions About LG Washing Machine Leaking
Why is my LG washing machine leaking from the bottom?
The bottom leak is most commonly caused by the drain pump assembly, which accounts for approximately 40 percent of all leak cases. The tub-to-pump bellows hose is the second most common cause at 25 percent. Check the pump filter first, then inspect the hose and pump housing for cracks.
How much does it cost to repair an LG washing machine leak?
DIY repairs cost between $15 and $140 for parts, depending on which component needs replacement. Professional service fees typically range from $300 to $500. Most leaks can be fixed for under $100 with basic tools.
Can I use my LG washing machine if it is leaking?
Stop using the machine immediately if water is pooling. Continued use can damage flooring, create electrical hazards, and worsen the underlying problem. Unplug the machine and turn off the water supply until you diagnose and repair the issue.
How do I know if the door boot seal needs replacing?
Water leaking from the door edge during or after cycles indicates gasket problems. Pull back the rubber lip and check for tears, soft spots, or debris trapped in the folds. Clean the drain holes at the bottom of the seal first. If water persists, the seal likely needs replacement.
What is the most common cause of leaks in LG front-loaders?
The drain pump filter being clogged or the pump seal failing is the most common issue. Cleaning the filter monthly prevents most of these leaks. Other frequent causes include the bellows hose, inlet valves, and door gasket problems.