
Moving a washing machine might seem straightforward, but doing it wrong can lead to back injuries, floor damage, or even destroy the appliance. Whether you’re relocating within your home or moving to a new house, knowing how to lift a washing machine safely and efficiently is essential. These units can weigh anywhere from 120 to 350 pounds, especially front-loaders with concrete counterweights, and often contain water or delicate internal components. Without proper preparation and technique, a simple move can turn into a costly mistake.
The key to success lies in preparation, using the right tools, and applying safe lifting mechanics. From disconnecting utilities to stabilizing the drum and choosing the best lifting method, every step matters. This guide walks you through everything you need to know, from essential safety checks and transport bolt installation to manual lifts, dolly use, and pro-level solutions like AirSled systems.
Prepare the Appliance Safely
Before lifting, prepare the machine to prevent leaks, odors, and internal damage during transit. Skipping these steps can result in mold, electrical hazards, or water spills.
Disconnect Power and Water Lines
Turn off the circuit breaker connected to the washer before unplugging it. This prevents electrical shock. Secure the power cord to the back with painter’s tape to keep it out of the way.
Next, shut off both hot and cold water supply valves, usually red and blue. Place a bucket and towels under the hose connections at the rear. Unscrew the hoses by hand or with pliers, expecting some residual water. Once disconnected, cap or plug the ends to avoid leaks.
Label each hose and its corresponding valve to simplify reinstallation later.
Drain and Clean the Drum
Run a hot wash cycle 2 to 3 days before moving using one-half cup of baking soda, followed by another with 2 cups of distilled white vinegar. This removes residue and prevents mildew.
For front-loaders, clean the rubber door seal with vinegar and a toothbrush to eliminate grime. Empty and sanitize the filter, then leave the door open so the drum dries completely.
Secure the Drum With Transport Bolts
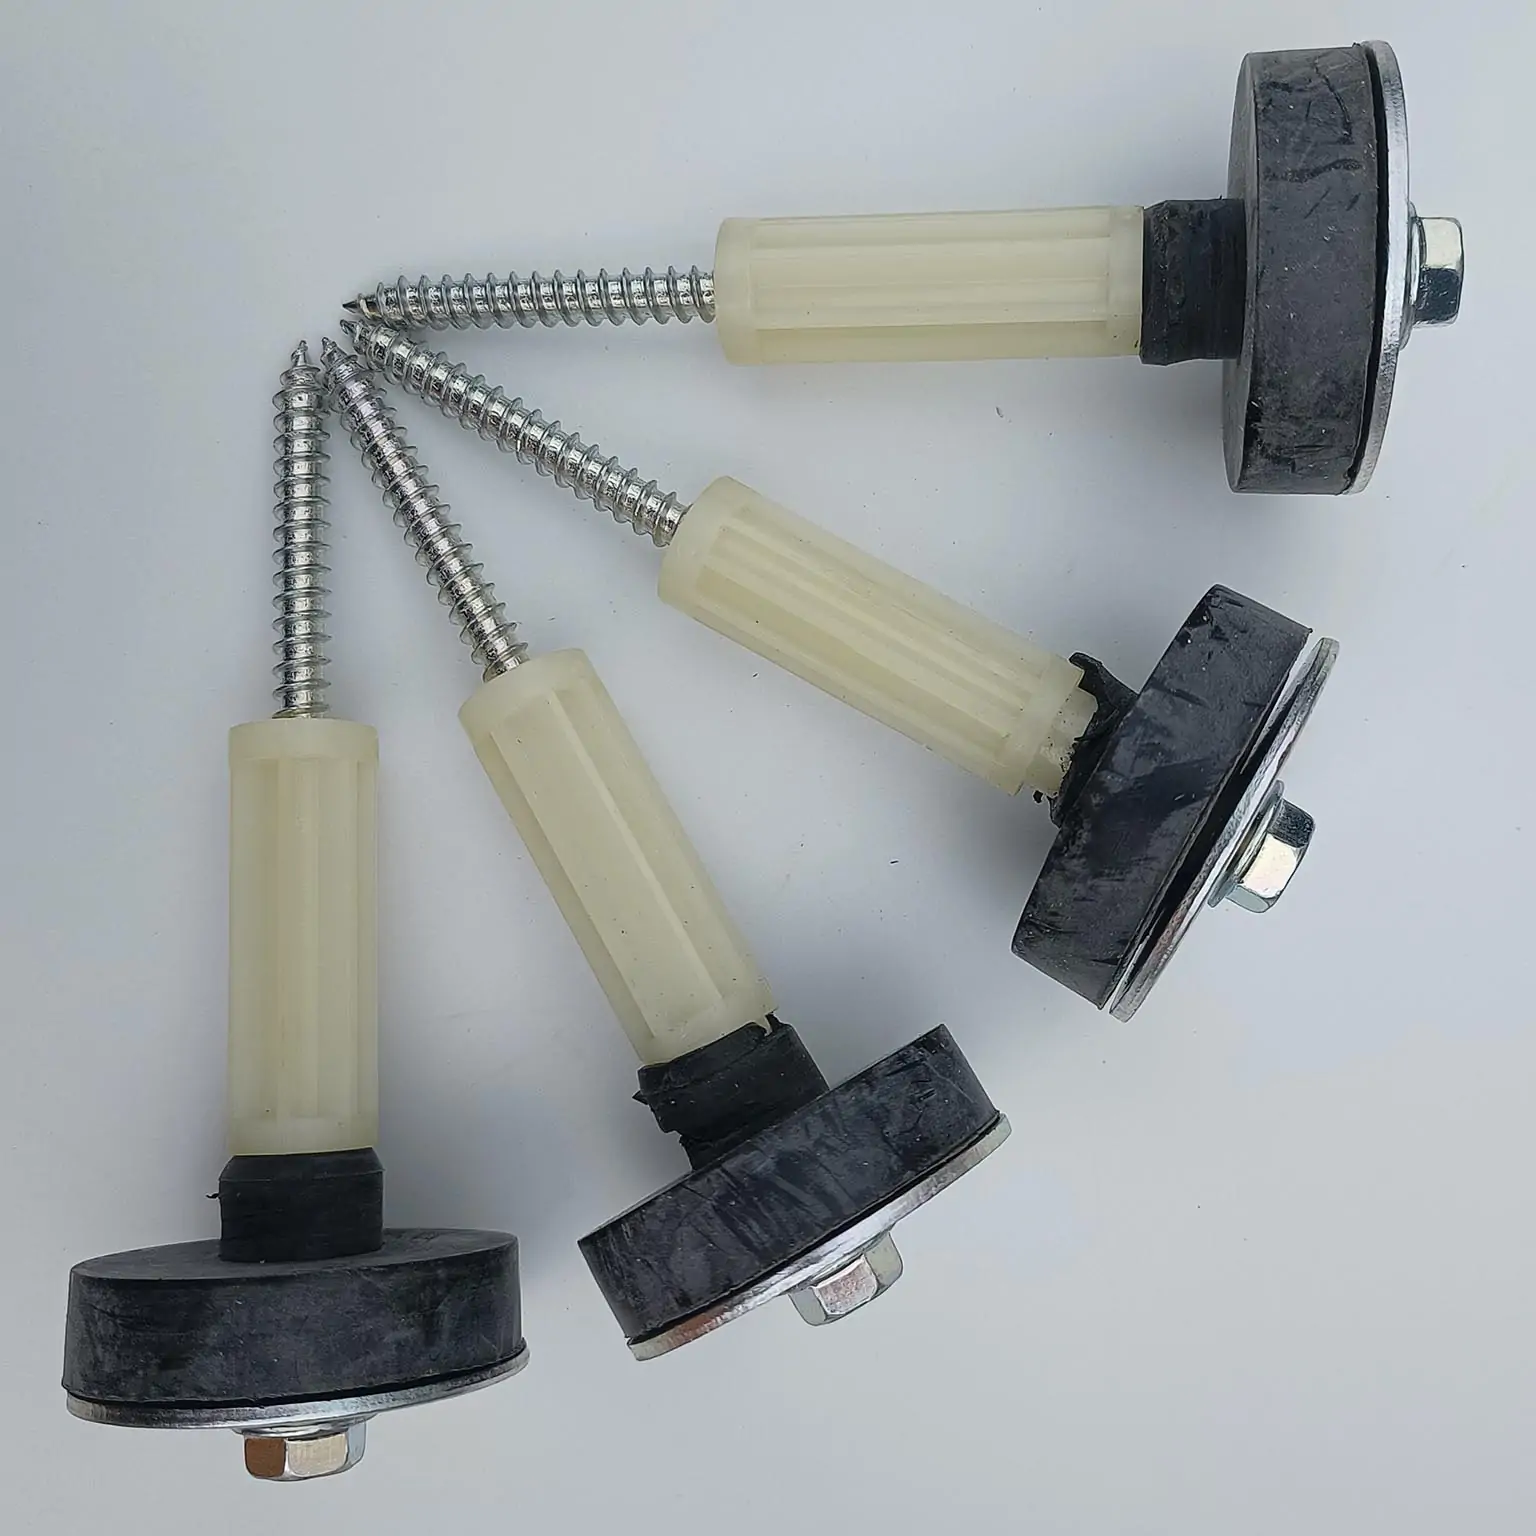
Failure to lock the drum is one of the most common causes of washing machine damage during moves. The drum is suspended on springs and dampers, and without stabilization, it can spin freely and destroy the suspension system.
Install Original Transport Bolts
Locate the transport bolt holes on the back panel. These holes connect directly to the drum’s suspension system. Insert the original bolts saved from installation with rubber washers and tighten them using a wrench or socket set.
These bolts immobilize the drum, which floats on springs during operation. Without stabilization, movement can snap dampers or misalign the drum.
Warning: Transport bolts must be removed before using the machine again. Operating with them in place causes violent vibration and permanent damage to the suspension system.
Use Styrofoam if Bolts Are Missing
If original bolts are lost, cut rigid Styrofoam blocks and wedge them tightly between the inner and outer drum. While not ideal, this buffers movement until replacement bolts arrive. Order OEM bolts online or contact the manufacturer. Do not skip this step.
Use Two-Person Lifting Correctly
When no tools are available, two people can manually lift the washer, but only with proper coordination and body mechanics. Always bend knees and keep the back straight. Avoid twisting the spine while bearing the load.
Assign Roles: Top vs. Bottom
Person A, the top or back person, stands behind the unit, gripping the top rear edge. This person is responsible for balance and tilt control.
Person B, the bottom or front person, faces forward, lifting from the base. This person bears most of the weight and controls movement.
Both must wear grip gloves and sturdy shoes to prevent slips.
Lift With Legs, Not Back
Person A pulls the top back to tilt the unit slightly. Person B grabs the front leg and opposite back corner, then shifts hands to both rear base corners. On a count of three, both bend knees and lift using leg strength, with backs straight and arms at 45-degree angles. Person B raises the unit to chest level while Person A stabilizes.
Communicate clearly using verbal cues like lifting, stop, and lower.
Navigate Stairs and Tight Spaces
Going up stairs requires Person A at the top setting the pace since they see the path ahead. Going down requires Person B at the bottom controlling speed to stop forward sliding. At turns, pause, reposition, and proceed. Watch for handrails, door frames, and thresholds.
Never twist while carrying. Pivot feet instead to change direction.
Reduce Friction With Sliding Hacks
For small adjustments across smooth floors, avoid lifting entirely with low-effort sliding techniques. These methods work best on tile, laminate, vinyl, and hardwood.
Try the Dryer Sheet Trick
Fold a used dryer sheet or paper towel in half. Tilt the machine slightly backward, using the door as a stopper if needed, then slide the sheet under both front feet.
The fabric’s residue reduces friction, letting the front glide while the back legs drag. This method works especially well on heavy front-loaders like Electrolux models.
Pro Tip: Place sheets under all four legs for maximum ease, especially with heavy front-loaders.
Use Furniture Sliders
Choose sliders based on your flooring type. Use plastic sliders for carpet and rugs. Use felt sliders for hardwood, laminate, and tile to prevent scratching.
Tilt one side, insert two sliders under the corners, and repeat on the other side. Push gently, and the unit will glide smoothly without scratching floors.
Move Long Distances With a Dolly

For moves involving hallways, stairs, or trucks, an appliance dolly is essential. This method requires two people and proper strapping technique.
Choose the Right Dolly
Use a heavy-duty appliance dolly with vertical straps, a wide base for stability, and pneumatic tires for thresholds. Rent one from hardware stores if needed.
Strap the Washer Securely
Wrap the machine in furniture pads and secure with mover’s wrap. Tilt and slide the dolly base underneath, centered. Use ratchet straps to tightly fasten the washer to the dolly frame. Keep the unit upright. Never lay it down unless specified by the manual.
Pull, Do Not Push
One person pulls the dolly handle while another guides from the side. Pulling gives better control and reduces tipping risk.
When descending stairs, back down slowly. The spotter controls descent by pressing the handle down.
Lift With Forearm Forklift Straps
A forearm forklift is a safer alternative to manual lifting that protects your back and distributes weight evenly across stronger leg muscles.
Set Up the Straps
One person tilts the washer slightly. The other slides a strap under the base from side to side. Repeat on the opposite side, then cross the straps. Each lifter inserts arms into the loops, palms up.
Execute the Lift
Bend knees and keep the back straight. Lift together using leg power. The crossed straps transfer weight to forearms, reducing strain on the lower back. Walk in sync, communicating every move.
Lower by bending knees only. Maintain tension until the unit touches the ground.
Use AirSled for Zero-Friction Movement
For pedestal-mounted or high-end units, the AirSled system eliminates lifting and protects floors. This method allows a single person to move heavy loads effortlessly.
Match Height With Lift Cart
Use a lift cart with XL Top upgrade, which features an HDPE platform. Raise it via remote until the top aligns with the pedestal height. This ensures full support when transferring the washer off its base.
Slide in Air Beams
Insert low-friction air beams under the front of the unit. Activate the air supply. Compressed air lifts the washer slightly, creating a hover effect. Now, a single person can glide the machine across the floor effortlessly.
Note: If the beam snags on the cart’s seam, gently squeeze the HDPE pieces together to release.
Handle Special Moving Challenges

Some setups require extra caution due to weight, height, or access limitations. Understanding these challenges prevents damage and injury.
Move Pedestal-Mounted Units Safely
Standard dollies cannot reach under pedestal feet, creating a tipping hazard. Use an extended platform like the AirSled XL Top to support all four leveling feet. Transfer the machine onto the cart at exact height. No tilting is required.
Avoid Drawer Damage on Front-Loaders
Models with front drawers, like certain Electrolux units, can jam if dragged or tilted unevenly. Use the dryer sheet method under front legs to ensure smooth, jerk-free gliding. Keep the tilt angle minimal when crossing thresholds.
Never Move Stacked Units Intact
Stacked washer-dryer combos are extremely top-heavy and unstable. Do not attempt to move them as one unit. Instead, unstack the pair first, then move each appliance separately. Use at least two people per unit.
For complex moves, hire professionals. This setup poses serious fall and injury risks.
Reinstall and Test After Moving

Once in place, reconnect and verify everything works before regular use. Proper reinstallation ensures the machine operates safely in its new location.
Level the Machine
Slide it gently into position. Adjust the leveling feet until it sits flat and does not rock. An unlevel washer vibrates excessively, damages flooring, and shortens lifespan.
Remove Transport Bolts
Critical: Take out all transport bolts before turning on the machine. Leaving them in causes loud banging and can destroy the suspension. Save the bolts in a labeled bag taped to the back for future moves.
Reconnect Utilities
Reattach hot and cold hoses using labels from disconnection. Hand-tighten, then give a quarter turn with pliers. Do not over-tighten. Connect the drain hose to the standpipe or sink. Plug in the power cord. Turn on water valves and check for leaks.
Run a Test Cycle
Start a short, empty wash cycle. Listen for unusual thumping, which could mean bolts are still in. Check for excessive shaking, indicating an unlevel unit. Look for leaks under the base.
Address issues immediately before regular use.
Frequently Asked Questions About Lifting a Washing Machine
Can I lift a washing machine by myself?
Solo moving is possible with specific tools like a dolly, appliance mover, or AirSled system. However, manual lifting always requires two people to distribute weight and maintain balance. Never attempt to manually lift a washing machine alone.
How much does a washing machine weigh?
Washing machines typically weigh between 120 to 350 pounds, depending on the model and whether it contains water or internal components like concrete counterweights. Front-loaders are generally heavier than top-loaders.
Why are transport bolts so important?
Transport bolts secure the internal drum during movement. Without them, the drum, which floats on springs during operation, can spin freely and cause severe damage to the suspension system, dampers, and drum alignment.
What is the easiest way to move a washing machine across a room?
The dryer sheet trick offers the easiest method for small adjustments. Fold a used dryer sheet and place it under the front feet. The residue reduces friction, allowing the machine to glide smoothly. This works especially well on tile, laminate, and vinyl flooring.
How do I move a washing machine up or down stairs?
Use a team of two people. The person at the top sets the pace when ascending. The person at the bottom controls speed when descending to prevent forward sliding. Communicate constantly with verbal cues like step up, step down, and pause.
When should I hire professional movers for a washing machine?
Hire professionals for stacked washer-dryer units, multiple flights of stairs, spiral staircases, units approaching 350 pounds, or long-distance moves requiring truck transport. Professional movers have the equipment and expertise to prevent injury and damage.
Key Takeaways for Safely Lifting Your Washing Machine
Lifting a washing machine does not have to be dangerous or difficult if you prepare properly, use the right tools, and apply safe techniques. The most critical step is installing transport bolts before moving, as this protects the internal suspension system from catastrophic damage. Always disconnect power and water supplies, clean the drum to prevent mold, and label all hoses for easy reinstallation.
Choose your lifting method based on the distance and your available equipment. For minor adjustments, use the dryer sheet or furniture slider methods. For long-distance moves, rely on a properly strapped appliance dolly. For pedestal-mounted units, consider professional-grade solutions like the AirSled system.
Regardless of the method you choose, prioritize proper body mechanics. Bend with your legs, keep your back straight, and communicate constantly with your partner. By following these steps, you will move your washing machine efficiently, avoid costly mistakes, and ensure it runs smoothly in its new location.



