
Removing a washing machine hose is a necessary task for repairs, replacements, or relocation—and doing it correctly prevents water damage, leaks, and appliance issues. Whether you’re replacing old rubber hoses with durable stainless steel ones or moving your washer to a new home, knowing how to safely disconnect and remove the hoses is essential. This guide walks you through every step—from cutting power and water to draining residual water and handling stubborn connections—so you can complete the job efficiently and safely. You’ll also learn when to upgrade your hoses, how to inspect for wear, and what mistakes to avoid.
Cut Power and Water First
Before touching any hose, safety comes first. Disconnecting utilities eliminates the risk of electric shock, flooding, or accidental machine activation.
Unplug the Washing Machine
Start by unplugging the washer from the wall outlet. Even if the machine appears off, residual electrical current can pose a hazard during disconnection. If you’re working in a basement or laundry room with hardwired power, turn off the circuit breaker to cut electricity completely.
Shut Off Water Supply Valves
Locate the hot and cold water shutoff valves behind the washer—usually two small knobs near the floor. Turn both valves clockwise until they stop. This cuts off water flow to the machine. Never skip this step, as open valves will cause flooding when hoses are disconnected.
Pull Washer Away from Wall
Gently pull the washing machine forward so you can access the back. If it’s heavy, rock it slightly or use furniture sliders. Work with a partner if possible to prevent tipping. Leave enough space to maneuver tools and avoid kinking any remaining lines.
Prepare for Water Spillage
Even with water shut off, hoses and the machine hold residual water. Prepare now to avoid messes and water damage.
Place Bucket Under Connections
Set a small bucket or container directly beneath the hose connections on the back of the washer. This catches drips and runoff when you disconnect the supply lines.
Lay Down Towels or Rags
Spread old towels or absorbent rags on the floor behind the machine. They’ll soak up minor leaks and protect flooring from water stains or slips.
Gather Tools and Supplies
Have these items ready:
- Channel lock pliers or adjustable wrench for tight fittings
- Gloves to protect hands from moisture and grit
- Face mask if removing drain hose to avoid lint dust
- Replacement hoses if upgrading to stainless steel
Disconnect the Drain Hose First

Always remove the drain hose before the water supply lines to prevent dirty water from spilling during the process.
Remove from Standpipe or Drain
Locate the drain hose extending from the back of the washer into a wall standpipe or floor drain. Carefully pull it out. Do not jerk—this can damage the pipe or dislodge debris.
Drain Residual Water into Bucket
Immediately lower the end of the hose into your bucket. Let any standing water inside drain out completely. This may take 30 seconds to a minute. Gently squeeze the hose if needed to clear stubborn water.
Inspect for Clogs or Lint Buildup
While disconnected, check the inside of the drain hose for lint, hair, or debris. Use a wet/dry vacuum or long brush to clean if clogged. A clear hose ensures proper drainage after reconnection.
Remove Water Supply Hoses
With the drain line clear, move to the hot and cold supply hoses. These carry pressurized water and must be disconnected carefully.
Try Hand-Tightening First
Grasp the coupling (the connector) on the machine side and turn it counter-clockwise (“lefty loosey”). Many modern hoses have hand-tightened fittings that can be removed without tools.
Use Pliers for Stuck Hoses
If the hose won’t budge, use channel lock pliers. Grip the coupling—not the valve or machine inlet—to avoid damage. Apply steady, gentle pressure. Do not force it; excessive torque can strip threads or break the shutoff valve.
Control Leaking Water
As the hose loosens, water will drip. Let small amounts drain onto towels. If flow is heavy, re-tighten slightly, shift to a dry towel, and continue loosening in stages. This “ratcheting” method minimizes spills.
Drain Hose into Bucket
Once loose, point the open end of the hose into the bucket to drain remaining water. Do this for both hot and cold lines.
Unscrew from Wall Valves
After draining the machine side, disconnect the other end from the wall supply valves. Turn counter-clockwise and immediately place the open end into the bucket to drain any trapped water in the line.
Handle Stubborn or Corroded Hoses

Old hoses with mineral buildup or rust can be difficult to remove. Use these techniques to avoid damaging plumbing.
Soak with Vinegar for Calcium Buildup
If the connection is seized due to hard water deposits, soak a rag in white vinegar and wrap it around the coupling for 10-15 minutes. The acid helps dissolve calcium and makes turning easier.
Tap Gently to Break Corrosion
Use a rubber mallet or wooden handle to lightly tap the coupling. This can break loose rust or mineral bonds without damaging metal parts.
Stop If Valve Is Damaged
If the wall shutoff valve turns with the coupling or leaks when closed, do not continue. A broken valve requires a plumber. Attempting to remove a hose from a compromised valve can cause a flood.
Inspect Hoses and Connections
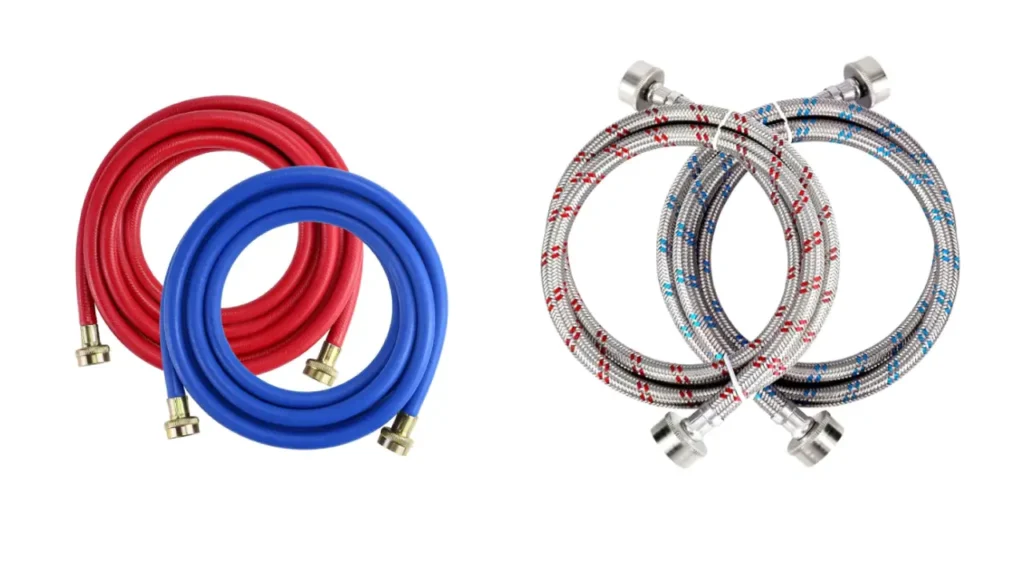
Now that hoses are off, check their condition and decide whether to reuse, replace, or upgrade.
Look for Warning Signs of Failure
Examine each hose for:
- Bulges or bubbles (signs of internal weakening)
- Cracks, splits, or fraying in the outer layer
- Rust or corrosion on metal fittings
- Kinks or permanent bends that restrict flow
Any of these mean replace immediately.
Check Age: Replace Rubber Every 2-3 Years
Rubber hoses degrade over time and are prone to bursting. If your hoses are more than two years old—or show any wear—replace them. Even if they look fine, age alone is a risk factor.
Upgrade to Stainless Steel Braided Hoses
Replace rubber hoses with stainless steel braided hoses. They’re more durable, resist bursting, and last 5-6 years or longer. The higher upfront cost pays off in flood prevention.
Clean Connection Points
Wipe down the water inlet ports on the back of the washer and the wall valve ends. Remove dust, lint, or old Teflon tape. A clean seal prevents leaks when reconnecting.
Reinstall or Prepare for Storage
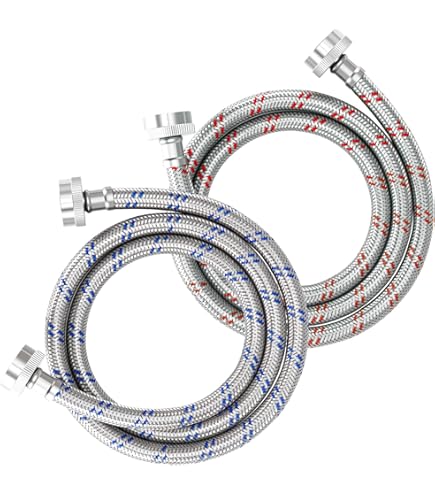
Once hoses are removed, decide whether to reinstall new ones or prepare the machine for transport.
Reconnect New Hoses Correctly
- Attach hot hose (red) to hot inlet, cold hose (blue) to cold inlet.
- Hand-tighten first, then give a quarter-turn with pliers—do not over-tighten.
- Connect other ends to matching wall valves.
- Ensure hoses are straight—no kinks or twists.
Test for Leaks Before Use
- Slowly turn on water supply valves.
- Watch all four connections (two at machine, two at wall) for drips.
- If leaking, tighten slightly or reseat the gasket.
- Run a short wash cycle to confirm no leaks under pressure.
Secure for Moving or Storage
If removing hoses for relocation:
- Reinstall transit bolts to lock the drum.
- Drain all water from pump and hoses.
- Wrap power cord in a towel and secure inside drum or to the side.
- Use padding and stretch film to protect the exterior during transport.
Prevent Future Problems
Regular maintenance prevents emergencies and extends hose life.
Inspect Every Six Months
Check hoses twice a year for cracks, bulges, or dampness. Catching issues early avoids costly water damage.
Install Leak Detection Devices
Consider automatic shutoff valves or water leak sensors. These alert you to leaks or shut off water automatically—ideal for unattended laundry areas.
Label Hoses for Easy Maintenance
Use waterproof labels or colored tape to mark hot and cold lines if color coding is faded. This simplifies future repairs or replacements.
Frequently Asked Questions About Removing Washing Machine Hoses
How do I remove a stuck washing machine hose without damaging the valve?
If the hose is stuck due to mineral buildup, soak the connection in white vinegar for 10-15 minutes to dissolve calcium deposits. Use channel lock pliers to grip the coupling (not the valve) and apply gentle, steady pressure. Never force the connection, as this can damage the shutoff valve and cause flooding.
Can I remove washing machine hoses without calling a plumber?
Yes, most homeowners can remove washing machine hoses themselves by following proper safety procedures. The key steps are: unplug the machine, shut off water valves, prepare for water spillage, and disconnect in the correct order (drain hose first, then supply hoses). Call a plumber only if the shutoff valve is damaged or corroded.
How often should washing machine hoses be replaced?
Rubber hoses should be replaced every 2-3 years, even if they appear undamaged. Stainless steel braided hoses last longer—typically 5-6 years or more. Inspect hoses every six months for cracks, bulges, rust, or other signs of wear, and replace immediately if any damage is found.
What tools do I need to remove a washing machine hose?
You’ll need channel lock pliers or an adjustable wrench for tight fittings, a bucket to catch residual water, old towels or rags for spills, and gloves to protect your hands. A face mask is recommended when removing the drain hose to avoid inhaling lint dust.
Why should I disconnect the drain hose before the supply hoses?
Removing the drain hose first prevents dirty laundry water from spilling onto your floor. The drain hose holds standing water that would release when the machine is tilted or moved. By disconnecting it first and draining it into a bucket, you minimize mess and potential water damage.
Key Takeaways for Removing Your Washing Machine Hose
Removing a washing machine hose is a straightforward DIY task when you follow the right steps. Always prioritize safety by unplugging the machine and shutting off water supply valves before starting. Prepare for residual water by placing buckets and towels beneath the connections, and always disconnect the drain hose before the supply lines to prevent spills. Handle stubborn connections with patience—use vinegar soaks and gentle tapping rather than force. Inspect your hoses for wear, bulges, or age (replace rubber hoses every 2-3 years), and consider upgrading to stainless steel braided hoses for better durability. Finally, test for leaks before using the machine again, and establish a biannual inspection routine to prevent future problems. With these practices, you can safely manage your washing machine hoses and protect your home from water damage.



