If your GE washing machine won’t spin or makes a loud grinding noise during the spin cycle, the culprit is likely a failed clutch assembly. This small but critical component engages the drum for high-speed spinning, and when it wears out, your washer loses its ability to properly drain and spin clothes dry. Ignoring this issue leads to wet laundry, extended drying time, and potential damage to other parts. The good news is that replacing the clutch is a doable DIY repair that costs around $38 in parts, saving you over $100 compared to professional service.
This guide covers everything you need to know about GE washing machine clutch repair, including how to diagnose failure, identify your clutch type, and complete the repair yourself. You’ll also learn what tools you need, common mistakes to avoid, and when to suspect other issues instead.
Identify Your GE Washer Clutch Type
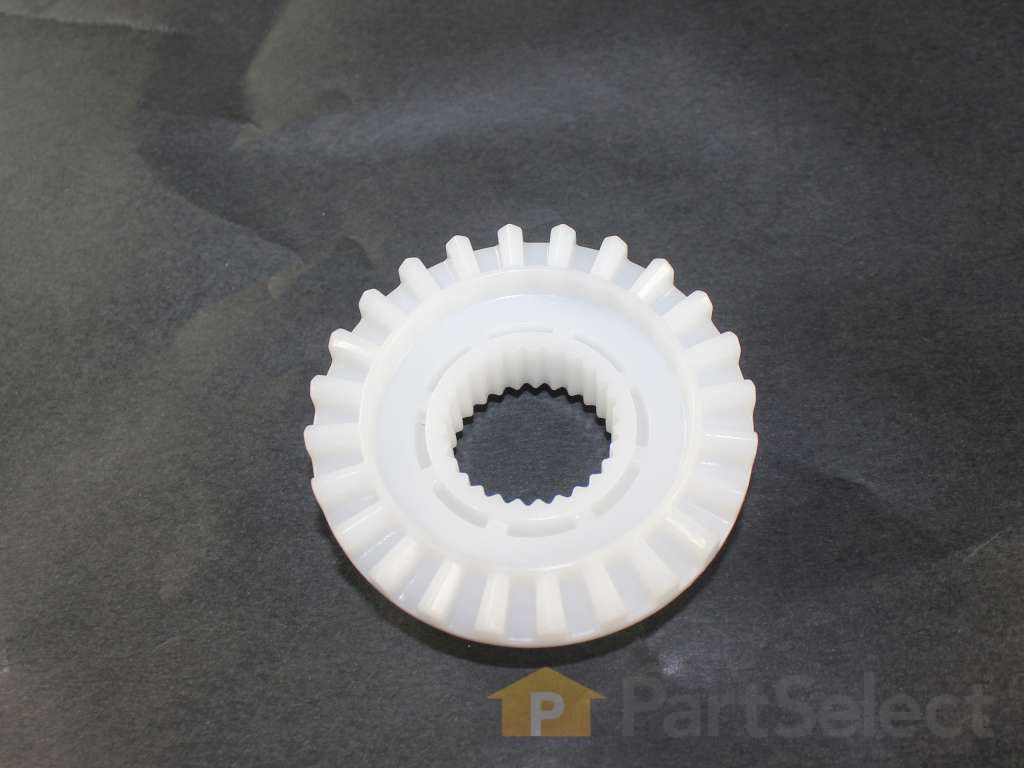
GE top-load washers use one of two clutch systems. Knowing which one your model has is crucial before ordering parts.
Transmission-Mounted Clutch (WH05X24185)
This clutch sits on the transmission shaft under the washer. Access requires tilting the machine and removing the drive belt and pulley. It fits most modern GE models including GTW, HTW, and YTW series such as GTW460ASJ, GTW685BSL, and YTW4514PN.
Motor-Mounted Clutch (WH5X256)
This clutch attaches directly to the motor shaft and is accessed by removing the front panel. It uses a clip system for quick removal and is found in older or specific models.
Quick Tip: Check your model number on the back of the washer or inside the lid. If it starts with GTW, HTW, or YTW and isn’t listed for WH5X256, you likely have the WH05X24185 clutch.
Diagnose Clutch Failure in Your GE Washer

Before disassembling your washer, confirm the clutch is the issue and not the motor, belt, or agitator.
Listen for Grinding or Whining Noise
A loud, high-pitched grinding or whirring during spin-up is a hallmark of a failing plastic clutch gear. The noise increases as the drum tries to reach full speed. Noise from the bottom center under the tub indicates clutch failure. Noise that is more of a rumbling or knocking, often persistent even when not spinning, suggests bearing failure.
Check for No or Slow Spinning
If the motor runs but the drum doesn’t spin or spins weakly, the clutch may be slipping. Run a spin-only cycle. If the motor hums but the basket barely moves, suspect the clutch. Open the lid mid-spin. If the agitator moves but the tub doesn’t, the clutch or transmission is at fault.
Look for White Plastic Powder
Open the tub and inspect the bottom or around the transmission area. White dust or shavings mean the plastic clutch gear is grinding apart, which is a confirmed failure.
Warning: If you see white powder, replace the clutch immediately. Continued use can damage the transmission and lead to costly repairs.
Rule Out Other Problems Before Replacing
Several problems mimic clutch failure symptoms. Rule these out before replacing your clutch.
Test for Stripped Agitator Splines
If the motor and transmission pulley turn but the agitator doesn’t move, the splines may be stripped. Remove the agitator cap and use a 7/16″ or 10mm socket to unscrew the center bolt. Lift out the agitator and inspect the splines on the bottom and the transmission shaft. Replace the agitator if splines are worn or broken. This part costs around $78.
Inspect the Drive Belt
A cracked, glazed, or loose belt can cause no-spin issues. With the washer tilted back, inspect the belt for cracks, fraying, or slippage. Replace the belt if worn. Always inspect it when replacing the clutch.
Test the Clutch Coil (Electric Models)
Some GE models use an electromagnetic coil to engage the clutch. If it fails, the clutch won’t activate. Symptoms include motor running with no spin and no noise. Unplug the washer and locate the clutch coil near the transmission. Use a multimeter to test resistance. A reading outside the manufacturer’s spec, usually 20 to 50 ohms, means the coil is bad.
Tools Needed for Transmission-Mounted Clutch Repair
Gather these tools and parts before starting your GE washing machine clutch repair.
Essential Tools
• Pulley remover tool (essential, don’t skip this)
• Sockets: 3/8″, 9/16″, 14mm
• Ratchet with extension
• Impact driver
• Wooden block or sturdy chair (to prop the washer)
Parts to Purchase
• Replacement clutch: WH05X24185
• Clutch spring (replace it, don’t reuse the old one)
• Silicone grease (for splines)
Pro Tip: Buy a clutch kit that includes the spring and grease. It’s often cheaper and ensures compatibility.
Step-by-Step: Replace Transmission-Mounted Clutch (WH05X24185)
This is the most common clutch type. The repair takes 1.5 to 2.5 hours and requires working under the washer.
Step 1: Prepare the Washer
- Unplug the washer or turn off the circuit breaker.
- Turn off water valves and disconnect supply lines.
- Drain the hose by placing it in a bucket.
- Tilt the washer backward and prop the rear on a wooden block. Ensure it is stable.
Step 2: Remove the Belt and Pulley
- Remove the belt cover by unscrewing the three screws on the plastic cover at the base of the transmission.
- Take off the drive belt by sliding it off the large transmission pulley first, then the small motor pulley.
- Remove the transmission pulley using a 14mm socket to remove the center nut. Attach a pulley remover tool and crank until the pulley pops off the shaft.
Caution: Hold the pulley while loosening the nut to prevent the tub from spinning.
Step 3: Replace the Clutch and Spring
- Disconnect the mode shifter by pressing the locking tab and unplugging the shifter from the clutch.
- Remove the two screws holding the shifter to the transmission.
- Pull the shifter away. The old clutch and spring will come off with it.
- Inspect the old clutch for missing teeth or white plastic dust to confirm failure.
Step 4: Install the New Clutch
- Lubricate the splines by applying silicone grease to the transmission shaft and new clutch splines.
- Install the new spring by sliding it onto the shaft first.
- Slide on the new clutch by aligning the splines and pushing until fully seated.
- Reattach the mode shifter by aligning the pegs with the transmission holes and securing with the two screws. Don’t overtighten.
Step 5: Reassemble and Test
- Reinstall the pulley by sliding it back on, aligning splines, and tightening the 14mm nut while pressing down to seat it.
- Reinstall the belt by placing the ribbed side inward on the transmission pulley first, then stretching it over the motor pulley. Rotate both pulleys to ensure proper seating.
- Replace the belt cover and reattach with the three screws. Ensure the grounding wire is secured under a screw if present.
- Lower the washer and reconnect water, power, and drain hose.
- Run a spin-only cycle and listen for smooth operation. If noise persists, recheck belt alignment and pulley tightness.
Step-by-Step: Replace Motor-Mounted Clutch (WH5X256)
This system is accessed from the front and doesn’t require tilting the washer.
Required Tools
• Putty knife (for panel clips)
• Ratchet with 3-inch socket
• Flathead screwdriver
• Hammer
• Replacement clutch and clip: WH5X256
Step 1: Remove the Front Panel
- Unplug the washer.
- Insert a putty knife into the seam on both sides at the top.
- Push the clips inward and gently pull the panel forward.
- Lower and lift off the panel.
Step 2: Release Belt Tension
- Locate motor mounting nuts at the base of the motor.
- Loosen but don’t remove both nuts.
- Slide the motor backward to slacken the belt.
Step 3: Remove the Clutch
- Remove the belt from both pulleys.
- Inspect the clutch clip by rotating so the flat side faces forward.
- Use a putty knife to lift the locking clip and tap with a hammer to pop off the main clip.
- Pry the clutch down with a screwdriver if stuck, then slide it off the motor shaft.
Step 4: Install the New Clutch
- Align the cutout on the new clutch with the pin on the motor shaft.
- Slide it on, lifting the motor slightly if needed.
- Install the new clip by sliding it on, rotating to align, and tapping gently with a screwdriver and hammer until fully seated.
- Reinstall the belt by routing under the transmission pulley first, then over the clutch pulley.
- Tension the motor by pulling forward slightly and tightening mounting nuts. Snug is sufficient, not over-tight.
- Reattach the front panel by aligning bottom pins and pushing top forward until clips click.
Step 5: Test the Repair
Plug in and run a spin cycle. Confirm smooth, fast spinning with no noise.
Common Mistakes to Avoid During Repair

Even experienced DIYers make these errors. Don’t let them ruin your repair.
Reusing the Old Spring
The clutch spring wears out and loses tension. Always replace it with the clutch. A weak spring causes slipping and premature clutch failure.
Skipping Silicone Grease
Plastic-on-metal engagement needs lubrication. Apply silicone grease to splines during installation. Never use oil or WD-40 because these degrade plastic.
Misaligning the Belt
If the belt isn’t fully seated in the pulley grooves, it will slip and cause noise. Always rotate both pulleys by hand after installation to verify alignment.
Forgetting the Grounding Wire
On transmission-mounted models, the belt cover often has a grounding wire. If not secured under a screw, it can cause electrical issues or safety hazards.
Maintain Your New Clutch for Long Life
Extend the life of your new clutch with these simple habits.
Clean the Tub Regularly
Lint, detergent residue, and foreign objects can accelerate wear. Run a monthly cleaning cycle with washing machine cleaner or vinegar.
Avoid Overloading
Excessive weight strains the clutch and transmission. Stick to the recommended load size for your model.
Check the Level
An unbalanced washer causes excessive vibration. Use a level to ensure all four legs are stable.
When to Call a Professional
While clutch replacement is DIY-friendly, some situations require professional help.
• No power to motor or control board errors
• Transmission failure (grinding persists after clutch replacement)
• Leaking transmission fluid (rare but serious)
• Lack of tools or confidence, especially the pulley remover
Cost Comparison: DIY vs Professional Repair

Understanding the costs helps you make the right decision.
DIY Parts Cost
• Clutch assembly WH05X24185: approximately $30.78
• Silicone grease: approximately $7.62 (often included in kits)
• Total DIY parts cost: approximately $38.40
Professional Service Cost
• Estimated professional repair cost: approximately $150 to $175
• Estimated savings by DIY: approximately $112
Key Takeaways for Successful GE Clutch Repair
A failed GE washing machine clutch is a common but fixable problem. With the right diagnosis, parts, and tools, you can restore full spin function and avoid a costly service call. Whether you have the WH05X24185 transmission-mounted clutch or the WH5X256 motor-mounted clip type, this repair is straightforward if you follow the steps carefully.
The most important points to remember are replace the clutch and spring together, use silicone grease on splines, always inspect the belt during repair, and confirm it is the clutch and not the agitator or control board before starting. Now that you know how to fix it, grab your tools and get your washer spinning like new again.
Frequently Asked Questions About GE Washing Machine Clutch Repair
How do I know if my GE washing machine clutch is bad?
Listen for a loud grinding or whirring noise during the spin cycle. Check for white plastic powder inside the tub or around the transmission. Test by running a spin-only cycle. If the motor runs but the drum doesn’t spin or spins slowly, the clutch is likely failing.
Can I replace the clutch myself, or do I need a professional?
You can replace the clutch yourself with basic tools and mechanical aptitude. The repair costs about $38 in parts and takes 1.5 to 2.5 hours. Professional service costs $150 to $175, so DIY saves over $100.
What tools are required for transmission-mounted clutch repair?
You need a pulley remover tool (essential), sockets in 3/8″, 9/16″, and 14mm sizes, a ratchet with extension, an impact driver, and a wooden block to prop the washer. Skipping the pulley remover tool makes the job extremely difficult.
How much does a GE washing machine clutch replacement cost?
The clutch assembly (WH05X24185) costs approximately $30.78. When including silicone grease and a new spring, total parts cost is approximately $38.40. This is far less than professional repair costs of $150 to $175.
What happens if I don’t replace a failing clutch?
Continued use with a failed clutch leads to complete spin failure, leaving your laundry soaking wet. The grinding debris can damage the transmission, requiring more expensive repairs. Replace the clutch as soon as you notice symptoms.