If your GE washing machine is leaking, you are not just dealing with a puddle on the floor. You are facing a potential disaster that can lead to warped subfloors, mold growth, and even electrical hazards if left unchecked. The good news is that most GE washer leaks stem from a few common sources, and many can be diagnosed and fixed in under an hour. Whether water is pooling at the front, back, or center bottom, this guide will help you pinpoint the exact cause and apply the right fix fast.
Leaks typically originate from three zones: external connections like hoses and valves, internal plumbing like pumps and hoses, or critical mechanical parts like seals and gearcases. The type of fluid, whether clear water, soapy suds, or oily residue, can tell you everything you need to know about the source. By following a step-by-step approach and using simple tools, you can stop the leak before it causes permanent damage to your home.
External Hose Leaks: First Check
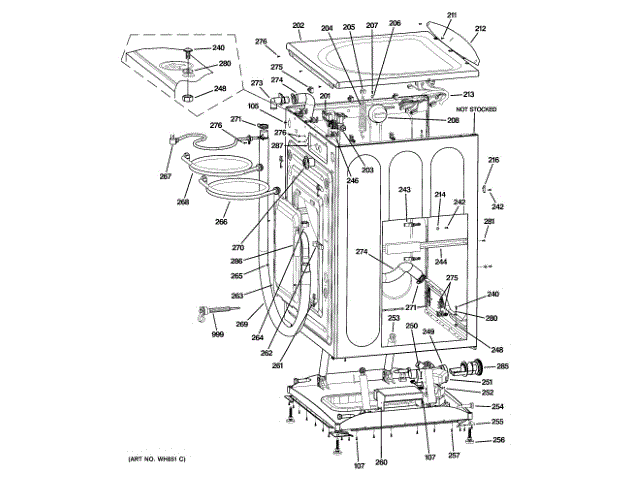
The majority of GE washing machine leaks originate from external hoses. These components are the easiest to inspect and replace, making them the logical starting point for any leak diagnosis.
Inspect the Drain Hose
A damaged or loose drain hose is responsible for approximately 80% of bottom leaks. This hose carries wastewater to the standpipe during the spin cycle, and if it is cracked, kinked, or improperly secured, water will escape under pressure.
To test the drain hose, pull the washer away from the wall, run a short cycle, and watch the hose during the final spin. Look for splits, bulges, or white soap residue, as these are signs of micro-leaks. Also check both ends where the hose connects to the machine and the wall. A loose clamp or misaligned fit can cause steady dripping.
If damage is found, replace the hose. A new one costs $20 to $30 and installs in minutes. Ensure the hose is not kinked and is clamped tightly on both ends. Never force the hose into a tight space, as bending it too much restricts flow and increases pressure, leading to future leaks.
Test Fill Hoses and Fittings
The hot and cold fill hoses bring water into the washer. Over time, rubber degrades and metal fittings corrode, especially in areas with hard water. Check for bulges, cracks, or dampness around the connections.
GE recommends replacing fill hoses every 5 years, even if they look fine. This simple step prevents sudden bursts that can flood your laundry room. When installing new hoses, hand-tighten first, then use pliers for a snug fit that is not over-tightened. Cross-threading can cause immediate leaks.
Also inspect the rubber washers inside the hose connectors. If they are flattened, cracked, or missing, replace them. A $5 washer can save you hundreds in water damage repairs.
Water Inlet Valve Issues
If water drips when the washer is off, the inlet valve may be failing. This component controls water flow into the tub and can leak from cracked housings or worn seals.
Access the Inlet Valve
To inspect the inlet valve, unplug the washer, turn off the water, and remove the top or rear access panel. Use a quarter-inch nut driver to open the panel. The valve is usually located at the back, with two water lines and electrical connectors.
Look for cracks around the solenoids or moisture at the base. Disconnect the hoses and remove the mounting bracket. If the valve is cracked or leaking, replace it. New units cost $40 to $80 and take about 45 minutes to install.
Reconnect the wiring harness securely, as most are keyed to prevent incorrect installation. Turn the water back on slowly and check for leaks before running a full cycle.
Internal Drain Hose Inspection
If external hoses are dry, the leak may be internal. This requires removing the front panel to access the hose running from the tub to the pump.
Remove the Front Panel
For most GE top-load models, use a putty knife to press the spring clips near the top corners. Tilt the panel forward and lift it off. For front-loaders, remove screws at the bottom and disconnect the door lock harness.
Locate the internal drain hose, which is usually a 1-inch rubber tube connected to the pump. Check for cracks, wear, or loose clamps. Gently squeeze the hose, as soft spots or splits mean replacement is needed.
Soapy residue or dampness around the connection points confirms a leak. Replace the hose and ensure clamps are tight. Reassemble carefully, making sure no wires or hoses are pinched.
Drain Pump Failure Signs
The drain pump forces water out of the tub. When it fails, leaks often appear as soapy water dripping from the right side of the machine.
Identify Pump Leaks
Symptoms include slow draining, gurgling noises, or water pooling during the spin cycle. Remove the lower access panel and inspect the pump body for cracks, especially around the inlet and outlet ports.
Foreign objects like coins or buttons can crack the housing. Also check the impeller for damage. If the pump is cracked or leaking, replace it.
Parts cost $80 to $120. A first-time DIYer should budget about 2 hours. Use a 3/8-inch socket to remove the cover and ground wire. Disconnect the wiring harness and drain hose. Place a towel underneath to catch residual water.
Replace the Pump Step-by-Step
Remove the three mounting bolts and pull the pump out. Clean the mounting surface and inspect the gasket. Wet the new gasket and seal to ease installation. Align the new pump and press it firmly into place. Reinstall bolts, hose, and clamp. Reconnect the wiring and ensure the harness is clipped securely. Reinstall the cover, routing the ground wire through the lower bolt.
Test the repair with a short cycle. No leaks? You have just saved a service call.
Gearcase Leak: Critical Failure

If water or oily fluid pools under the center of the washer, the gearcase transmission may be failing. This is a serious issue requiring immediate attention.
Recognize Gearcase Failure
Key signs include oily or dark fluid, which is gear oil mixed with water. Grinding, whining, or squealing during agitation is another indicator. Weak or erratic spin and water under the machine’s center are also warning signs.
The gearcase is sealed for life. Once the internal seals degrade, oil leaks out and water leaks in, destroying internal components. The average lifespan is 8 to 12 years.
Running the washer with a failed gearcase risks flooding and irreparable damage. Stop using the machine if you see oily residue.
Repair or Replace
Repair cost ranges from $180 to $420 for parts and labor. Labor takes 1.5 to 2.5 hours and requires full disassembly, including removing the tub, belt, motor coupling, and agitator shaft.
The decision rule is to repair if the washer is under 8 years old and otherwise reliable. Replace the unit if it is over 10 to 12 years old, has had multiple repairs, or shows secondary damage like worn bearings or belt issues.
Unless you are an experienced technician, hire a professional. Mistakes in reassembly can cause immediate re-leak or mechanical failure.
Tub Seal and Shaft Leak
Water leaking during the wash cycle, especially from the center bottom, may point to a failed tub seal. This seal sits between the outer tub and the transmission shaft.
Why It Is a Major Job
Replacing the tub seal requires lifting the entire tub assembly. You will need specialty tools like a tub nut wrench and must disassemble the agitator, pump, and drive system.
Time required is 4 to 6 hours. The risk of improper reassembly is high, as if the seal is not seated perfectly, the leak returns.
Most technicians recommend replacing the gearcase and tub seal together, as both are accessed during disassembly. For older models, this repair often costs more than the machine is worth.
Unless you have specific experience, leave this job to a professional.
Front-Load Door Seal Leaks
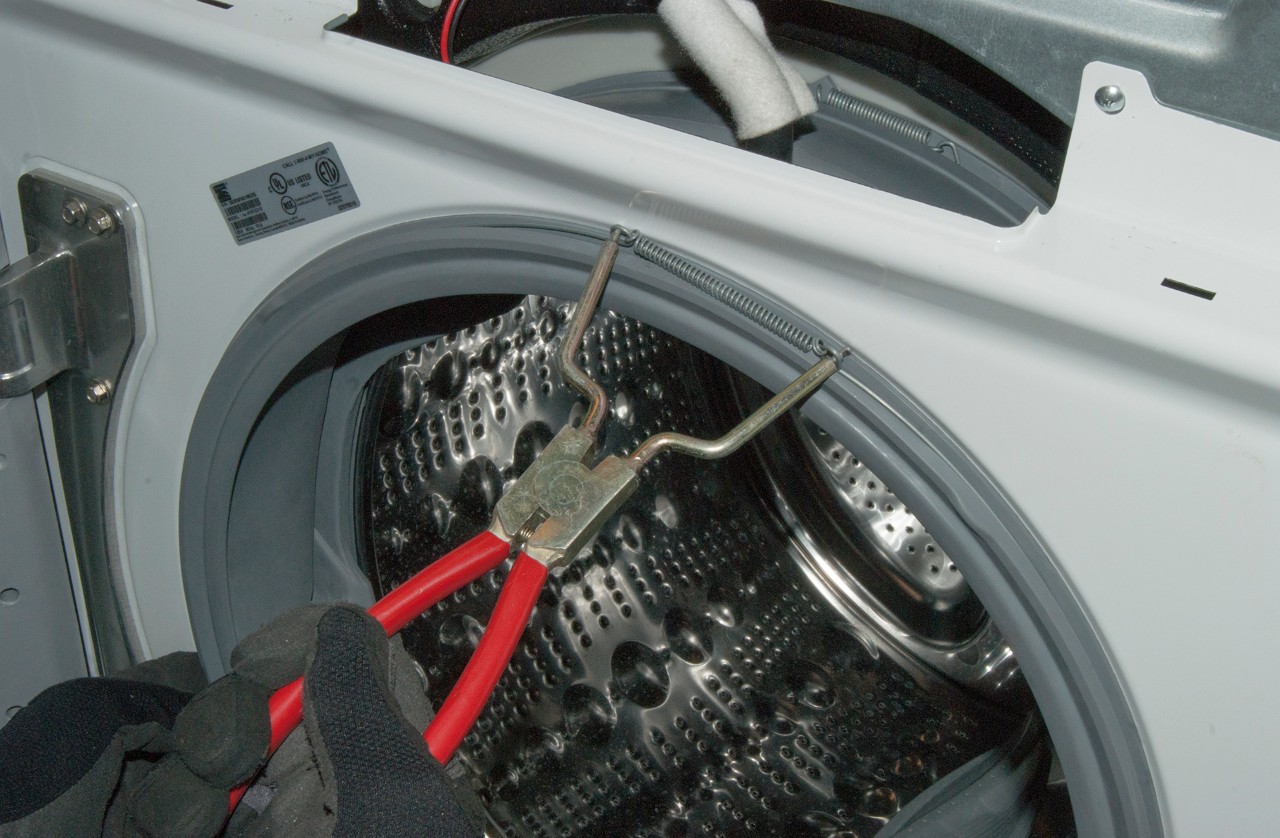
For GE front-load washers, a damaged door gasket is a common leak source. Water escapes from the front during the wash or spin cycle.
Check the Door Gasket
Inspect the rubber seal for tears, mold, or debris trapped in the folds. Coins, buttons, or zippers can puncture the seal. Also check if the retaining spring is loose, as this holds the seal in place.
Clean the seal weekly with a damp cloth. Never leave the door closed after a cycle, as moisture breeds mold and weakens rubber.
Replace a Damaged Gasket
If the seal is cracked or no longer seals tightly, replace it. The process takes about an hour.
The key step is reinstalling the retaining spring. GE uses a wide, high-tension spring that is hard to reattach by hand. Use a TSE1 tool or a cable tie and wrench method. Thread a cable tie through the spring loop, tighten the tie to compress the spring, slide the spring into the groove, and cut the tie to remove it.
Roll the seal lip over the door channel first, then install the spring. Ensure it is fully seated in the groove.
Dispenser and Detergent Leaks
Leaks from the top front of a front-load GE washer often trace back to the detergent dispenser.
Clear Clogged Hoses
Detergent buildup, especially in hard water areas, can block internal hoses, causing overflow. Remove the dispenser tray by pulling it out and pressing the release button.
If stuck, check for hidden screws. There are typically two top, two bottom, and one center screw with coarser thread. Remove plastic retainers and use a flathead screwdriver to disengage clips.
Clean the float mechanism and internal channels. Focus on the large primary tub hose, which is front center, the right-side hose, and the rear drain hose. Use a brush or compressed air to remove film. Flush with warm water if needed. Reinstall hoses securely. Some models lack clamps, so use a zip tie or new clamp if a hose feels loose.
Reconnect All Hoses Correctly
During reassembly, reconnect the rear hose first, as this is a common mistake to forget it. Ensure the front hose notch fits into the dispenser groove. Use the guide finger for alignment.
Reinstall the gasket spring carefully. Test with a short cycle using no clothes.
User Errors That Cause Leaks
Not every leak is mechanical. Common user mistakes can mimic hardware failure.
Prevent Oversudsing
Using too much detergent or non-HE detergent in an HE machine creates excessive suds. These overflow the tub and leak from the front.
The fix is simple. Use only HE detergent and measure precisely, as more suds do not clean better. Run a rinse cycle to clear excess residue.
Avoid Overloading
Stuffed drums prevent proper drainage and cause imbalance. This stresses hoses, seals, and the gearcase.
Follow load guidelines in the manual. Distribute clothes evenly. Large, heavy items like comforters should be washed alone.
Stop Overflowing Immediately
If water pours over the top during fill, the inlet valve or pressure switch may be faulty. Turn off power and water at the source. Call a technician, as this is not a DIY fix.
Leak Prevention and Maintenance
Preventing leaks is easier and cheaper than repairing them.
Replace Hoses Proactively
Swap out fill hoses every 5 years, even if they look fine. Use braided stainless steel hoses for longer life.
Clean Seals and Dispensers
Wipe the door gasket after each use. Clean the detergent drawer monthly. Run a cleaning cycle with washer cleaner every 2 to 3 months.
Inspect Monthly
Check under the washer monthly for dampness, oil, or mold. Early detection saves floors and wallets.
Service Every 5 to 7 Years
Schedule a professional inspection to check internal seals, pump integrity, and drivetrain wear, especially if your washer is over 7 years old.
Final Leak Diagnosis Flow
Use this quick decision tree to identify the source.
Leak at the rear? Check drain and fill hoses. Replace if cracked or loose.
Leak at the front? Inspect door gasket for front-loaders or check for oversudsing for top-loaders. Clean dispenser if needed.
Leak at center bottom? Check the fluid type. Clear or soapy water indicates a likely tub seal or internal hose problem. Oily or dark fluid indicates gearcase failure, and you should stop use and call a professional.
Under 8 years old? Repair may be worth the investment.
Over 10 to 12 years old? Consider replacement instead of repair.
Frequently Asked Questions About GE Washing Machine Leaking
Why is my GE washing machine leaking from the bottom?
Bottom leaks are most commonly caused by a damaged or loose external drain hose. This component is responsible for about 80% of bottom leak issues. Check the hose for cracks, kinks, or loose connections first.
How much does it cost to fix a leaking GE washing machine?
Costs vary by issue. External hoses cost $20 to $30 to replace. Drain pumps cost $80 to $120 for parts. Water inlet valves cost $40 to $80. Gearcase repairs range from $180 to $420 including labor.
Can I repair a GE washing machine leak myself?
Yes, for many issues. External hose replacements, fill hose updates, and drain pump repairs are doable for DIYers with basic tools. However, gearcase and tub seal repairs require professional service due to complexity.
How do I know if my GE washer gearcase is failing?
Signs include oily or dark fluid pooling under the center of the machine, grinding or whining noises during agitation, and weak spin performance. Stop using the washer immediately if you see oily residue.
How often should I replace washing machine hoses?
GE recommends replacing fill hoses every 5 years as a preventative measure. Even if they appear fine, older hoses can burst without warning and cause major water damage.
Is it worth repairing a leaking GE washing machine?
This depends on the age of the machine. Repair if the washer is under 8 years old and the repair cost is reasonable. Replace the unit if it is over 10 to 12 years old or has multiple existing problems.
Key Takeaways for Fixing Your GE Washing Machine Leak
A leaking GE washing machine does not have to mean a new appliance. By systematically checking hoses, pumps, and seals, you can often fix the problem yourself and save both time and money while protecting your floors from water damage. Start with the easiest fixes, the external hoses, before moving to more complex internal components.
Know when to call a professional. Gearcase failures with oily fluid and major disassembly jobs are not worth the risk for inexperienced DIYers. Regular maintenance, including hose replacement every 5 years and monthly inspections, keeps your washer running clean and dry for years to come.