
If your washing machine won’t drain, makes strange noises, or you’ve lost a sock behind the drum, the solution may lie behind the front panel. Knowing how to remove front of washing machine panels safely gives you access to critical components like the drain pump, door latch, drive belt, and drum area. Whether you’re troubleshooting an error code, retrieving a forgotten item, or replacing a worn part, this guide walks you through every step with model-specific instructions, the right tools, and safety-first protocols. No more guessing: with the proper technique, you can unlock full internal access in under an hour.
Safety First: Power and Water Shutdown
Before touching any screws or panels, protect yourself and your appliance by切断ing all power and water sources.
Unplug the Washer
Always disconnect the power cord from the wall outlet. For added safety, turn off the circuit breaker that supplies the washer for one full minute to reset electronic systems and eliminate residual voltage. This prevents accidental startup or electrical shock during disassembly.
Shut Off Water Supply
Locate the hot and cold water valves behind the machine. Turn them clockwise to close completely. Disconnect the inlet hoses and drain any remaining water into a bucket to avoid spills when you tilt or move the unit.
Stabilize the Unit
Pull the washer forward carefully, ensuring it sits on a level surface. Place towels beneath the unit to protect flooring and keep the work area dry. Never attempt to work on a tilted or unstable machine.
Pro Tip: Place a flashlight inside the drum before starting. It helps illuminate dark corners once the front panel is removed.
Tools Needed for Front Panel Removal
Using improper tools can crack plastic clips or strip screws. Gather these essentials before starting.
Essential Tools List
A putty knife or plastic pry tool releases tension tabs without causing damage. You will also need a Phillips screwdriver and a flathead screwdriver for various screw types. Needle-nose pliers are critical for LG boot ring removal. A socket wrench handles bolts when screws are not used. A flashlight spots hidden clips and wires. A bowl or bucket catches residual water from the pump filter.
Optional Model-Specific Tools
A specialized boot ring tool is recommended for LG models to reinstall the metal ring on the rubber boot. This tool significantly reduces effort and prevents injury during reinstallation.
Warning: Avoid using metal tools near electrical components. They can cause short circuits. Use plastic or insulated tools when working near wiring.
Understanding Your Panel Fastening System
Most front panels use one of two systems. Knowing which your machine uses saves time and prevents damage.
Tension Tab Release
Many GE washers, especially Spacemaker combos, use spring-loaded tension tabs near the top corners. The gap between the top panel and front panel is typically 1.5 to 2 inches from each edge. Insert a plastic putty knife into this gap and push inward firmly until you hear a pop. This indicates the tab has released. Repeat on the opposite side, then lift the bottom edge of the front panel upward to disengage lower tabs.
Clip and Screw System
Higher-end models often combine screws with plastic clips. Screws may be hidden under the door seal, behind the detergent drawer, or beneath the bottom access panel. Once screws are removed, look for plastic clips along the bottom or sides that require upward lifting or outward prying to release.
GE Spacemaker Combo: Quick Front Panel Access
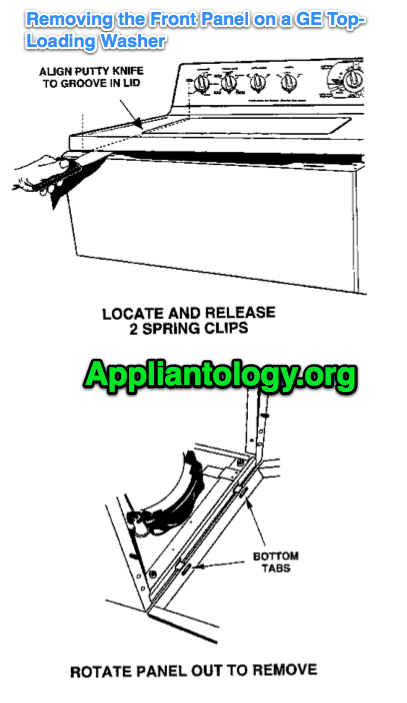
Compact GE combo units allow direct front panel access with this straightforward method.
Release Side Tension Tabs
Insert a plastic putty knife approximately 1.5 inches from the left edge, positioning it between the top panel and front panel. Push inward until the tab pops free. Repeat this process on the right side of the machine.
Remove the Panel
Grasp the bottom of the front panel and lift straight up to disengage upward-facing tabs. Pull forward gently and set the panel aside carefully. Behind the panel, you will see an access panel and two small retaining clips that allow cleaning the inner base.
Reinstall Tip: Align bottom tabs with corresponding slots first. Lift the panel into place, match top edges so left and right slots align, then press firmly until you hear a distinct click confirming the tabs are locked.
Standard GE Front-Load Washer Panel Removal
These instructions cover new-style GE front-load washers including Series 1, 2, and Profile models.
Locate Hidden Screws
Check under the door seal by gently peeling back the rubber gasket. Remove the detergent drawer as some models have screws underneath. Inspect the bottom access panel for additional screws securing the front panel.
Pry and Release Lower Clips
Slide a putty knife under the bottom edge of the front panel. Apply firm pressure to catch and disengage plastic mounting clips. Listen for a snap indicating the clip is free.
Disconnect Wiring
If the panel houses control elements or sensors, locate and disconnect wiring harnesses. Never pull on wires directly. Grip the connector itself and press the release tab to separate safely.
Final Removal
Lift the panel slightly to clear bottom guides, then pull forward to detach completely. Set the panel aside and proceed with your repair or inspection.
LG Front-Load Washer: Complete Disassembly

For deep access to the drain pump or motor, LG models require multiple disassembly stages.
Remove Top Panel
Unscrew the top panel brackets at the back of the machine. Slide the panel backward to disengage front clips, then tilt up and remove entirely.
Take Out Detergent Drawer
Pull the drawer out fully. Press the push button on the guide rail to disengage clips, then slide the drawer out completely.
Detach Control Panel
Remove screws securing the control panel to the chassis. Disconnect all electrical connectors by gripping the plug, not the wire. Use a flathead screwdriver to unclip the panel from the chassis. Carefully feed wires through as you remove the panel.
Remove Door Boot and Metal Ring
Open the door fully. Use needle-nose pliers to grip the spring end of the metal ring at the bottom of the rubber boot. Pull the ring free and remove it by hand. Peel the rubber boot off the front panel lip, using your fingers to separate it fully around the perimeter.
Access Filter and Latch
Open the bottom filter panel and unclip it. Pull out the drain hose, remove the plug, and drain water into a bowl. Replug the hose and tuck it back. Remove screws from the filter trim and pull it off. Unscrew the door latch assembly and let it hang by its wires.
Remove Front Panel
Remove all remaining screws securing the front panel. Hold the panel with one hand to prevent it from falling. Lift upward to clear bottom clips, then pull forward to detach completely.
Reinstalling the Front Panel Correctly

Reassembly is reverse of removal, but precision matters to avoid costly mistakes.
Align Before Forcing
Ensure all tabs, slots, and studs line up perfectly before applying pressure. Forcing misaligned parts cracks plastic permanently. On GE models, verify bottom tabs slide into chassis slots before pressing top edges.
Confirm the Click
Press firmly on both top corners until you hear a distinct click. This confirms tension tabs are locked. Gaps between the panel and chassis mean incomplete seating.
LG Boot Ring Reinstallation
Insert one end of the metal ring into the groove on the rubber boot. Use pliers to stretch and guide the ring around the entire perimeter. Keep the spring centered at the bottom of the boot. This positioning is critical for a proper seal. Apply steady pressure as this step requires strength and patience.
Pro Tip: A boot ring tool reduces effort significantly. Two people can also help, with one holding the boot while the other stretches the ring.
Common Problems and Solutions
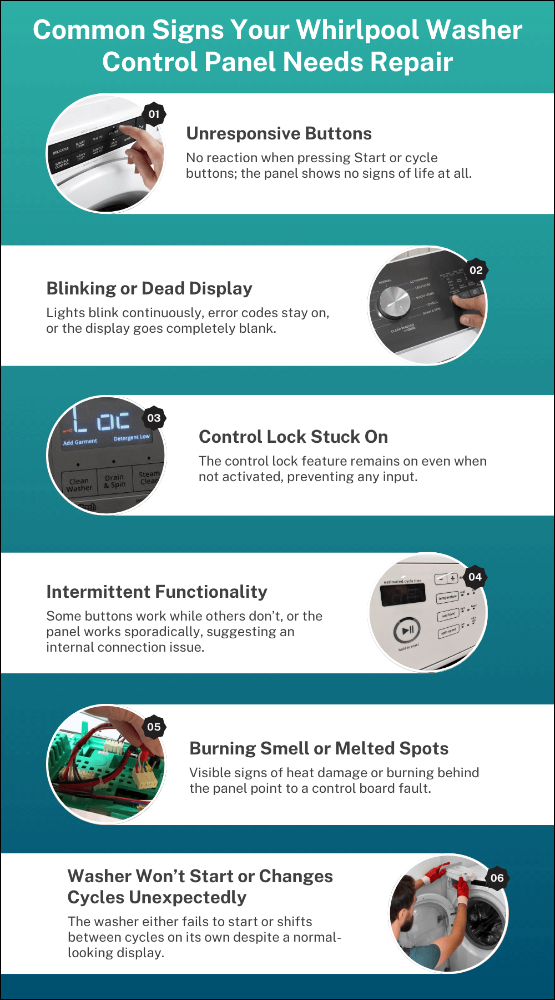
Front panel removal can present challenges. Here is how to address them.
Panel Won’t Budge
Hidden screws are the most common cause. Recheck under the detergent drawer, rubber door boot, and bottom access panel. Even one missed screw prevents removal.
Rubber Boot Won’t Seat Properly
The metal ring is not fully engaged in its groove. Start at the spring end and stretch evenly around the entire perimeter. Ensure the spring faces downward.
Washer Leaks After Reassembly
The boot is not sealed correctly or the filter hose is loose. Recheck boot ring seating and tighten the filter cap securely.
Error Codes After Reinstall
A wiring harness is loose or not fully seated. Open the panel again and verify all connectors are properly engaged.
Frequently Asked Questions About Removing Washing Machine Front Panels
How do I know if my washing machine uses tension tabs or screws?
Most GE Spacemaker combos use tension tabs. Standard GE front-loads and LG models typically use a combination of screws and clips. Examine the gap between the top and front panel. If you see small slots 1.5 to 2 inches from the edge, tension tabs are likely used.
Can I remove the front panel without unplugging the washer?
No. Unplugging is essential for safety. Electrical components inside the panel can cause shock even when the machine is idle. Always disconnect power before starting any disassembly.
How long does front panel removal take?
GE Spacemaker models take 15 to 20 minutes. Standard GE front-loads take 30 to 45 minutes. LG models take 45 to 60 minutes due to multiple components that must be removed first.
What if I lose a sock inside the washing machine?
Remove the front panel to access the space between the drum and outer tub. Shine a flashlight into this area. Use a vacuum with a hose attachment or long tweezers to retrieve the item.
Do I need special tools to reinstall the LG door boot ring?
A specialized boot ring tool is recommended but not required. Needle-nose pliers can work, though the process requires significant strength. Two people make the task easier.
Will removing the front panel void my warranty?
Disassembly may void warranty coverage if it causes damage. Always consult your model-specific manual before proceeding. Perform panel removal only for out-of-warranty repairs or maintenance.
Key Takeaways for Removing Your Washing Machine Front
Removing the front panel of your washing machine is a valuable DIY skill that saves money on service calls. Always disconnect power and water before starting. Gather the right tools, including a plastic putty knife, screwdrivers, and needle-nose pliers. Identify whether your model uses tension tabs, screws, or both. Follow model-specific steps for GE Spacemaker, standard GE front-load, or LG front-load machines.
Reinstallation requires patience. Align all tabs and slots before pressing firmly. For LG models, pay special attention to the door boot ring installation. Test the machine with a drain cycle after reassembly to check for leaks and unusual noises.
With the right approach, front panel removal opens access to the drain pump, drive belt, door latch, and inner drum area. This enables you to clear clogs, replace worn parts, retrieve lost items, and perform regular maintenance that extends your washing machine life.



