
Installing a washing machine isn’t just about plugging it in and turning it on. Proper plumbing ensures safe, efficient operation and prevents costly water damage. Whether you’re replacing an old unit or setting up a new laundry area, knowing how to plumb a washing machine correctly is essential. A poorly connected water supply or improperly installed drain can lead to leaks, siphoning, or even appliance failure.
This guide walks you through every step of the process. You’ll learn professional techniques, code-compliant practices, and common mistakes to avoid. By the end, you’ll have a fully functional, leak-free setup that meets safety standards and extends your machine’s lifespan.
Choose the Right Installation Location
Confirm Utility Access
Before moving the machine into place, verify that your chosen spot has access to three essentials. You need a cold water supply (and hot if your model requires it), a drain point such as a standpipe or floor drain, and a grounded electrical outlet with GFCI protection. If any of these are missing, new plumbing or electrical work may be needed.
Avoid Freezing and Heat Zones
Never install a washing machine in areas prone to freezing or near direct heat sources. Frozen pipes can burst while excessive heat damages hoses and electronics. The floor must be level and solid to prevent vibration during spin cycles.
Measure for Clearance
Ensure there’s enough space for full door opening, hose routing without kinks, ventilation around the unit, and easy access for maintenance. Check doorways and hallways if moving the machine through tight spaces.
Remove Transport Bolts First
Locate and Extract Bolts
New washing machines come with four transport bolts at the back to secure the drum during shipping. These must be removed before use. Using an adjustable spanner, unscrew each bolt and store them safely for future moves.
Insert Blanking Caps
After removal, insert the plastic caps provided into the empty holes to protect internal components. Failure to remove bolts prevents the drum from spinning freely, causing loud noise, imbalance, and permanent damage.
Gather Essential Tools and Materials
Required Tools
Have these on hand before starting your installation. You’ll need an adjustable spanner, a screwdriver for jubilee clips, a spirit level, mole grips for stubborn fittings, a bucket and towels for spills, a pipe cutter or hacksaw for new plumbing, and a drill with bits for wall mounting.
Recommended Supplies
Upgrade from basic parts for long-term reliability. Use stainless-steel braided hoses instead of rubber, as they resist bursting better. Choose lever-style shut-off valves for easier operation. Install a standpipe with a P-trap using 2-inch diameter pipe for code compliance. Consider an Air Admittance Valve if roof venting isn’t possible.
Install Water Supply Valves

Select Proper Valve Type
Use one of these options for your water supply. Drop-ear elbows with hose bibbs provide a basic setup with threads facing downward. Boiler drain valves offer a durable alternative with ½-inch male threads. Washer boxes with lever control work best for concealed installations, with dual-lever or single-lever models featuring anti-shock features reducing water hammer. Avoid washer boxes with round-handled valves since they seize over time.
Connect to Existing Plumbing
For new installations, cut your copper or CPVC line and install a T-fitting. Use push-fit Speedfit connectors or clamp-type Tektite connectors for quick, reliable joins. Solder copper joints properly or glue CPVC with primer and cement. Ensure valves are accessible and clearly labeled hot and cold.
Attach Supply Hoses Correctly

Match Hoses to Inlets
Most machines label connections clearly. Cold water is marked with a C or blue (usually on the right). Hot water is marked with an H or red (usually on the left). Many modern models are cold-fill only and heat water internally, requiring only a cold connection.
Follow Connection Protocol
Start by inspecting the rubber O-ring inside the hose connector. Replace it if cracked or missing. Attach the 90-degree end to the machine and the straight end to the wall valve. Hand-tighten first, then give a quarter-turn with a wrench. Do not over-tighten since this cracks fittings and causes leaks.
Verify Water Flow
Run a short cold cycle to confirm water enters the drum. If no flow occurs, check that isolating valves are fully open, the inlet filter is not clogged, and hoses aren’t kinked.
Set Up the Drain System
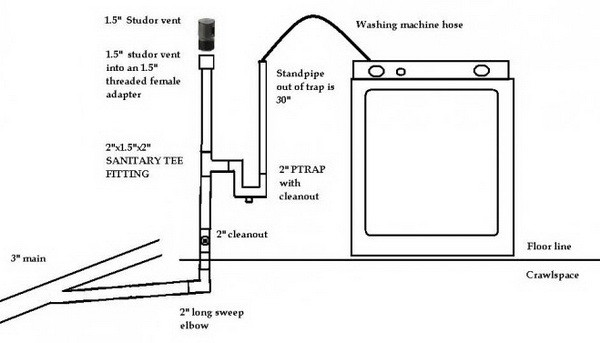
Install a Code-Compliant Standpipe
The standpipe must meet specific requirements. It should be 18 to 42 inches high with 30 to 36 inches being ideal. Use 2-inch diameter pipe and connect it to a P-trap to block sewer gases. Include a horizontal run of at least 4 inches after the trap before the vent to prevent S-trap formation. Use a 3×2 bushing if connecting to a 3-inch main waste line.
Vent the Drain Properly
A vent prevents airlocks and siphoning. It should rise at a 45-degree angle and terminate through the roof if possible. Use an Air Admittance Valve only where local codes allow. Install a cleanout near the vent for future access.
Connect the Drain Hose
Route Hose with a High Loop
Prevent backflow by forming a high loop. Secure the hose to the wall or underside of a countertop. The peak should be at least 30 inches above the floor. This prevents dirty water from siphoning back into the machine.
Insert into Standpipe Safely
Push the hose 6 to 8 inches into the standpipe. Do not seal with tape or glue since this traps pressure. Use a hose clamp or plastic bracket to hold it in place. Keep the hose straight and kink-free.
Under-Sink Drain Options
When connecting under a sink, use a dedicated branch on the sink waste. Ensure pipe diameter is larger than the hose, typically 1.5 inches or more. Keep the air gap if a water softener is present.
Position and Level the Machine
Slide Into Place Carefully
Move the washer slowly, protecting floors and avoiding hose strain. Leave a few inches behind for airflow and service access.
Level Front-to-Back and Side-to-Side
Place a spirit level on top of the machine. Adjust the front feet by twisting counter-clockwise to raise and clockwise to lower. Lift the corner slightly with a block if needed. Recheck level in both directions.
Lock the Legs
Once stable, tighten the locking nuts under the feet to prevent shifting during spin cycles. An unlevel machine vibrates excessively and wears out faster.
Test for Leaks and Function

Perform a Leak Check
Slowly open both water valves. Inspect all four connection points, two at the machine and two at the wall valves. Look for drips or moisture. Tighten slightly if needed, but never over-tighten.
Run a Test Cycle
Plug into a grounded outlet and run a short empty spin cycle. Watch for leaks at joints, excessive vibration indicating poor leveling or missing transport bolts, unusual noises suggesting bolts are still installed, and proper drain performance with no backup or siphoning. If issues arise, stop the cycle and recheck connections.
Handle Special Installation Scenarios

Under-Sink Installations
In tight spaces, use flexible supply hoses with right-angle fittings. Mount valves inside the cabinet. Connect waste to a dual-inlet sink trap. Keep the sink drain cap for future use. Ensure cabinet cutouts allow for hose routing and ventilation.
Caravan or Mobile Setup
For portable units, connect to a kitchen tap using a faucet adapter. Use a standard electrical socket. Place on a level surface before starting. Empty hoses after use to prevent freezing. These models often have built-in pumps for draining to sinks or buckets.
Shared Drain with Dishwasher
Both appliances can share a standpipe. Install a dual-entry P-trap. Ensure total flow doesn’t exceed drain capacity. Maintain separate air gaps for each appliance. Use individual shut-off valves for isolation. Avoid connecting both to the same inlet valve; use T-fittings with mini stop valves instead.
Troubleshoot Common Plumbing Issues
Fix Leaking Connections
Common causes include over-tightened fittings cracking plastic, damaged O-rings, or cross-threaded hoses. Replace O-rings or connectors. Reconnect with the hand-tight plus quarter-turn rule. Use thread seal tape only if specified.
Stop Vibration and Noise
Check whether transport bolts were removed, the machine is level, and the floor is solid. Add anti-vibration pads if necessary.
Prevent Siphoning
Symptoms include water draining out during the fill cycle and gurgling sounds. Ensure the drain hose forms a high loop. Limit insertion depth to 8 inches maximum. Install a non-return valve if siphoning persists.
Restore No Water Flow
Verify supply valves are fully open, the inlet filter is clean, and hoses aren’t kinked or twisted. Clean the cold water inlet filter annually to maintain flow.
Maintain Your Plumbing System
Inspect Hoses Regularly
Check every 6 months for bulges or blisters indicating failure, cracks or corrosion, and loose connections. Replace rubber hoses with stainless-steel braided versions if not already installed.
Clean Filters and Traps
Remove and rinse the inlet filter if flow slows. Clear debris from the P-trap annually. Flush the standpipe with hot water to prevent clogs.
Exercise Shut-Off Valves
Turn valves on and off occasionally to prevent seizing. This is especially important for older round-handled types.
Follow Code Standards for Longevity
Key Plumbing Code Requirements
Major codes require a minimum 3-inch diameter main drain line. Standpipe height must be 18 to 42 inches. Trap weir clearance needs at least 4 inches of horizontal run before the vent. Vent angle should be 45 degrees upward. Check local codes since some allow AAVs while others require roof vents.
A properly plumbed washing machine lasts 10 to 12 years. Key factors include leak-free connections, perfect leveling, regular hose and filter maintenance, and use of quality components. Avoid DIY shortcuts since investing in good valves, hoses, and proper drainage pays off in durability and safety.
Frequently Asked Questions About How to Plumb a Washing Machine
Can I install a washing machine myself if I have no plumbing experience?
Yes, you can install a washing machine yourself if you have basic DIY skills and the right tools. The process involves connecting water supply hoses, installing a drain line, and leveling the machine. However, if no existing water or drain lines exist, or if you’re unfamiliar with plumbing codes, calling a professional is advisable.
What happens if I don’t remove the transport bolts?
Failure to remove transport bolts prevents the drum from spinning freely. This causes severe imbalance, excessive noise, and potential structural damage to the machine. Always remove these four bolts from the rear before first use.
How high should the drain hose be above the floor?
The drain hose should form a high loop with its peak at least 30 inches above the floor. This prevents siphoning where dirty water flows back into the machine. Some manufacturers specify slightly different heights, so check your model’s instructions.
Why is my washing machine vibrating excessively during spin cycles?
Excessive vibration usually indicates the machine isn’t level, transport bolts weren’t removed, or the floor is uneven. Use a spirit level to check alignment in both directions. Tighten the locking nuts on the feet once level is achieved.
Should I use rubber or stainless-steel braided hoses?
Stainless-steel braided hoses are strongly recommended over standard rubber hoses. Rubber hoses are prone to blistering and leaking over time. Braided stainless steel offers superior durability and burst resistance, reducing the risk of water damage.
Key Takeaways for Properly Pluming Your Washing Machine
Plumbing a washing machine is a manageable DIY task with the right tools and knowledge. The most critical steps include removing transport bolts before first use, connecting water supply hoses correctly without over-tightening, installing a code-compliant standpipe with proper venting, and thoroughly testing for leaks before running a full cycle.
Always prioritize safety by turning off water and power before starting. Never rush connections since proper installation prevents costly water damage. Use quality components like stainless-steel braided hoses and lever-style shut-off valves for long-term reliability.
With proper setup, your washer will deliver years of quiet, efficient service. Regular maintenance including hose inspections and filter cleaning extends the lifespan significantly.



