
If your washing machine won’t spin, is leaking water, or making strange grinding noises, you likely need to access the internal components hiding behind the front panel. Whether you’re retrieving a lost sock stuck behind the drum, replacing a worn drive belt, or clearing a clogged drain pump, knowing how to open the front of a washing machine safely saves you expensive repair bills. This guide covers essential safety steps, brand-specific removal techniques for GE and LG models, and what to do once the panel is off.
Essential Safety Steps Before Opening Your Washer
Before touching any screw or clip, you must disconnect power and water to prevent injury. Always unplug the washing machine from the wall outlet. Even when turned off, standby power can still pose a shock risk during disassembly. Next, turn off both hot and cold water supply valves located behind the machine and disconnect the hoses. Place an old towel underneath the unit to catch any residual water drips.
Open the emergency drain filter, typically found behind a small panel at the bottom front of the machine. Place a shallow tray beneath it, unscrew the drain plug, and let water drain completely. Re-seal the hose before proceeding to prevent leaks during reassembly. Take photos of all wiring connections and clip placements as you work. Wear thick gloves and safety goggles since metal edges can be sharp and debris may fall during inspection.
Tools Required for Washing Machine Front Panel Removal
Having the right tools prevents damage and speeds up the repair process significantly. Your essential kit should include a plastic pry tool or putty knife to avoid scratching plastic surfaces, along with both Phillips and flathead screwdrivers. Needle-nose pliers are critical for removing boot rings on front-load machines, and a socket wrench set helps with pulley or motor work. A bright flashlight illuminates dark interior spaces where components hide.
Optional but helpful items include a camera or smartphone for reference photos, a magnetic tray to keep screws organized, and a bowl for draining residual water. Investing in a $5 plastic trim removal tool prevents the costly damage that metal screwdrivers can cause to plastic clips and trim pieces.
Understanding How Front Panels Attach to Washing Machines
Most washing machine front panels use one or more fastening methods, and knowing which one your machine uses prevents unnecessary force that could crack the plastic. Tension clips and tabs along the top, sides, or bottom snap into recessed slots and require gentle prying to release. This design is common in GE and Whirlpool models.
Some panels use upward-facing hooks at the bottom that fit into slots, requiring the panel to be lifted upward after side clips release. Hidden screws may lurk under trim pieces, behind the control panel, or at the base always inspect thoroughly before prying. Snap-fit designs combine sliding rails with pressure clips and require careful alignment during reinstallation.
GE Washing Machine Front Panel Removal Methods
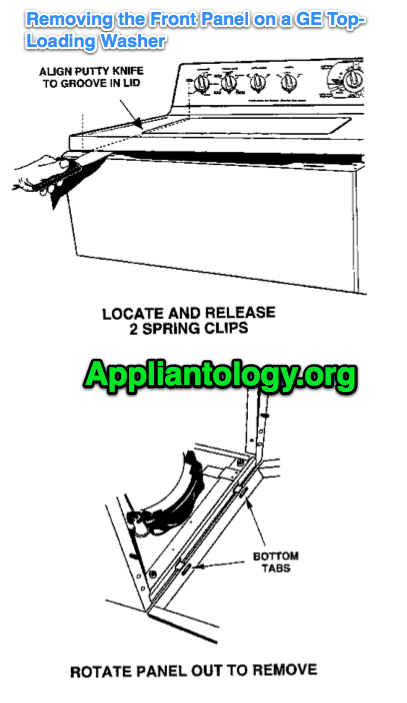
GE models vary significantly between series, but all follow logical release patterns that can be mastered with patience.
GE Spacemaker Combo: No-Screw Tension Tab Release
This stacked washer-dryer combo uses tension tabs with no visible screws. Locate the narrow gap between the top panel and front panel. Insert a thin plastic tool approximately 1.5 to 2 inches from each side edge where the tension tabs sit. Push inward gently until you hear a soft pop indicating the clip released. Repeat on the opposite side, then grasp the bottom of the front panel and lift straight up to disengage bottom hooks.
GE Standard Front Load: Screw and Sensor Method
Some GE front-loaders require screw removal before the panel comes free. Use a putty knife at the lower center edge and slide under the panel to release the bottom clip. Locate the second securing point just above the center and apply steady pressure. Once loose, find and remove the two screws securing the panel to the frame near the base. Unplug the small wiring harness behind the panel, then carefully pull the front panel forward and set it aside.
GE Stackable Combo Model GUD24ESSJ0WW
This specific model features a no-screw design with notches near the lower corners. Find the small notch near the lower right corner of the front panel seam. Insert a flathead tool just to the right of it, press forward, and lift slightly until you feel release. Repeat on the left corner, then lift the panel off easily. Reinstall by aligning the two plastic tabs on the chassis with panel slots, sliding one side in first, then pushing the other until you hear a solid click.
LG Front Load Washing Machine Full Disassembly
LG machines require a more involved process, but the steps are straightforward when followed in order.
Remove Top Panel and Detergent Drawer First
Start by removing the two brackets at the back of the top panel with a screwdriver. Slide the top panel backward to release front clips, then lift it off. Open the detergent drawer fully and press the Push tab inside the slot to release internal clips. Remove the entire drawer and set it aside.
Detach the Control Panel
Disconnect all wiring connectors from the control panel by pulling on the grip, never the wire itself. Remove screws holding the control panel to the top frame. Use a pry tool to unclip the front edge, then pull forward and thread wires through the chassis carefully.
Remove Door Boot Seal and Filter Assembly
Open the door fully and use needle-nose pliers to grip the spring end of the metal ring at the bottom of the rubber door seal. Pull to separate the ring, then remove it completely. Slide the rubber seal off the front panel lip by working your fingers around the entire rim. Open the filter access door, remove screws from the surrounding trim, and pull it off. Unscrew the door latch and let it hang by its wires.
Final Front Panel Removal
Hold the front panel in place to prevent it from falling. Remove all exposed screws, typically 4 to 6 depending on your model. Lift the panel upward to disengage bottom clips from the chassis, then pull it forward to completely remove it.
Universal Front Panel Removal for Other Brands
For brands not specifically covered, follow this general approach. Inspect the entire perimeter carefully, checking the top, sides, and base for screw covers, seams indicating pry points, or notches and dimples showing where clips attach. Start prying at the top corner using a plastic tool, gently twisting to release the first clip, then work your way around all edges.
Once all clips are free, lift the panel upward since most designs have bottom hooks that must clear their slots. Before fully removing the panel, peek behind it for any sensors or lights connected by wiring. Only disconnect wiring if absolutely necessary for your specific repair.
What You Can Access Once the Panel Is Off

With the front panel removed, you can inspect and maintain several critical components that commonly cause washing machine problems.
Clear Trapped Debris Between Drum and Tub
Use a flashlight and vacuum to clean the space between the drum and outer shell. Small items like socks, coins, hair ties, and buttons frequently get trapped here and cause grinding noises or drainage issues.
Inspect and Replace the Drive Belt
Examine the large rubber belt connecting the drum to the motor. Look for visible cracks, fraying edges, slippage, or complete breakage. A damaged belt is the most common cause of washing machines that fill and drain but refuse to spin.
Check Motor Coupling and Drain Pump
The rubber coupler connecting the motor to the drum can crack or break over time, preventing the drum from spinning. The drain pump sits at the bottom of the unit. Remove hoses to check for clogs caused by lint, coins, or foreign objects blocking water flow.
Test Drum Bearings for Wear
With the belt removed, rotate the drum by hand and listen carefully. Grinding noises, resistance, or visible wobble indicate failing bearings that will eventually require professional replacement.
Reassembling Your Washing Machine Without Mistakes

Putting the panel back together matters as much as taking it apart, and rushing this step causes the most common post-repair problems.
Align Bottom Tabs Before Forcing
Always position bottom tabs into their slots first before applying any pressure. Misalignment at this stage causes broken clips and gaps in the panel. Don’t force the panel if it resists lift slightly and reposition until the tabs seat properly.
Snap Clips Into Place Evenly
For clip-based panels, press one side in fully, then work on the other. Apply steady downward pressure until you hear multiple clicks confirming all clips have engaged. Listen carefully for the distinct snap that means the panel is secure.
Reconnect All Wiring Harnesses
Ensure sensors, door locks, and control panel connections are fully seated. Loose connections cause error codes and prevent the machine from operating. Push each connector in firmly until you feel it click into place.
Critical LG Boot Seal Reinstallation
Reinstalling the door boot seal correctly is the trickiest part of LG reassembly and the number one source of post-repair leaks. Insert one end of the metal ring into the groove on the rubber boot. Use pliers to stretch the ring around the perimeter, starting at the bottom and working up both sides. The spring at the bottom must sit perfectly centered in its groove. An improperly seated boot will leak during every wash cycle.
Final Verification Before Testing
Check that the panel sits flush with no visible gaps. Verify the door opens and closes smoothly without catching. Confirm all screws are tightened but not over-tightened. Restore water and power connections, then run a short spin cycle to test operation before loading your laundry.
Troubleshooting Common Front Panel Issues
Panel stuck and won’t budge even with prying usually means you’ve missed hidden screws or haven’t released all perimeter clips. Recheck under trim pieces, behind the control panel, and along the base with a bright flashlight. Forcing a stuck panel cracks plastic permanently.
Panel won’t snap back into place after repair typically means bottom tabs are misaligned with their slots. Don’t force it or you’ll break the clips. Lift slightly and reposition until tabs slide in easily, then apply even pressure.
Water leaking from the door after reassembly means the boot seal wasn’t properly seated. The metal ring must be fully nested in its groove with the spring perfectly centered at the bottom. This often requires removing the panel and reinstalling the boot correctly.
No spin after completing repairs points to a broken belt, failed motor coupling, or disconnected sensor. Re-inspect the belt for proper tension and check all wiring connections. Error codes appearing after reassembly usually mean the control panel harness isn’t fully connected. Power off completely and reseat all connectors, especially those near the door lock and main control board.
Frequently Asked Questions About Opening Washing Machine Front Panels
Can I open my washing machine front panel without professional help?
Yes, most front panels can be removed by homeowners following proper safety procedures. The process requires basic tools like screwdrivers and a plastic pry tool. Complex repairs like bearing replacement may still need a professional technician.
Does opening the front panel void my washing machine warranty?
Proper removal using correct techniques generally does not void warranties. However, forcing panels, breaking clips, or causing damage through improper tools may void coverage. Always check your specific model’s warranty terms.
How do I know if my washing machine uses screws or clips to hold the front panel?
Inspect the perimeter carefully. Look for visible screws at the base or under trim pieces. Check for seams or gaps where plastic clips might engage. Some models have both screws and clips.
What should I do if I break a plastic clip during removal?
Broken clips can be replaced with OEM parts ordered online. Stop immediately if a clip breaks to prevent further damage. Use plastic tools rather than metal to minimize this risk.
How long does it typically take to remove and reinstall a front panel?
For simple screw-based designs, plan for 15 to 30 minutes for removal and another 15 to 30 minutes for reassembly. Complex LG models may take 1 to 2 hours total due to the multiple components that must be removed first.
Key Takeaways for Successfully Opening Your Washing Machine

Knowing how to open the front of a washing machine empowers you to fix common problems like drainage issues, belt failures, and trapped debris without paying for expensive service calls. Always disconnect power and water before starting, and use plastic pry tools to prevent cosmetic damage to plastic clips and trim.
GE models typically use tension tabs or hidden screws that release with gentle prying, while LG machines require a systematic multi-step disassembly starting with the top panel and detergent drawer. Take photos at every step to simplify reassembly, and don’t rush the door boot seal installation on front-load machines since improper seating causes annoying leaks.
If you encounter electrical components, major motor issues, or drum bearing failures that feel beyond your skill level, stop and call a professional. Some repairs require special tools and calibration that aren’t worth the risk of causing additional damage. With careful attention to the steps in this guide, you can successfully access your washing machine’s internals, retrieve that lost sock, replace a worn belt, and restore your machine to proper working order.



