
You’ve noticed strange noises, leaks, or your washing machine won’t spin properly. Dismantling a washing machine may seem intimidating, but with the right tools and step-by-step guidance, it’s a manageable DIY task. Whether you’re troubleshooting a drain pump issue, replacing worn suspension rods, or deep-cleaning sediment buildup, knowing how to dismantle a washing machine properly is essential for any homeowner.
This guide walks you through the complete disassembly process for both top-loading and front-loading models. From removing the control panel to extracting the inner tub and accessing the motor, every step is detailed with actionable instructions, common pitfalls to avoid, and safety reminders. By the end, you’ll be equipped to safely dismantle your washer, inspect critical components, and prepare for reassembly or repair.
Essential Safety Precautions Before Starting
Before touching any screw or hose, prioritize safety. A washing machine combines electricity, water, and heavy moving parts, so mistakes can lead to injury or damage if you’re not careful.
Power and Water Shut-Off
Always unplug the machine from the wall outlet. Never rely on the power switch alone because internal circuits may still be live. Next, turn off both hot and cold water supply valves behind the washer. Disconnect the inlet hoses and drain any residual water into a bucket. Expect up to a quart of water to spill when detaching the drain hose or pump.
Gear Up for Safety
Wear rubber gloves to protect against sharp edges and mildew, and use safety goggles when prying or hammering. Work on a dry, level surface. If the floor is slippery, place anti-slip mats or towels underneath. Never force components because misalignment indicates a missed step, not the need for extra force.
Secure the Lid and Stabilize the Unit
For top-loaders, tape the lid open to prevent it from snapping shut during disassembly. This protects both the lid switch and your fingers. Ensure the machine is stable because tilting it forward or sideways without support risks tipping. If removing the outer tub, have a second person assist due to weight.
Gather the Right Tools
Using the correct tools prevents damage to plastic clips, stripped screws, and broken fasteners. Having everything ready before you start saves multiple trips to the hardware store.
Must-Have Tools List
You will need these essential tools for dismantling a washing machine:
- 7/16-inch socket with 9-inch extension and ratchet for the agitator bolt
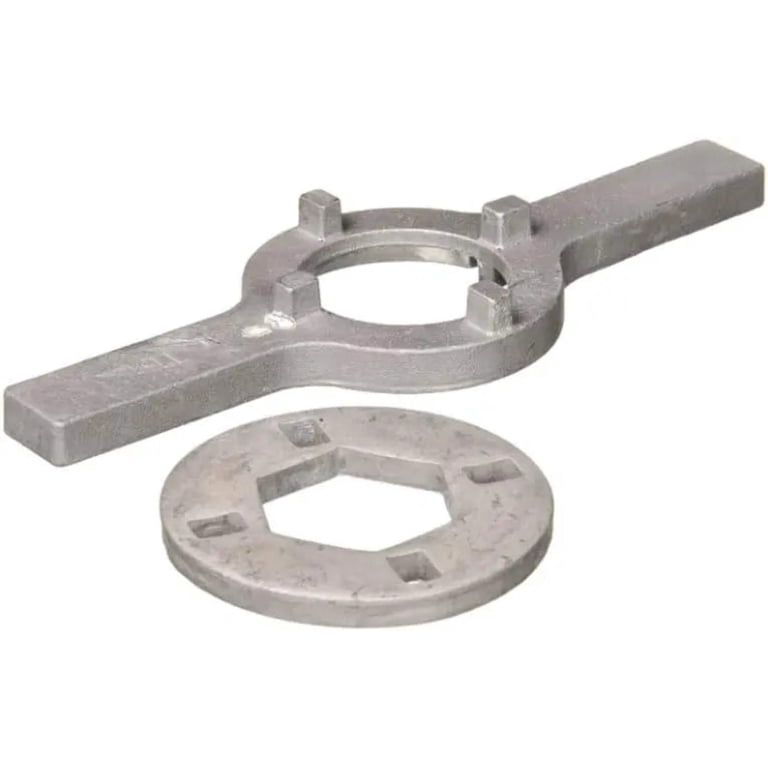
- 1 11/16-inch tub nut wrench, also called a spanner nut tool
- Putty knife for releasing front panel and control panel clips
- Pliers for hose clamps and wire retainers
- Flathead screwdriver for prying clips and removing split rings
- Hammer for tapping the spanner nut loose
- Marker for alignment marks
- O-ring removal tool or flexible pick for tub cover clips
Pro Tips for Tool Use
Avoid metal screwdrivers on plastic clips because they can crack or break the plastic. Use a putty knife or nylon pry tool instead. Label wires with tape before disconnecting so you know exactly where they go during reassembly. Keep screws organized in a labeled tray or container by stage of disassembly.
Remove the Control Panel and Main Top

Access begins with removing the control panel and top cabinet. The method varies slightly by brand and model, so pay attention to your specific configuration.
Open the Control Panel Safely
On most GE and Whirlpool top-loaders, insert a putty knife under the front edge of the control panel to release two spring clips. Rotate the panel forward to expose the wiring harness. Disconnect the harness carefully and never yank wires. Set the panel aside.
Some models have rear screws instead. Remove 2 to 3 screws at the back, then slide the panel forward to detach.
Take Off the Main Top
With the control panel out of the way, remove the main top by following these steps:
- Unscrew the rear hinge screws, usually two screws
- Remove the wiring and tube cover fastener and pull it off
- Slide the top forward slightly to disengage rear tabs
- Squeeze the lid switch wire retainer with pliers and release it from the frame
- Lift the lid switch tab and pull it through the opening
- Lift the entire top off and set it aside
For Whirlpool models like WTW4800XQ2, remove three back panel screws. One secures the top to the base and two hold the back panel. Push the machine against a wall, open the lid, and pull the top toward you while lifting up and back to release internal hooks.
Extract the Agitator and Drive Components
With the top off, the agitator is exposed. This component must come out to access the inner tub for cleaning or repair.
Remove the Dispenser and Dust Cover
Lift off the fabric softener dispenser or detergent cup. Underneath, you’ll find a plastic dust cover with a rubber washer. Pull it straight out. During reassembly, apply liquid soap to the washer for smooth sealing and to prevent tearing.
Unbolt and Pull the Agitator
Use a 7/16-inch socket and ratchet to remove the central agitator bolt. Once the bolt is out, lift the agitator straight up. If stuck, wiggle gently side-to-side while pulling. Do not twist or force it. Set aside with the drive block and washer from the drive shaft.
Take Off the Tub Cover and Spanner Nut
Now the inner tub is visible, but it’s locked in place by the spanner nut. This is one of the most critical steps when you dismantle a washing machine.
Remove the Tub Cover
Two types of tub covers exist. For clip-held covers, use an O-ring tool or thin flexible pick to release each clip around the rim. Work slowly because clips break easily. For screw-held covers, remove screws securing dampening straps, release bottom tabs, and lift off.
Loosen the Spanner Nut
This large nut secures the inner tub to the drive shaft. Follow these steps carefully:
- Mark alignment with a marker before removal because this is critical for reassembly
- Use a 1 11/16-inch tub nut wrench and hammer
- Turn clockwise to loosen on GE models and counterclockwise on Whirlpool or Kenmore models
- Confirm your model direction before proceeding
- Tap the wrench lightly in small increments because applying full force can damage components
- Once loose, lift the nut straight out
The nut has two parts: a lower narrow section and an upper flat disc with holes.
Lift the Inner Tub and Drive Shaft Components

With the spanner nut gone, the inner tub is free to remove. This step is essential when you dismantle a washing machine for deep cleaning.
Remove Inner Tub and Split Ring
Lift the inner tub straight up and set it aside. On the drive shaft, you’ll find a split ring and washer. Use a flathead screwdriver to pry out the split ring, then lift off the washer.
Inspect the drive shaft for corrosion or wear. Clean with a dry cloth. This is also a good time to check the transmission for leaks.
Access the Motor, Pump, and Outer Tub
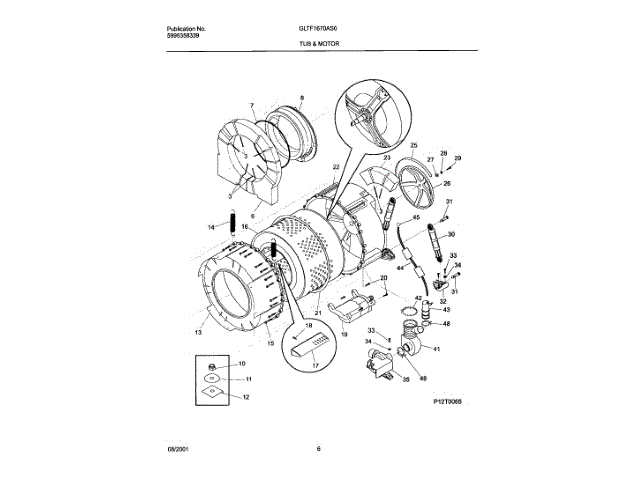
Now the core components are exposed. It’s time to remove the outer tub and motor assembly for complete access.
Disconnect Air Tube and Wires
Locate the air pressure tube running from the tub to the pressure switch. Disconnect it from the switch and release it from the twist retainer on the tub side. Set aside.
Next, disconnect motor and mode shifter wires from the control board. Unscrew the grounding wire from the frame. Use pliers to squeeze and release all four wire retainers on the motor bracket. Unwind wires from the suspension rod.
Detach the Drain Hose
At the bottom of the outer tub, loosen the hose clamp with pliers. Pull the drain hose off and be ready for residual water. Place a towel underneath to catch any drips.
Remove Outer Tub and Motor
Follow these steps to remove the outer tub and motor assembly:
- Lift the outer tub slightly to unsnap the four suspension rods from the base
- Use a broom handle or hammer shaft to push down on lower bushings and release them
- Tilt the tub and motor assembly forward
- Slide the entire unit out of the cabinet
If your model is belt-driven, remove the belt from the motor pulley before detaching the motor. For direct-drive systems, unscrew motor mounting bolts and disconnect wiring harnesses.
Front-Loader Disassembly Basics
The process differs for front-loading machines where access is from the front rather than the top.
Remove the Front Panel
Unscrew 3 to 4 screws along the bottom edge of the front panel. Carefully pull the panel forward and down to release top clips. Set aside.
Access the Drum and Seal
The drum is held by large retaining bolts around the front. Remove them to free the drum. Inspect the rubber door gasket for mold or tears. Replace if needed.
Handle the Suspension System
Front-loaders use springs and shock absorbers to stabilize the drum. Release tension slowly because springs are under high pressure. Note their orientation before removal so you can reinstall correctly.
Drain Pump Removal
The drain pump is located at the bottom front and has two hoses. Loosen clamps and disconnect. Unscrew mounting bolts and pull the pump out. Check for foreign objects like coins or small items that may have gotten trapped.
Clean and Inspect All Components
Disassembly is the perfect time for deep maintenance. This step prevents future problems and extends the life of your machine.
Deep Clean the Tub and Under-Agitator Area
Use a soft cloth or sponge with vinegar or washing machine cleaner. Focus on these key areas:
- Under the agitator base
- Between inner and outer tubs
- Drain pump housing
- Door seal on front-loaders
Avoid abrasive pads because they scratch surfaces and can trap residue.
Inspect for Wear and Damage
Check these critical components during inspection:
- Belts for cracks, fraying, or stretching
- Hoses and clamps for brittle rubber or loose fittings
- Seals and gaskets for dry rot or mold
- Bearings for rough spinning or grinding noise
- Suspension rods and springs for sagging or breakage
- Corrosion on drum, frame, or motor housing
Replace any suspect parts before reassembly.
Reassemble in Reverse Order
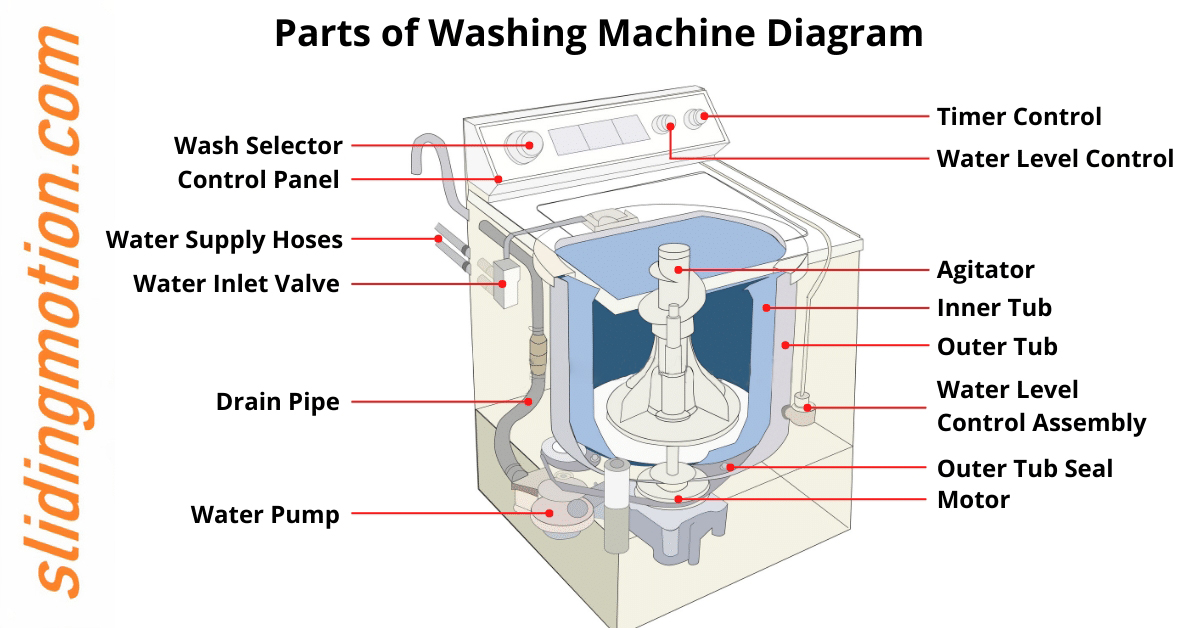
Reassembly follows the same steps backward, but with critical attention to detail. Rushing this step causes most post-reassembly problems.
Reinstall Outer Tub and Motor
- Align motor forward and slide assembly back in
- Snap suspension rods into base sockets
- Engage lower bushings by pressing down
- Reconnect drain hose and tighten clamp
- Reattach air tube and secure in twist retainer
- Reconnect wires and snap retainers into place
Replace Inner Tub and Spanner Nut
- Slide split ring and washer back onto drive shaft
- Lower inner tub onto shaft
- Thread spanner nut on by turning counterclockwise to tighten
- Hammer gently with tub wrench until snug
- Align with your original mark
Reattach Agitator and Cover
- Reinstall drive block and washer
- Set agitator in place, guiding bolt through spanner nut
- Secure with 7/16-inch bolt and tighten until snug, then add a quarter turn more
- Do not overtighten because this damages threads
- Reinstall dust cover and dispenser by pushing until it clicks
Reconnect Top and Control Panel
- Insert lid switch through top panel hole
- Snap wire retainer into frame
- Slide main top back, aligning tabs
- Secure with screws
- Reinstall wiring cover
- Snap front panel into base and front pins
- Reattach control panel by sliding tabs in, reconnecting wires, and securing screws
Final Checks Before Power-Up
Don’t skip verification because rushing can cause leaks or electrical faults.
Visual Inspection
Check these items before restoring power:
- All screws and clips fully engaged
- No wires pinched or hanging loose
- Agitator moves freely
- Top closes flush
- Hoses and clamps tight
Restore Power and Water
- Plug in the machine
- Turn on water supply valves
- Run a test cycle with no clothes
Monitor for Issues
Watch for these problems after starting the machine:
- Leaks at hose connections
- Unusual noises like grinding or banging
- Proper spinning and draining
- Error codes or failure to start
If problems occur, stop the cycle and recheck connections.
Troubleshoot Common Post-Reassembly Issues
Even careful work can have hiccups. Knowing how to diagnose these problems saves time and frustration.
Washer Won’t Start
This usually indicates one of these issues:
- Lid switch misalignment
- Power connection not secure
- Control panel harness not seated properly
Check these connections first before proceeding further.
Leaking from Bottom
Inspect these components if water appears:
- Drain hose clamp may be loose
- Pump or tub seals may be damaged
- Spanner nut may not be tight enough
Excessive Vibration
Recheck these items if the machine shakes abnormally:
- Suspension rod snaps may not be fully engaged
- Inner tub may not be level
- Shipping bolts may still be in place if this is a new installation
Model-Specific Tips and Warnings
Always confirm your model’s quirks because brands differ in their assembly methods.
GE Top-Loaders
- Spanner nut loosens clockwise
- Main top slides forward after screw removal
- Control panel has rear screws
Whirlpool and Kenmore
- Spanner nut loosens counterclockwise
- Top removal requires back-panel access
- Dust cover washer needs lubrication during reassembly
When to Call a Professional
Consider professional help if you encounter these serious issues:
- Direct-drive motor problems
- Transmission failure
- Electrical board faults
- Broken suspension mounts
High-tension springs and complex electronics are not worth the risk if you’re unsure.
Frequently Asked Questions About Dismantling a Washing Machine
How long does it take to dismantle a washing machine?
The process takes 1 to 2 hours for experienced DIYers. First-time attempts may take 2 to 3 hours because you’ll need to reference instructions frequently.
Do I need special tools to dismantle a washing machine?
Yes, specific tools are required. You’ll need a 7/16-inch socket, a 1 11/16-inch tub nut wrench, a putty knife, pliers, and a flathead screwdriver. These tools are available at most hardware stores.
Can I dismantle a front-loading washing machine myself?
Yes, but the process differs from top-loaders. Front-loaders require removing the front panel to access the drum, suspension springs, and drain pump. The principles are the same, but the component layout is different.
What happens if I don’t mark the spanner nut position?
Without alignment marks, the inner tub may sit off-center, causing excessive vibration and noise during spin cycles. Always mark the position before removal.
Should I clean components while dismantling the washing machine?
Absolutely. Disassembly provides the perfect opportunity for deep cleaning. Remove residue, debris, and mold from the inner tub, under the agitator, and around the door seal on front-loaders.
Key Takeaways for Dismantling Your Washing Machine
Dismantling a washing machine is a powerful skill that saves money and extends appliance life. By following this guide, you’ve learned how to dismantle a washing machine safely, inspect components thoroughly, and reassemble with confidence.
The most important points to remember are always disconnect power and water before starting, mark alignment points before removing components, and take your time during reassembly. Rushing causes most post-reassembly problems.
Regular maintenance every 6 to 12 months prevents major failures and keeps your machine running efficiently. Use the right tools, consult your model’s manual when in doubt, and prioritize safety throughout the entire process.
Now you’re ready to tackle the next repair with a clean, quiet, and properly functioning washing machine.



