
If your GE washing machine won’t start, won’t drain, or makes strange noises, you are not alone. Millions of homeowners face GE washing machine repair challenges every year, especially with models over five years old. The good news? Many common problems like a broken drive belt, failed lid lock, or clogged drain pump can be diagnosed and fixed without replacing the entire unit. Whether you are troubleshooting blinking lights, a humming motor, or a drum that will not spin, this guide gives you the step-by-step repair knowledge to save hundreds on service calls.
Access Diagnostic Mode on Your GE Washer

Modern GE top-load washers have built-in diagnostics to test components without disassembly. This mode helps pinpoint failures in valves, pumps, and sensors, saving time and guesswork.
Enter Washer Diagnostic Mode
To activate diagnostic mode, follow these steps. First, turn the cycle selector dial to 12:00. Next, press and hold the Start/Pause button. While holding Start, rotate the dial 180 degrees clockwise, which is about 7 clicks. Finally, release the button. You should hear a click, and lights will begin flashing.
The washer is now in diagnostic mode. Each light combination activates a different component. Two lights indicate the hot water inlet valve. Three lights indicate the cold water inlet valve. The drain light activates the drain pump. Use this to verify if the pump runs or if water valves open. If a component does not respond, move to electrical testing.
Clear Stored Error Codes
Sometimes, old codes linger even after fixing the issue. Clear them with this sequence. With power on, press and hold Start/Pause. Rotate the dial 7 positions clockwise. Release, then turn one click counterclockwise until only the Sensing Fill light is lit. Hold Start/Pause for 3 seconds to erase all codes.
Important: If a code reappears immediately after clearing, the fault is still active. Do not ignore this warning, as it indicates a real, ongoing problem that needs further investigation.
Decode No-Start and Blinking Light Errors
A GE washer that will not start is usually caused by a lid switch failure, power issue, or control board fault. Blinking lights provide clues, but not always clear codes.
Diagnose Lid Lock Failure
The lid lock is the most common cause of no-start conditions. Watch for these symptoms. The washer fills but will not agitate or spin. The Lid Lock light blinks or stays off. There is no click when closing the lid.
Check these first before proceeding with repairs. Is the lid warped or misaligned? Is the metal striker tab bent or loose? Are wires disconnected behind the console?
To access the lid switch, unplug the washer and remove two screws from the back plate. Slide the metal console housing to the right and lift forward. Disconnect the pressure hose from the PCB and check for kinks. Remove the capacitor and two gray top screws. Locate the lid lock harness and ensure it is fully seated.
Use a putty knife to release front console clips. Lift the assembly and remove the white bezel by pressing outward tabs. Slide out the old switch and replace the striker, which is secured by two screws.
Pro Tip: The bezel has a peg guide. Align it correctly or it will not snap in during reassembly.
Test Start Switch and Power Supply
If the lid lock checks out, test the start switch. Press Start and listen carefully. Do you hear a click? No click means the switch may be worn or the control board is not powering it.
Before opening the machine, perform these checks. Check outlet voltage with a known-working device like a hair dryer. Reset the circuit breaker dedicated to the washer. Inspect the power cord for damage or loose connections. No power at the outlet means the issue is in your home’s wiring, not the washer.
Replace Drive Belt and Inspect Pulleys
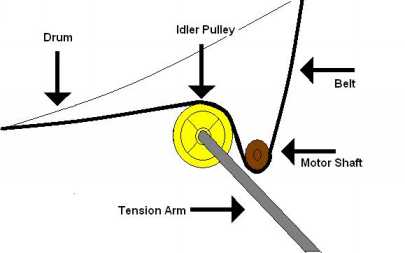
A worn or broken drive belt prevents spinning and causes loud squealing or grinding noises. This is a common GE washing machine repair scenario.
Safely Access the Belt
Unplug the washer. Tilt the unit backward and place a box under the rear legs to prevent water from draining. Remove the bottom front panel using a 3/8 inch socket, which requires three screws. One may hold a grounding strap.
Look for these signs of belt failure. Frayed or cracked belt material. Shavings or oil residue on the components. Shredded belt wrapped around the motor.
Oil on the belt signals a seal failure in the transmission, which likely leads to bearing damage if not addressed quickly.
Install New Drive Belt
To remove the old belt, roll it off the motor pulley while pulling down. To install the new belt, thread it onto the small motor pulley first. Guide it over the large drum pulley. Use a flathead screwdriver to seat the belt fully into both grooves. Rotate the drum by hand to ensure smooth movement.
Warning: If the belt is stiff, warm it with a hair dryer for 1 to 2 minutes to improve flexibility. Misalignment by even one groove causes noise and rapid wear. Double-check seating before reassembling the machine.
Fix Clutch and Shifter Assembly Issues
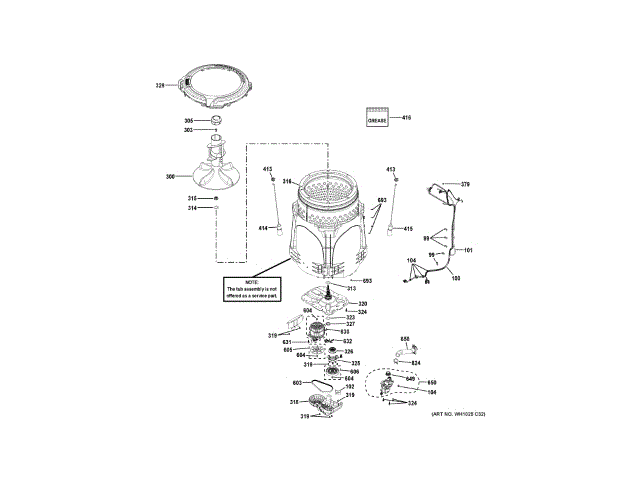
The clutch controls the shift between agitation and spin cycles. A faulty clutch causes no spin, even if the motor runs properly.
Remove Shifter and Clutch
Remove the 9/16 inch nut from the shifter pulley by turning counterclockwise. Tap gently with a metal tool while rotating to loosen. Use a motor puller if the nut is stuck.
Critical Safety Step: The clutch spring is under high tension. Catch it when removing the assembly. Failure to do so can send it flying and cause injury.
Components include the plastic clutch with lip, the shifter mechanism, and the clutch spring. Each must be handled carefully during removal and installation.
Test Clutch Coil Resistance
Use a multimeter to test the clutch coil resistance. Set the multimeter to ohms and touch probes to the coil terminals. The expected reading is around 5700 ohms. Readings near 5200 ohms may still work but are slightly out of spec. Below 4500 or above 6500 ohms means you should replace the clutch.
Reinstall Clutch Properly
Install the clutch spring first. Place the plastic clutch inside. Hold it in position while inserting the shifter. Reattach the 9/16 inch nut and tighten securely. A loose clutch prevents the drum from spinning and triggers no-start errors, even if other components are functional.
Diagnose Motor and Speed Sensor Failures

The motor powers drum movement. Failures often stem from belt debris, overload, or electrical faults that require professional GE washing machine repair.
Check Speed Sensor After Belt Failure
If the drive belt shredded, inspect the speed sensor on the left side of the motor. Belt fragments can damage the sensor, preventing motor engagement.
To replace the speed sensor, disconnect the harness by pressing the red tab. Press both side tabs on the housing to release the sensor. Align the two small tabs on the new sensor and slide in until it clicks. Reconnect the harness and ensure the red tab locks. Check that the white cable tie is secure.
Assess Motor Health
Overloading accelerates motor wear. If the motor hums but does not turn, check for a failed start capacitor. Test for open windings with a multimeter. If the motor tests bad, replace it.
However, in many cases, only the belt and speed sensor need replacement even if debris hit the motor, provided the motor itself still functions properly.
Identify Bearing and Gearbox Failure

A loud grinding noise during the spin cycle is the hallmark of worn-out bearings, often accompanied by water leaking from the bottom of the machine.
Confirm Bearing Damage
Signs of failure include grinding or rumbling during high-speed spin. Water pools under the machine. Oil or grease appears on internal components. These indicate the tub bearing seal has failed, allowing water into the gearbox.
Decide Repair vs. Replace
Bearing replacement requires removing the outer tub and replacing the entire gearbox assembly or rear tub. For machines over 7 to 8 years old, this repair is not economical. Parts cost $200 to $350. Labor requires 3 to 5 hours. Total repair cost often exceeds 50% of a new washer price. In these cases, replacement is recommended.
Troubleshoot Water Inlet and Drain Problems
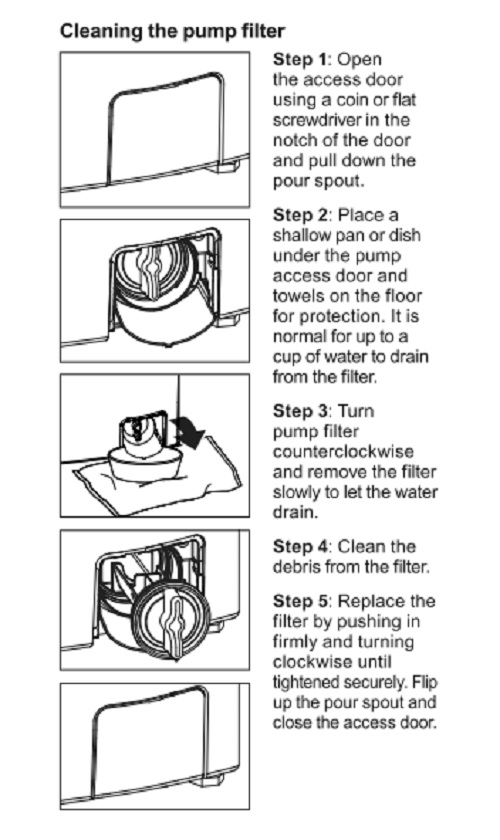
Washers that will not fill or drain are usually blocked or have failed valves or pumps. These are frequent GE washing machine repair issues.
Clean Water Inlet Valve Filters
If no water is entering, turn off the water supply. Disconnect hoses from the back. Remove the inlet valve cover, which is held by Phillips screws. Pull out filter screens and clean under running water.
Clogs come from sediment in water lines, corroded pipes, or frozen fill tubes in unheated garages. Test in diagnostic mode by activating hot and cold valves. If no flow occurs, the solenoid may be dead and you need to replace the entire valve.
Unclog Drain Pump and Hoses
Symptoms include the washer fills but will not drain. LE or OE error codes appear. Clothes come out soaked after the cycle.
To access the pump, unplug the washer and remove the front lower panel. Place a towel under the pump because water will spill. Open the pump filter cap by turning counterclockwise.
Remove these common items. Coins. Hair ties. Socks. Lint clumps. After cleaning, run a drain cycle in diagnostic mode to confirm pump function.
Ensure the drain hose has an air gap or loop above the standpipe. This prevents siphoning and drainage problems.
Test Pressure Switch and Hose
The pressure switch tells the washer when the tub is full. A faulty switch causes filling problems throughout the wash cycle.
Locate and Inspect Pressure System
Unplug the washer. Access the PCB behind the console. Find the thin rubber hose connecting the tub to the control board.
Check for these problems. Disconnection at either end. Kinks or cracks in the hose. Leaks or moisture inside the hose.
A faulty hose causes overfilling, no fill, or failure to advance to wash cycle. Reconnect or replace the hose. If the problem persists, test the pressure switch with a multimeter for continuity.
Evaluate Control Board and Panel Faults
Burnt components or loose wires on the control board can kill power to the entire machine. This is one of the more complex GE washing machine repair scenarios.
Inspect for Electrical Damage
After unplugging, remove the console to access the main board. Look for burnt spots, melted wires, or charred terminals. These indicate a short circuit in a connected component like the motor, valve, or pump.
Critical Rule: Never install a new control board without first testing the circuits it powers. If the root cause is not fixed, the new board will fail immediately.
Fix Loose Panel Connections
A non-responsive control panel may have loose ribbon cable, cracked PCB traces, or broken knob stems. Replace knobs by pulling straight off. Some knobs have rear locking tabs that require special attention. For damaged panels, replace the entire unit because there are no user-serviceable parts inside.
Apply the 50% Repair Rule
Deciding whether to repair or replace hinges on age, cost, and failure type. Use this rule for every GE washing machine repair decision.
Use the Repair vs. Replace Formula
Ask these two questions. Is the machine under 10 years old? Is the repair cost less than 50% of new washer price? If yes to both, repair is the better choice.
Example: A new GE washer costs $800. The 50% threshold is $400. A repair estimate is $280. This is worth fixing.
But if bearings failed and the repair costs $450 on a 9-year-old machine, replacement is the smarter financial move.
Know When to Walk Away
Do not repair if you see grinding bearings, rusted outer tub, burnt control board with failed motor, or multiple major failures. These are junkyard candidates, especially in rental units or humid environments.
Prevent Future Failures with Maintenance
Extend your washer life with simple, regular care. Prevention is the best GE washing machine repair strategy.
Perform Monthly Checks
Clean the pump filter to prevent drain issues. Wipe the door seal on front-loaders to stop mold. Run a bleach cycle every 2 months to eliminate odor. Check hoses for bulges or leaks.
Avoid Overloading
Overloading is a top cause of motor burnout, bearing wear, and clutch failure. Follow load guidelines. For large loads, fill to 3/4 capacity. For heavy items like towels and jeans, reduce volume by 25%.
Schedule Professional Maintenance
Providers like Sears Home Services and Mr. Appliance offer annual maintenance plans. These include deep internal cleaning, belt and pulley inspection, and electrical connection checks. For households with multiple GE appliances, these plans pay for themselves in avoided repairs.
Choose the Right Repair Service
When DIY is not an option, pick a qualified technician. The right service ensures quality GE washing machine repair.
Use Factory-Authorized Providers
Bodewell is GE official service brand. They have factory-trained techs, genuine parts, and competitive rates. Contact the main line at 833-4BODEWELL, or 833-426-3393. Hours are Mon to Fri 8 AM to 8 PM ET.
Sears Home Services and Mr. Appliance also use genuine GE parts and offer flat-rate pricing. These providers stand behind their work with satisfaction guarantees.
Regional Specialists Offer Faster Service
Regional specialists provide localized expertise. In NYC, call 212-444-8114 for same or next-day service. In Washington DC, call 202-559-3966 with expertise in hard water issues. In Southwest Florida, call 800-800-8356 for humidity-resistant repairs.
Virtual Help: Neli Virtual Appliance Repair offers phone and chat support to guide DIY fixes, potentially saving $150 or more in labor costs.
Frequently Asked Questions About GE Washing Machine Repair
How do I enter diagnostic mode on my GE washing machine?
Turn the cycle selector dial to 12:00. Press and hold the Start/Pause button. While holding Start, rotate the dial 180 degrees clockwise, about 7 clicks. Release the button. You should hear a click, and lights will begin flashing to confirm entry.
What is the most common cause of a GE washer not starting?
The lid lock is the most common cause of no-start conditions. Check if the lid is warped, the striker tab is bent, or wires are disconnected behind the console. The lid lock light may blink or stay off when this component fails.
When should I replace my GE washing machine instead of repairing it?
Apply the 50% rule. If the machine is over 10 years old or the repair costs more than 50% of a new washer price, replace it. Also replace if you see grinding bearings, rusted tub, or multiple major failures.
How much does GE washing machine repair cost?
Average repair costs range from $160 to $400. Specific washing machine repairs typically cost between $50 and $450. Labor rates are $40 to $120 per hour. Diagnostic fees often apply toward the final repair cost.
Can I replace the drive belt on my GE washer myself?
Yes, with basic tools. Unplug the washer and tilt it backward. Remove the bottom front panel. Roll the old belt off the motor pulley. Thread the new belt onto the small motor pulley first, then guide over the large drum pulley. Use a screwdriver to seat it fully.
How do I clear error codes on my GE washer?
With power on, press and hold Start/Pause. Rotate the dial 7 positions clockwise. Release, then turn one click counterclockwise until only the Sensing Fill light is lit. Hold Start/Pause for 3 seconds to erase all codes. If a code reappears immediately, the fault is still active.
Key Takeaways for GE Washing Machine Repair
Most GE washing machine repairs like replacing a lid switch, drive belt, or drain pump can be done for under $200, either DIY or with a professional. Use diagnostic mode to identify the real issue, avoid unnecessary part swaps, and always test electrical components before replacing boards. For machines under 8 years old, repairs are usually worth the investment. But when bearings grind or the tub rusts, replacement becomes the smarter financial move. By following this guide, you will make informed decisions, extend your appliance life, and keep your laundry running without overspending.



