If your GE washing machine fills with water, drains, and spins during the rinse cycle, but the agitator isn’t moving during the wash cycle, you’re likely dealing with a broken or worn agitator mechanism. This is a common issue across many GE top-load models like the GTW330ASK3WW and others using part numbers such as WH43X34257 and INV12944185. The good news? You don’t need to replace the entire machine. Most agitator problems can be fixed in under an hour with basic tools and a few replacement parts.
The root cause usually lies in small but critical internal components: agitator dogs, the coupling, or stripped splines. These parts wear out over time from repeated use, especially when heavy loads stress the system. Ignoring the problem leads to poorly cleaned clothes, increased strain on the motor, and eventually more expensive repairs. In this guide, you’ll learn how to diagnose the exact failure, remove the agitator safely, inspect and replace damaged parts, and reassemble everything correctly.
Diagnose the GE Washing Machine Agitator Problem
Before removing any parts, confirm the issue is with the agitator and not the motor or transmission.
No Agitation But Spin Works
If the drum spins normally at high speed during the spin cycle but the agitator doesn’t move during wash, the transmission and motor are likely fine. This points directly to the agitator drive system.
Symptoms to look for:
- Agitator spins freely when turned by hand
- Doesn’t move clothes during wash
- Only jerks slightly instead of agitating
Quick test: With power off, grab the agitator and try to rotate it back and forth. If it moves easily without resistance, the dogs are likely broken.
Grinding or Slipping During Wash
A grinding noise or slipping motion suggests partial engagement with the drive system.
Possible causes include:
- Partially stripped splines on the agitator base or spindle
- Damaged coupling with cracks or worn rubber
- Loose central nut or missing washer
Listen closely during a test cycle. A rhythmic clicking or grinding often means the dogs are catching intermittently rather than fully engaging.
Identify Your GE Agitator Type

GE uses two main designs. Knowing which type you have determines your repair path.
Top-Load Models with Dog Assembly in Cap
Found on many mid-to-late 2000s GE models.
Key characteristics:
- Remove the fabric softener dispenser cap to access the central bolt
- Replace agitator dogs (Part # INV12944185) or coupling
- Removal method: central bolt technique
Models with Alignment Hole at Base
Common in newer GE washers.
Key characteristics:
- Small round hole near the bottom edge of the agitator skirt
- Aligns with a nipple inside to lock the shaft for removal
- Access transmission bolt or replace base (e.g., WH43X34257)
- Removal method: alignment hole technique
Check your model number on the lid or frame to verify compatibility before ordering parts.
Gather Tools and Replacement Parts
Use the right tools to avoid damaging plastic components or stripping bolts.
Required Tools
- Phillips screwdriver for locking mechanism and cap removal
- Flathead screwdriver to pry off caps
- 7/16-inch socket wrench or nut driver for most common nut size
- 11 mm socket needed for WH43X34257 base replacement
- Adjustable wrench or ratchet with extension for tight spaces
- Pliers to remove plastic covers
- Bucket and towels to catch residual water
- Plumber’s grease (optional) to lubricate hub during reassembly
Replacement Parts to Have Ready
- Agitator dogs (INV12944185): $8–$15, 4-pack
- Agitator base (WH43X34257): $30–$50, model-specific
- Coupling kit includes rubber connector and bolt
- Rubber washers and gaskets to prevent leaks if damaged
- Fabric softener dispenser cap to replace if cracked
Order parts using your full model number for accuracy.
Remove the Agitator Safely
There are two primary methods. Choose based on your washer design.
Use the Alignment Hole Method
Best for accessing the transmission bolt or inspecting the base.
Step 1: Locate and align the hole
Find the small round hole at the base of the agitator skirt. Reach inside the agitator and feel for a raised dot (nipple) on the inner plate. Rotate the agitator until the hole lines up exactly over the nipple.
Why alignment matters: Misalignment prevents the locking mechanism from engaging, and forcing removal can damage gears.
Step 2: Lock the shaft
Insert a Phillips screwdriver through the aligned hole and press down firmly until it seats against the transmission. This locks the central shaft in place.
Step 3: Disengage and lift
While holding the screwdriver in place, have someone steady the tub. Turn the agitator counterclockwise to release the gear lock. Once loose, lift the agitator straight up. If stuck, wiggle gently side-to-side. Do not yank.
Use the Central Bolt Method
Used when replacing agitator dogs or coupling.
Step 1: Remove dispenser and cap
Pull the fabric softener dispenser straight up. Underneath, there may be a plastic cover. Remove it with pliers if needed. Pry off the center cap with a flathead screwdriver. You’ll now see the central bolt.
Step 2: Unthread the bolt
Use a 7/16-inch or 11 mm socket (depending on model) to loosen the bolt. Hold the agitator base steady to prevent spinning. Once the bolt is out, pull the agitator upward. If it resists, twist slightly while pulling to break any seal.
Set aside the bolt, washer, and gasket in a safe place.
Inspect and Replace Key Components
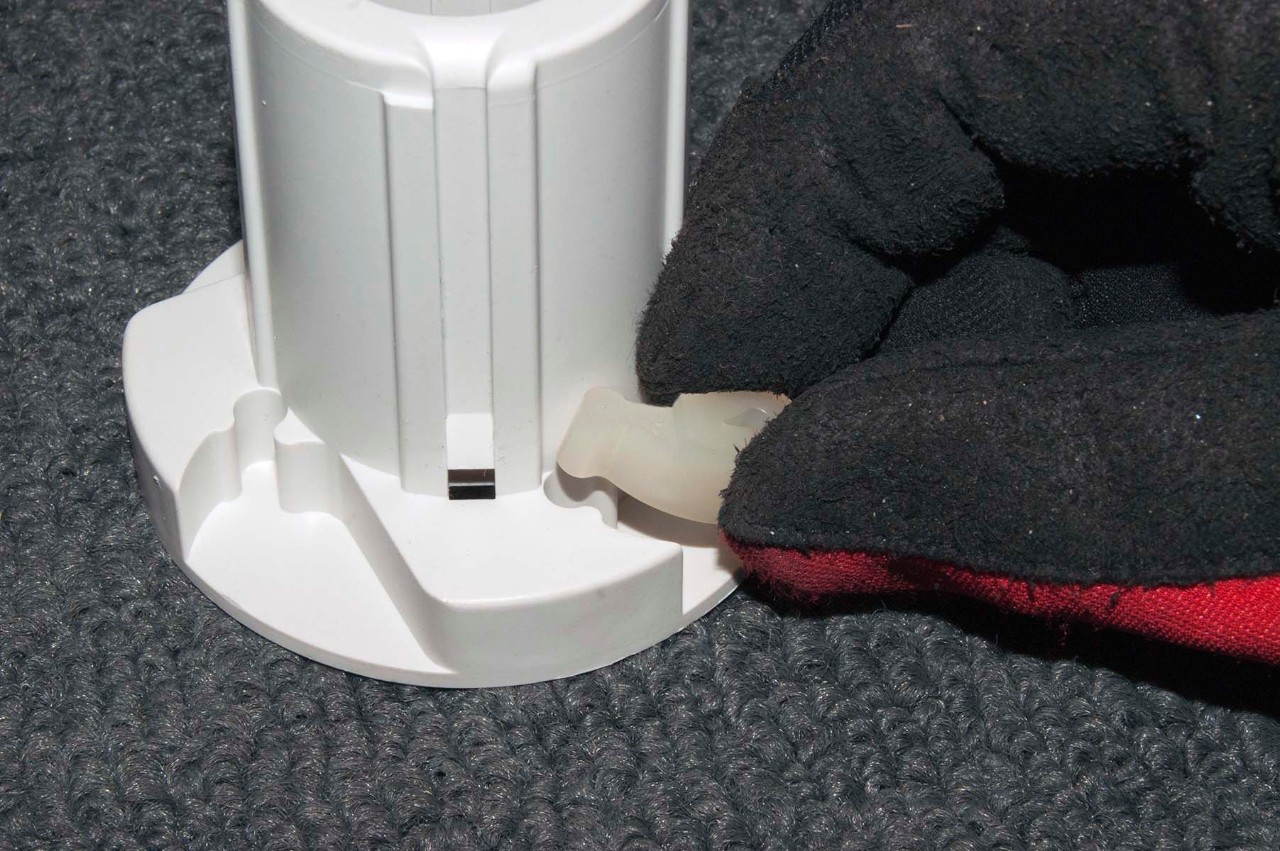
With the agitator out, examine each part for wear or damage.
Replace Worn Agitator Dogs
Locate the dogs: In top-access models, the dogs sit in slots inside the upper portion of the agitator. They look like small plastic pawls with teeth.
Check for damage: Inspect all four dogs. Look for cracked bodies, broken or rounded teeth, or missing pieces. If any dog is damaged, replace the full set even if only one looks bad. Uneven wear causes imbalance.
Install new dogs correctly: Remove old dogs by hand or with pliers. Clean the slots of lint and debris. Install new dogs (Part # INV12944185) with the teeth facing downward and outward to engage the spindle splines. Push them fully into place until they click. Test fit by inserting a screwdriver into the spline. Each dog should catch when rotated.
Fix a Damaged Agitator Coupling
Find the coupling: The coupling sits on the drive shaft beneath the agitator. It’s usually a white or gray plastic piece with a rubber center and a central bolt.
Look for failures: Signs of a bad coupling include cracks in plastic or rubber, split rubber insert, loose or missing bolt, or wobbly connection between shaft and agitator. A failed coupling causes slippage, noise, or no agitation.
Swap in a new one: Remove the old coupling bolt with a 7/16-inch nut driver. Lift off the old coupling. Slide the new one onto the shaft, ensuring it sits flush. Reinsert and tighten the bolt securely. Do not overtighten. Test by rotating the coupling. It should turn smoothly with no play.
Examine Splines and Shaft
Check internal splines: Both the agitator base and the drive shaft have splines (tines) that interlock. Shine a flashlight down the agitator opening. Look for stripped, worn, or broken splines. If splines are damaged, the agitator won’t transmit power.
Replace as needed: Stripped agitator splines require replacing the entire agitator assembly. Damaged drive shaft requires professional service involving transmission disassembly. Minor wear can sometimes be cleaned and lubricated, but severe stripping needs replacement.
Clean the Hub and Remove Debris
Lint, soap scum, and fabric softener residue build up over time.
Clear the hub area: After removing the agitator, wipe the hub and shaft with a damp cloth. Use an old toothbrush to scrub away gunk from splines and recesses.
Pro tip: A buildup here can prevent proper seating, leading to immediate re-failure.
Apply plumber’s grease (optional): A small dab on the hub helps the agitator slide into place and reduces future wear. Avoid excess because it can attract dirt.
Reinstall the Agitator Properly

Reassembly is just as important as disassembly. One mistake can cause leaks or noise.
Align and Seat the Agitator
Match pegs to holes: The bottom of the agitator has two alignment pegs. The drive shaft has corresponding holes. Lower the agitator straight down, guiding the pegs into the holes. Ensure the four retention tabs snap into the drive plate.
Lock it into place: Twist the agitator clockwise until it clicks and no longer rotates freely. Rock it back and forth to confirm it’s fully seated. There should be no wobble.
Reattach the Central Nut
Replace washers first: If your model uses a central nut, reinstall the rubber washer and gasket underneath. Make sure they’re not pinched or twisted.
Tighten to spec: Thread the 7/16-inch nut back on by hand, then tighten a quarter turn past hand-tight.
Warning: Over-tightening crushes the rubber seal and causes leaks. It can also strip plastic threads. Use a socket wrench gently. Do not use an impact tool.
Final Reassembly Steps
Replace the dispenser cap: Press the fabric softener dispenser back into place until it clicks. Ensure grooves align properly.
Restore power and water: Plug the washer back in and turn on water supply valves. Check for kinks in hoses before starting a test cycle.
Test the Repair
Run a short cycle to verify the fix.
Start a Wash Cycle
Set the dial to a normal wash with agitation. Let it begin filling. Once full, observe the agitator.
Confirm agitation:
- The agitator should move back and forth vigorously
- No grinding or slipping noises
- Clothes should swirl and tumble
If it’s still not working, double-check that agitator dogs are installed correctly, no debris is blocking movement, and the nut isn’t overtightened.
Check for Leaks
After the cycle starts, crouch down and look under the agitator base. Any dripping means the washer or gasket is damaged or improperly seated. Shut off water and recheck the seal.
Prevent Future Failures
Keep your agitator running smoothly with simple maintenance.
Regular Cleaning Routine
Every 3 months, remove the agitator cap, wipe out lint and residue, and inspect dogs for early wear. This prevents buildup that interferes with engagement.
Avoid Overloading
Too many clothes increase stress on the agitator dogs and coupling. Follow load size guidelines. Don’t pack the drum.
Keep Spare Parts Handy
Agitator dogs and couplings are wear items. Buy a set of INV12944185 dogs and a replacement coupling now. They cost less than $20 and save time when failure strikes again.
When to Call a Professional
Some issues go beyond DIY repair.
Transmission or Shaft Damage
If the drive shaft splines are stripped or the transmission is leaking oil, professional repair is needed. These require full disassembly and are not user-serviceable.
Persistent Agitation Failure
If you’ve replaced the dogs, coupling, and ensured proper installation, but the agitator still doesn’t work, there may be an electrical or transmission issue. A certified technician can diagnose motor coupling, clutch, or control board faults.
Key Takeaways for GE Washing Machine Agitator Repair
- Most GE agitator issues are caused by worn dogs (INV12944185) or a faulty coupling
- Use the alignment hole method if your model has a base hole; use the central bolt method if accessing from the top
- Never overtighten the central nut. Tighten only a quarter turn past hand-tight
- Clean debris from the hub and splines to prevent re-failure
- Test thoroughly after reassembly: agitate, spin, and check for leaks
With the right approach, you can restore full agitation to your GE washer in less than an hour and avoid a costly service call.
Frequently Asked Questions About GE Washing Machine Agitator Repair
How do I know if my GE washing machine agitator needs repair?
If your washer fills, drains, and spins normally, but the agitator doesn’t move during the wash cycle, the agitator mechanism needs attention. Other signs include grinding noises, weak agitation, or the agitator spinning freely when turned by hand.
What causes a GE washing machine agitator to stop working?
The most common causes are worn agitator dogs (plastic pawls), a damaged coupling, stripped splines, or debris buildup. These components experience constant stress during each wash cycle and eventually wear out.
Can I replace the agitator dogs myself?
Yes, replacing agitator dogs is a straightforward DIY repair. You need a 7/16-inch socket, a flathead screwdriver, and replacement dogs (Part # INV12944185). The repair typically takes 30 to 45 minutes.
How much does GE agitator repair cost?
Agitator dogs cost $8 to $15 for a 4-pack. A replacement agitator base (WH43X34257) costs $30 to $50. A coupling kit runs $15 to $30. Professional labor would add $150 to $300.
What happens if I don’t fix a broken agitator?
A broken agitator leaves clothes poorly cleaned because they don’t tumble properly. It also strains the motor since the washer tries to compensate. Eventually, the problem worsens and leads to more expensive repairs.
Why won’t my agitator come off even when I try?
You likely haven’t aligned the hole and nipple correctly. The alignment hole on the agitator skirt must line up perfectly with the internal nipple before the locking mechanism releases. Without this alignment, forcing the agitator can damage the gear system.