
Moving into a new home or upgrading your laundry setup? Setting up a washing machine correctly is essential for safety, performance, and long-term reliability. A poorly installed unit can leak, vibrate excessively, fail to fill, or even cause water damage. But don’t worry—once you know the steps, the process is straightforward. This guide walks you through how to set up a washing machine from unpacking to final testing, using only the facts from manufacturer standards and installation best practices. You’ll learn how to prepare your space, connect water and drain lines, level the unit, and run a successful test cycle, all without costly mistakes.
Let’s get your washer running safely and smoothly in under an hour.
Verify Installation Space and Conditions
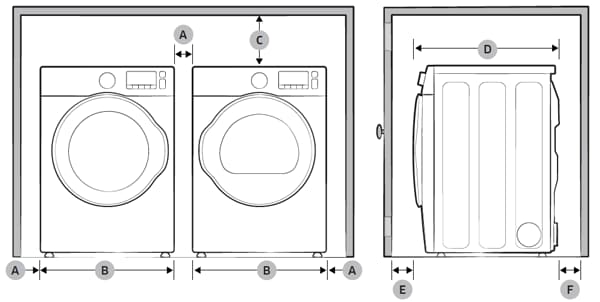
Before bringing in the machine, confirm your setup area meets all physical and environmental requirements.
Check Dimensions and Clearance
Measure doorways, hallways, and the final space to ensure the washer fits. Allow 1 inch of clearance on all sides between the machine and walls or adjacent appliances. This space prevents vibration transfer, allows airflow, and enables future maintenance. For front-load models, ensure the door opens fully without hitting cabinets or a dryer. Unlike dryers, washing machine doors cannot be reversed.
Confirm Floor and Temperature Requirements
Install the machine on a firm, level floor. Avoid carpeting because soft or uneven surfaces increase vibration and risk machine movement during spin cycles. If placing on hardwood or tile, use anti-slip pads to prevent scratches and sliding. The room temperature must stay above 32°F (0°C) to prevent water in hoses or valves from freezing, which can crack internal components.
Validate Utility Access
Ensure all three utilities, water, drain, and power, are within reach:
• Hot and cold water valves must be functional and accessible
• A drain system (standpipe, sink, or built-in nozzle) must be available
• A grounded 120V electrical outlet (or 240V for some models) should be nearby with no extension cords allowed
Unpack and Remove Shipping Bolts
Skipping this step is one of the most common causes of washer failure. Transport bolts protect the drum during shipping but must be removed before use.
Retrieve Accessories from Drum
After moving the washer near its spot, remove all packaging. Open the door and take out water hoses (hot and cold), drain hose, plastic blanking caps, user manual and tools (often a wrench), and hose guides or clips. Store these in a safe place because they are needed for future moves.
Remove All Transportation Bolts

Locate the bolts, usually four on the back panel. Use the included wrench or an adjustable spanner to unscrew and pull out each bolt and spacer. These bolts stabilize the drum during transit, and leaving them in causes violent shaking that can destroy the suspension system.
Insert the plastic blanking caps into the empty holes to keep out dust and water. Keep the bolts because you will need them if you ever move the machine. Never run the washer with transport bolts installed.
Connect Water Supply Lines
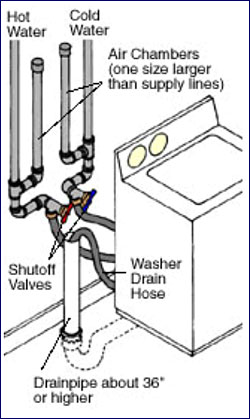
Use new hoses and proper technique to avoid leaks, bursts, or error codes.
Prepare and Flush Hoses
Always install brand-new water hoses because old ones are prone to failure. Check that rubber washers (gaskets) are inside each connector. These create the watertight seal, and never use Teflon tape or sealant as they can damage fittings.
Before attaching to the washer, flush the lines:
1. Turn off water valves
2. Connect hose ends to faucets but leave the other ends free
3. Open valves and let water run into a bucket for 10 to 15 seconds to clear debris
4. Close valves and connect hoses to the machine
Attach Hoses to Faucets and Washer
Match colors or labels: blue/cold to cold valve, red/hot to hot valve. Crossed lines can trigger fill errors like nF or 4E.
To connect:
• Hand-tighten each end first
• Then use a wrench to tighten only two-thirds of a turn more because over-tightening can crack fittings or crush gaskets
After connecting, slowly turn on both valves and check for leaks at all joints. If dripping, tighten slightly or reseat the gasket.
Install the Drain Hose Properly
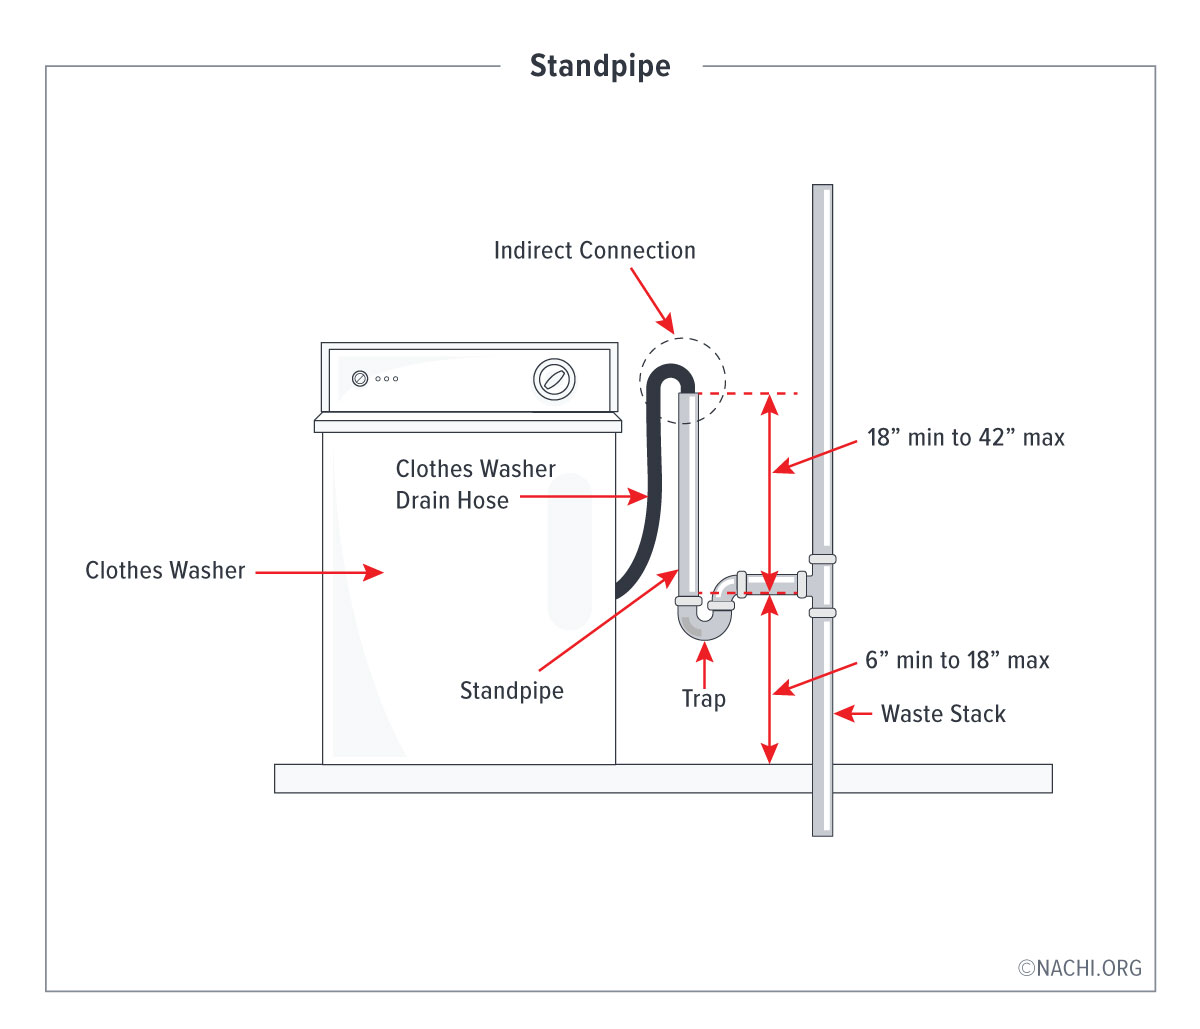
A poorly positioned drain hose causes siphoning, slow drainage, or water backup.
Maintain Required Air Gap
The end of the drain hose must sit at least 6 inches (15 cm) above the water level in the sink or standpipe. This air gap prevents dirty water from being sucked back into the clean wash cycle.
Choose Correct Drain Method
Use a Standpipe (Recommended)
Insert the hose into a vertical pipe:
• Minimum height: 24 inches (some models require 30 to 39 inches)
• Maximum height: 90 to 96 inches (7.5 to 8 feet)
• Keep the hose snug but not deep because pushing it too far can create a seal and slow draining
Secure with a hose guide or zip tie to prevent popping out during pumping.
Use a Laundry Sink
Hook the hose over the sink edge:
• Position the hose spout 24 to 35 inches from the floor
• Use the included plastic hose guide to hold the curve in place
• Fasten the guide to the wall or sink rim to prevent slipping
Avoid kinks, sharp bends, or extensions beyond the manufacturer’s limit.
Level the Washer for Stability

An unlevel washer walks, shakes, and wears out faster. Leveling is non-negotiable.
Level Front-Load Washers
- Place a spirit level on top, front-to-back and side-to-side
- Gently rock the machine, and if it wobbles, it is not level
- Adjust the front and rear feet by turning clockwise to lower a corner or counterclockwise to raise it
- Once stable, tighten the lock nuts against the base to secure each foot
Level Top-Load Washers
- Fill the tub with water just below the agitator
- Observe the water line, and if uneven, the washer is tilted
- Adjust front leveling legs (some models have rear adjustments)
- Recheck with a level or water line, then tighten lock nuts
Use Shims or Leg Rings if Needed
For uneven floors, insert sturdy shims under feet and avoid soft materials like cardboard. Some Samsung models (like WA54R7200) require leg rings when using a drip pan to prevent the motor from rubbing on the pan’s central bulge. Install by lifting the machine, adding the ring, and reattaching the foot.
Plug In and Power Up Safely
Electrical safety is critical, so never cut corners.
Use a Grounded Outlet Only
Plug the washer directly into a three-prong, grounded outlet. The third prong grounds the machine and prevents electrical shock. Do not use adapters or remove the grounding pin.
Verify voltage matches the machine’s rating (usually 120V, but some are 240V). The circuit should be 15-amp with a breaker or fuse.
Never Use Extension Cords
Extension cords or power strips can overheat and cause fire. A dedicated outlet is required, and if no outlet is nearby, consult an electrician.
Run a Test Cycle and Calibrate
Before washing clothes, verify everything works.
Perform a No-Load Test
- Leave the drum empty (no clothes or detergent)
- Select a short cycle like Rinse + Spin, Quick Wash, or No Wash
- Start the cycle and observe for filling issues, leaks, draining problems, or excessive vibration
If vibration occurs, recheck leveling and transport bolt removal.
Calibrate Smart Washers (If Applicable)
Some models (like Samsung) need calibration after installation to set load sensing.
To calibrate:
1. Ensure drum is empty
2. Press and hold Temp + Delay End for 3 seconds until Cb appears
3. Press Start/Pause
4. The drum rotates for about 3 minutes
5. When display shows End or 0, calibration is complete
Button combinations vary, so check your manual.
Fix Common Setup Issues Fast
Even with careful setup, problems can arise. Here is how to solve them:
Washer Leaking
Check hose connections and tighten slightly or replace damaged gaskets. Inspect the drain hose to ensure it is not cracked or improperly seated. Verify no transport bolts remain inside the machine.
Excessive Vibration
Re-level the machine and tighten lock nuts. Confirm all transport bolts are removed. Ensure the floor is solid and not carpeted or uneven.
Not Filling with Water
Check that valves are fully open. Verify hoses are not crossed (hot to hot, cold to cold). Look for kinks or clogs in supply lines.
Drain Not Working
Confirm drain hose height is between 24 and 96 inches. Check for kinks or blockages. Ensure the air gap is maintained.
Maintain Your Washer Long Term
Proper care extends your machine’s life and keeps it running efficiently.
Monthly and Annual Tasks
Run a tub clean cycle with washer cleaner or bleach to prevent mold and odor. Clean the pump filter (front loaders) every few months to catch lint and debris. Inspect hoses annually for bulges, cracks, or leaks, and replace every 5 years. Leave the door ajar after use to dry the drum and prevent mildew.
Best Practices for Daily Use
Do not overload the machine and follow capacity guidelines. Use HE detergent only in high-efficiency models. Balance loads to reduce strain on the motor.
Moving the Washer
Always drain all water, reinstall transport bolts to secure the drum, disconnect hoses and power, and transport upright to avoid damage.
Frequently Asked Questions About Setting Up a Washing Machine
Do I need a plumber to install a washing machine?
No, most homeowners can install a washing machine themselves if they follow the proper steps. You only need a plumber if your existing plumbing requires modifications like adding water supply valves or installing a drain standpipe.
What happens if I forget to remove shipping bolts?
Leaving transport bolts in place causes severe vibration during operation. The drum is secured only for transport, so the machine will shake violently, potentially damaging internal components, causing loud noises, and voiding your warranty.
Can I use extension cords for my washing machine?
No, extension cords are strictly prohibited. Washing machines require a dedicated grounded outlet because they draw significant power. Using extension cords can cause overheating, electrical failure, or fire hazards.
How do I know if my washing machine is level?
Place a spirit level on top of the machine in both front-to-back and side-to-side directions. The bubble should be centered. Alternatively, for top-loaders, fill the tub with water and check if the surface is level.
What is the correct height for the drain hose?
The drain hose must be at least 24 inches above the floor to prevent siphoning, and should not exceed 90 to 96 inches because the pump cannot push water higher than that.
When should I calibrate my washing machine?
Calibrate smart washers immediately after installation, after moving the machine, or if the machine seems to misjudge load sizes. Check your user manual to see if your model supports calibration mode.
Key Takeaways for Setting Up Your Washing Machine
Setting up a washing machine does not require a professional if you follow the right steps. From checking clearance and removing shipping bolts to connecting water lines, leveling the unit, and running a test cycle, each stage ensures your washer operates safely and efficiently. Always use new hoses, maintain proper drain hose height, and never skip the test run before washing actual clothes.
By investing an hour now, you prevent leaks, breakdowns, and costly repairs later. Keep this guide handy, consult your manual for model-specific details, and enjoy years of reliable laundry performance.



