
A burst washing machine hose can unleash up to 10 gallons of water per minute, turning a routine laundry day into a costly disaster. With the average water damage claim exceeding $5,000, replacing your washing machine hoses isn’t just maintenance, it’s essential home protection. Most experts recommend replacing supply hoses every 3 to 5 years, especially if they’re rubber. The good news? You don’t need a plumber to do it. With basic tools and 30 minutes, you can prevent flooding, extend your appliance’s life, and protect your home. This guide walks you through every step, from choosing the right hose to testing connections, so you can replace your washing machine hose safely, correctly, and confidently.
Assess the Risk of Hose Failure
Why Hoses Fail Over Time
Washing machine hoses endure extreme conditions. They face constant water pressure of 60 to 80 psi, repeated heating and cooling cycles, and continuous exposure to moisture and detergents. Rubber hoses degrade quickly, becoming brittle and prone to cracking. Even if they look fine externally, internal weakening can lead to sudden bursts. Braided stainless steel hoses resist this wear far better, but all hoses have a limited lifespan regardless of material quality.
Real Damage from a Burst Hose
A single burst can release 300 gallons in 30 minutes, enough to flood multiple rooms, warp flooring, damage walls, and promote mold growth. If your machine is upstairs or in a basement, the structural and financial impact multiplies significantly. Insurance may cover repairs, but deductibles apply, and repeated claims can raise your premiums. Replacing hoses proactively costs far less than cleaning up after a flood.
Know When to Replace Your Hose
Follow the 3 to 5 Year Rule
Replace washing machine supply hoses every 3 to 5 years, regardless of appearance. This is the standard recommendation from manufacturers and insurers alike. Even high-quality braided hoses lose integrity over time from constant pressure and temperature fluctuations. Mark the installation date on the hose with masking tape to track when replacement is due.
Spot These 5 Warning Signs
Replace immediately if you notice any of these problems:
- Bulges or bubbles in the hose, which indicate weak spots under pressure
- Frayed stainless mesh exposing the inner tube
- Rust or corrosion on fittings
- Kinks or sharp bends creating weak points
- Drips or moisture at connections, which are early leak signs
Inspect Every Few Months
Check hoses every 2 to 3 months. Look behind the machine for leaks, discoloration, or dampness. Ensure the drain hose is secure and elevated 24 to 30 inches to prevent backflow. Install water hammer arrestors to reduce shock from sudden valve closures, which stress hoses over time.
Choose the Right Replacement Hose
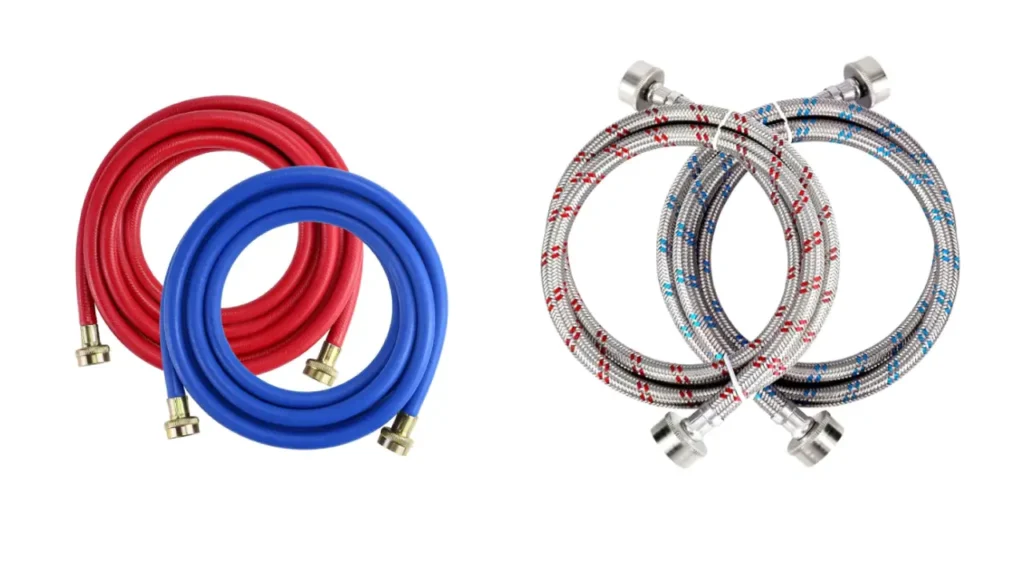
Avoid Rubber Hoses
Most machines come with rubber supply hoses, but these are the weakest link in your plumbing. They swell, crack, and burst without warning, often when you’re not home. Replace rubber hoses immediately, even if they’re less than five years old. The small investment in better hoses pays off in peace of mind.
Upgrade to Braided Stainless Steel
Braided stainless steel hoses cost $10 to $20 and offer major advantages. They feature reinforced metal mesh that resists bursting, withstand high pressure and temperature swings, resist kinking and abrasion, and last up to 5 years with proper care. Ensure they have 3/4-inch GHT (Garden Hose Thread) connectors, which is the standard in North America.
Consider Flood Prevention Hoses
For maximum protection, invest in smart flood prevention hoses. These feature dual-layer construction with nylon braiding and a plastic sheath, built-in leak sensors, and automatic shutoff valves. They offer lifetime durability that exceeds 5 years and come with manufacturer-backed insurance coverage. They adapt to all standard connections and shut off water instantly if a leak is detected, which is ideal for unattended laundry rooms.
Gather Tools and Prepare Safely
Essential Tools and Supplies
You’ll need these items to complete the job:
- New braided stainless steel or flood prevention hoses (5 to 7 feet)
- Adjustable wrench or groove joint pliers
- Bucket and old towels
- Clean bristle brush
- Safety glasses (recommended)
- Masking tape and marker (for labeling)
- Optional: Thread seal tape (for metal-to-metal threads only)
Shut Off Water and Power
First, unplug the machine to prevent electrical hazards. Then turn off hot and cold water valves behind the washer by rotating them clockwise until tight. Relieve pressure by briefly turning on a faucet if accessible or running the machine empty. Place a bucket and towels under the connections to catch any residual water.
Disconnect Old Supply Hoses
Remove Hot and Cold Hoses
Position a bucket under the connections first. Use pliers or a wrench to loosen the machine-side connection by turning counterclockwise. Let water drain into the bucket, then disconnect from the machine. Repeat at the wall supply valve. If lines aren’t color-coded, label hot and cold valves with tape before removing hoses to ensure correct reinstallation.
Check for Damage on Fittings
Inspect the machine’s inlet valves and wall spigots for corrosion, mineral buildup, or cracked or worn threads. Clean debris from the filter screens inside the hose connectors using a bristle brush. Clogged screens reduce water flow and strain the machine over time.
Install New Washing Machine Hoses
When to Use Thread Seal Tape
Do not use Teflon tape on plastic washing machine inlets because tape can crack plastic threads. Only apply tape to metal supply valve threads such as brass spigots. Wrap clockwise with 2 to 3 turns to seal metal-to-metal joints properly.
Connect Hoses to Wall Valves
Match hoses to their proper connections: red to hot, blue to cold. Hand-tighten the hose nut onto the hot water valve first. Align threads carefully to avoid cross-threading. Tighten with pliers, but no more than a quarter-turn past hand-tight. Repeat for the cold valve. Never overtighten because this can strip threads or crush internal washers, causing leaks.
Attach Hoses to the Washing Machine
Connect the red hose to the Hot (H) inlet on the machine’s back. Connect the blue hose to the Cold (C) inlet. Hand-tighten both connections. Use pliers for a gentle 1/4-turn if needed. Ensure hoses are straight with no kinks, twists, or contact with sharp edges that could cause damage.
Test for Leaks and Finalize Setup

Turn Water Back On
Slowly open the hot water valve while watching for leaks. Open the cold water valve and inspect both connections carefully. Check all four points: two at the wall and two at the machine. Any drips at this stage are easier to fix now than after the machine is running.
Fix Leaks Immediately
If a connection drips, tighten slightly but no more than 1/4 turn. If leaking continues, disconnect and inspect the rubber washer inside the hose nut. Replace it if cracked, flattened, or missing. Never use thread sealant or tape on the machine-side connection because this can damage the plastic threads.
Run a Test Cycle
Plug the machine back in. Run a short wash cycle such as rinse or quick wash. Monitor all connections under pressure. Check the floor for moisture after the cycle completes. If everything looks dry, your installation is successful.
Follow Best Practices for Longevity
Upgrade and Label Hoses
Always use braided stainless steel or flood prevention hoses. Label the installation date on the hose with tape. Set a phone reminder for replacement in 3 to 5 years so you never miss the deadline.
Tighten Correctly
Remember this rule: hand-tight plus 1/4 turn is all that’s needed. Overtightening is the number one cause of leaks and fitting damage. More force doesn’t mean better seals.
Inspect Regularly
Check every few months for moisture or drips, bulges or rust, and kinks or wear. Clean inlet filters annually to maintain proper water flow and prevent reduced performance.
Call a Plumber When Needed
If supply valves are stuck, corroded, or leak despite your efforts, don’t force them. A licensed plumber can replace valves safely and ensure proper water shutoff without causing additional damage.
Frequently Asked Questions About Replacing Washing Machine Hoses
How often should washing machine hoses be replaced?
Replace washing machine supply hoses every 3 to 5 years, regardless of their visible condition. Even hoses that appear fine internally may be degrading, and proactive replacement prevents catastrophic failures.
Can I replace a washing machine hose myself?
Yes, you can replace a washing machine hose yourself with basic tools. The process takes about 30 minutes and requires an adjustable wrench, pliers, and new hoses. No plumbing experience is necessary.
What type of hose is best for a washing machine?
Braided stainless steel hoses are the best choice for most homes. They resist bursting, kinking, and cracking, and they cost only $10 to $20. For maximum protection, consider flood prevention hoses with automatic shutoff valves.
What happens if I don’t replace my washing machine hoses?
If you don’t replace aging hoses, they can burst and flood your home. A burst hose releases up to 10 gallons per minute, causing thousands of dollars in damage. The average washing machine water damage claim exceeds $5,000.
How do I know if my washing machine hose is about to burst?
Watch for these warning signs: bulges or bubbles in the hose, frayed stainless mesh, rust on fittings, kinks or sharp bends, and drips at connection points. Replace the hose immediately if you notice any of these issues.
Should I use Teflon tape on washing machine hose connections?
Do not use Teflon tape on plastic washing machine inlet threads because it can crack the plastic. You can use thread tape on metal supply valve threads only, wrapping clockwise with 2 to 3 turns.
Key Takeaways for Replacing Your Washing Machine Hose

Replacing a washing machine hose is a simple, low-cost task that prevents major water damage. By upgrading to braided stainless steel or smart flood prevention hoses, following the 3 to 5 year replacement rule, and inspecting connections regularly, you protect your home and extend your appliance’s life. Remember to hand-tighten plus only a quarter turn, check for leaks after installation, and mark your calendar for future replacements. Take action today before a burst hose turns your laundry room into a flood zone.



