
A puddle forming under your washing machine is more than just a nuisance. It is a warning sign that can lead to electrical hazards, mold growth, and costly floor damage if left unattended. The good news is most leaks are fixable with basic tools and a methodical approach. Whether your machine drips during the fill cycle or pools water when idle, this guide will help you diagnose and fix water leakage in your washing machine quickly and safely.
You will learn how to pinpoint the leak source by timing and location, inspect both external and internal components, and decide when to DIY or call a professional. We will walk through every common cause, from loose hoses to failing seals, and provide clear steps to stop the leak for good.
Immediate Safety Steps Before Repair
Before touching any part of your washing machine, prioritize safety. Water and electricity are a dangerous combination.
Always unplug the machine from the power outlet. Then, shut off both hot and cold water supply valves behind the unit by turning them clockwise. This prevents accidental flooding during inspection.
If you need to move the washer, get help because it is heavy and can tip. Place towels and buckets underneath hose connections to catch residual water when disconnecting. Wipe up any standing water immediately to avoid slips and subfloor damage.
Confirm the leak is from the washer by drying the floor and exterior completely, then running a short cycle while observing. Never use a leaking machine, even a slow drip can escalate into a major problem.
Diagnose When and Where Your Washer Leaks
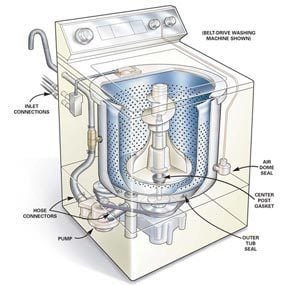
The timing of the leak reveals the likely culprit. Track exactly which cycle phase triggers the drip to narrow down the repair path.
Leaks during filling point to inlet hoses, the water inlet valve, or pressure switch issues. If water appears during washing or agitation, suspect the door gasket, detergent drawer, or internal tub. Leaks during drain or spin often stem from the pump, drain hose, or filter. A machine that leaks when idle usually has a faulty inlet valve or high water pressure forcing past seals.
Front leaks typically involve the door seal or detergent overflow. Back leaks suggest inlet or drain hose problems. Bottom leaks may mean a cracked pump, loose clamp, or tub defect. Water inside the drum when not in use is a red flag for a failing inlet valve or siphoning drain hose. Use a flashlight to trace moisture under the machine to identify whether the source is the pump, return hose, or tub.
Inspect Water Inlet Hoses and Connections
Start with the hoses at the back of the machine. Look for bulges, cracks, or brittleness, especially in rubber hoses. Over time, they degrade and can burst without warning.
Check the O-rings inside the hose fittings. Flattened, cracked, or missing washers cause slow drips down the back panel. Even if hoses look fine, replace O-rings every five years as preventive maintenance.
Tighten connections with a wrench, but do not over-tighten because this can strip threads or crack fittings. If hoses are damaged, replace them with stainless steel braided hoses for durability.
Household water pressure above 80 psi can force water past inlet valve seals, causing leaks even when the machine is off. Install a pressure gauge on a laundry faucet to test. If pressure is too high, fit a pressure-reducing valve on your home is main line.
Check Drain Hose and Standpipe Setup

A poorly installed drain hose can siphon wastewater back into the drum, causing overflow and leaks during idle periods.
Ensure the hose is not inserted more than six inches into the standpipe. Too deep creates a siphon effect. Use a hose clamp to secure it to the pipe, but allow an air gap to prevent backflow.
Check the entire hose length for splits or kinks. Clear clogs with a drain snake or auger if water backs up during draining. Inspect the home is drain pipe for clogs caused by lint or debris.
Replace brittle or cracked hoses immediately. A $15 part can prevent thousands in water damage.
Clean Detergent Drawer to Prevent Overflow
Using too much detergent or non-HE detergent in a high-efficiency washer creates excessive suds that back up into the overflow system and leak from the front.
To test, place a freshly washed garment in clean water. If it suds, you are using too much detergent.
Always use HE detergent and follow load-size guidelines. Clean the drawer weekly by removing it and rinsing out residue. Mold and soap scum block drainage channels, leading to overflow.
Wipe the drawer cavity with vinegar to dissolve buildup. Reinstall securely because misalignment causes leaks.
Fix Door Seal Leaks on Front-Loading Machines

A torn or dirty door gasket is the most common cause of front leaks. Inspect the rubber seal for cracks, splits, or stiffness, especially in the lower folds where water collects.
Clean the seal with a vinegar-soaked cloth to remove mold and grime. Dry thoroughly to prevent mildew.
If the gasket is torn or deformed, replace it. A damaged seal will not hold pressure, no matter how tight the door closes.
Check door alignment. If it does not close flush, tighten hinge screws. Misalignment prevents a proper seal and stresses the gasket.
Replace Faulty Water Inlet Valve
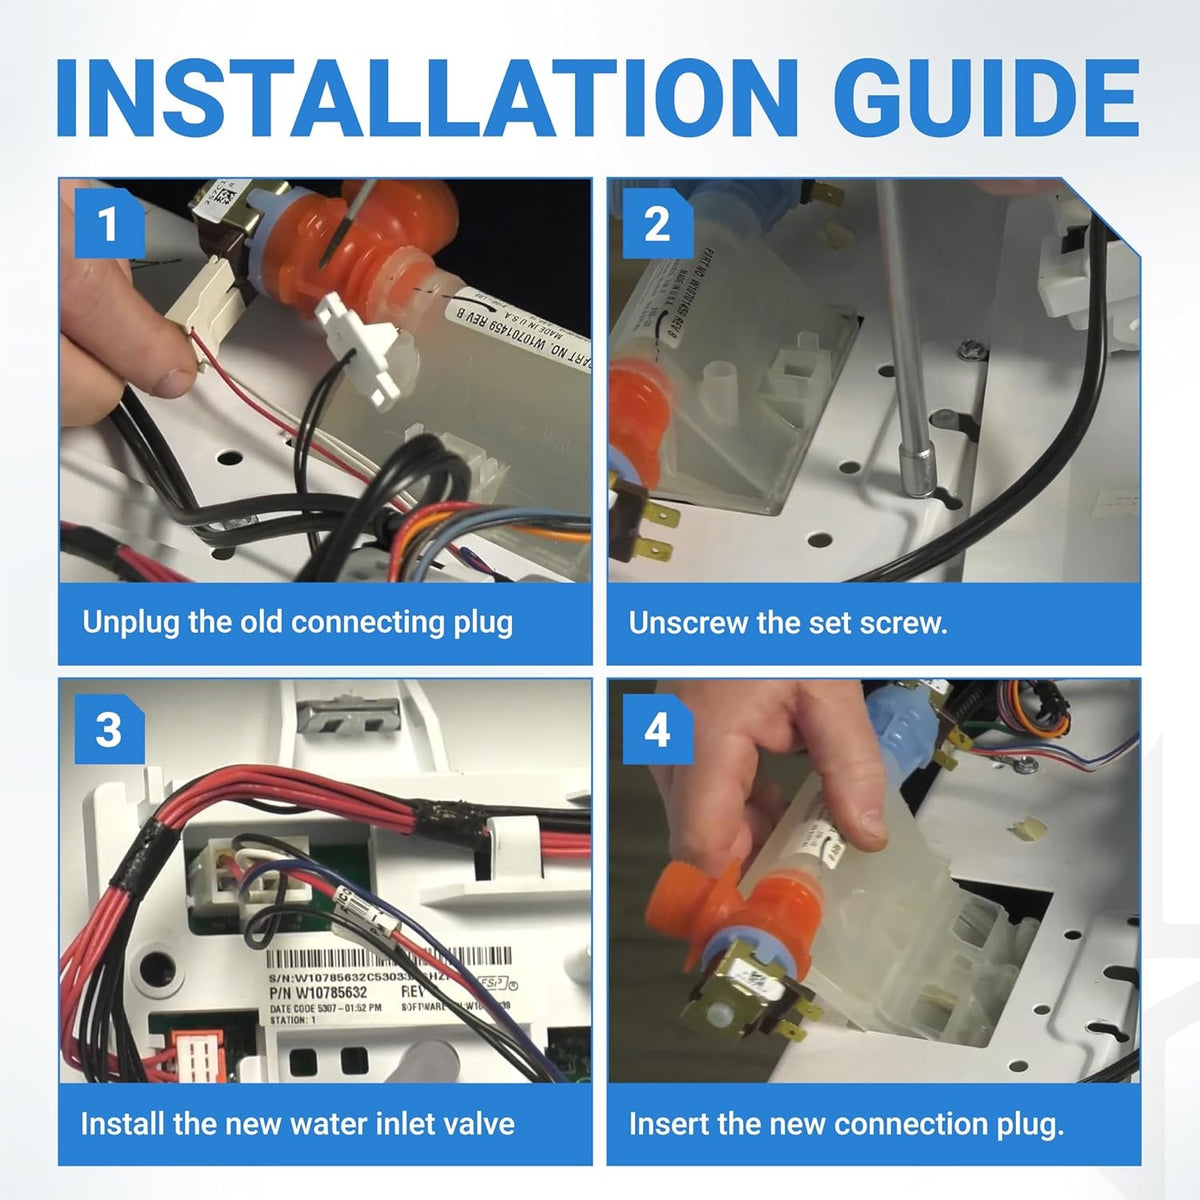
If water pools in the drum overnight, the water inlet valve is likely failing. Mineral buildup or worn solenoids prevent it from sealing completely.
To replace the valve, unplug the machine and shut off water. Remove the top or front panel depending on your model. Locate the valve at the rear top and disconnect the red hot and blue cold hoses.
Unplug the wiring harness, which is usually red, white, and blue wires. Remove mounting screws and the hose clamp holding the inlet tube.
Install the new valve, matching the model number exactly. Reconnect hoses and wires. Flush water lines before reattaching to prevent debris from clogging the new valve.
This repair takes under an hour and costs around $40 for the part.
Clear Drain Pump and Filter
A clogged pump filter causes water to back up and leak from the bottom. Locate the service panel at the front base.
Place a towel and bucket underneath, then open the panel. Turn the filter counterclockwise to remove. Expect water to spill, so have your container ready.
Clean out lint, hair, and debris. Reinstall tightly because loose filters cause instant overflow.
If the pump housing is cracked or clamps are loose, replace the entire pump. This repair involves accessing the machine is interior. If you are uncomfortable, call a technician.
Access Internal Hoses and Clamps
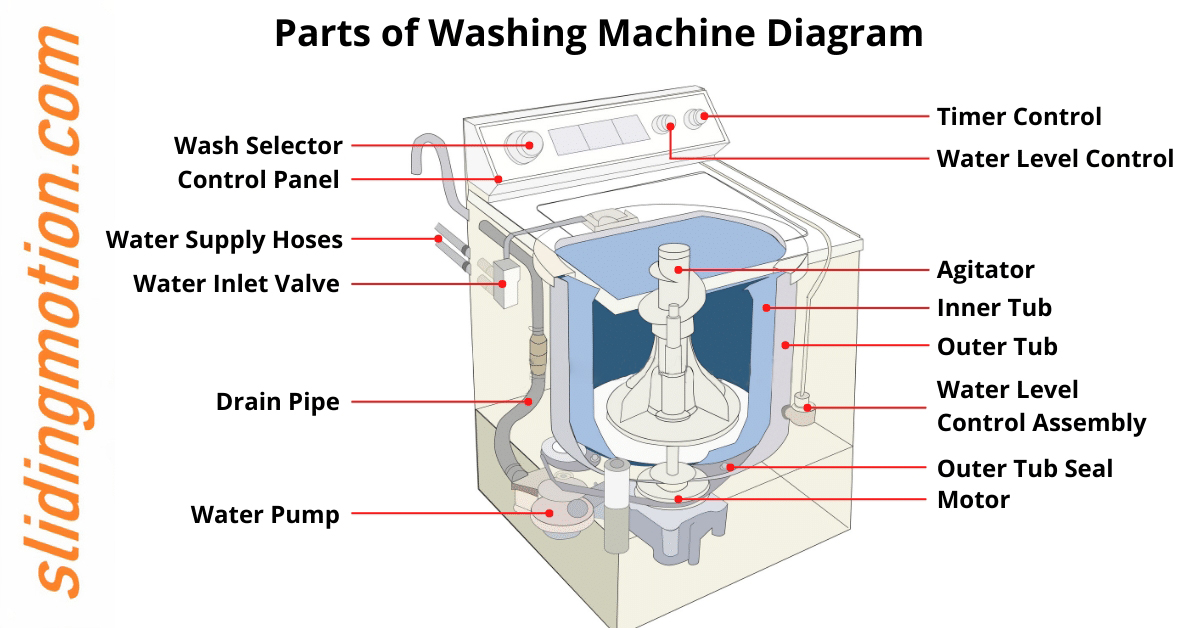
Some leaks come from internal hoses not visible externally. These connect the tub, pump, and dispenser.
To inspect these components, unplug the machine. Remove the top panel by sliding it back and lifting. Release brass spring tabs and base clips to remove the main cabinet.
Shine a flashlight to check for dampness or splitting hoses. A common failure point is the water return hose, which directs water during spin cycles. Cracks develop from repeated flexing.
Use an adjustable wrench to compress the clamp, remove the old hose, and slide on a new one. Ensure no kinks and reassemble carefully. Replacement hoses cost approximately $20, and this repair takes under 30 minutes for accessible models.
When to Call a Professional
Certain issues require professional expertise. Cracks in the outer tub cause leaks during fill or wash cycles. This requires full disassembly and is not a DIY-friendly repair. Contact a qualified technician.
A malfunctioning electronic control board can mismanage water flow. It may open the inlet valve at the wrong time, causing leaks. These issues demand advanced diagnostics.
If you have ruled out all other causes and the leak persists, the board or tub is likely at fault. It is time to call in a pro.
A faulty pressure switch can cause the machine to overfill, leading to water spilling from the detector drawer or door. Due to its electrical nature and integration with the control system, professional replacement is recommended unless you have experience with appliance electronics.
Prevent Future Washing Machine Leaks
Prevention is cheaper than repair. Inspect hoses every six months and replace every five years.
Use HE detergent only in HE machines and measure carefully. Clean the door seal and drawer monthly to prevent buildup.
Run cleaning cycles with vinegar or washer cleaner every one to two months. Re-level the machine if it vibrates or walks.
Turn off water valves during vacations or long absences. Avoid overloading because this stresses the drum, seal, and suspension.
Frequently Asked Questions About Washing Machine Leaks
Why is my washing machine leaking water from the bottom?
Bottom leaks typically indicate a failing drain pump, cracked tub, loose internal hose clamps, or a leaking water return hose. Unplug the machine and use a flashlight to inspect underneath. If water originates from the pump area, replace the pump. If from the tub, professional repair is needed.
What causes a washing machine to leak when it is not running?
This almost always points to a failing water inlet valve. The valve cannot seal completely, allowing water to seep through even when the machine is off. Replace the inlet valve immediately. Also check water pressure, which should be below 80 psi, and ensure the drain hose is not inserted too far into the standpipe.
How do I know if my washing machine leak is from too much detergent?
If suds or water overflow from the detergent drawer or front door, excess detergent is likely the culprit. Place a small, freshly washed item in a bowl of clean water. If the water becomes soapy, you are using too much detergent. Reduce the amount and always use HE detergent for HE washers.
Can I fix a leaking washing machine door seal myself?
Yes, you can clean or replace a door seal yourself. Clean the gasket with vinegar to remove mold and residue. If the seal is torn, deformed, or cracked, replace it with a model-specific part. Tighten loose door hinges to ensure proper alignment.
How often should I replace washing machine hoses?
Inspect washing machine hoses every six months for wear, bulges, or cracks. Replace rubber hoses every five years regardless of appearance. Upgrade to stainless steel braided hoses for better durability and longer lifespan.
Should I repair or replace a leaking washing machine?
If the leak comes from external components like hoses, the door seal, or the drain pump, repair is usually worthwhile. If the outer tub is cracked or the control board is malfunctioning, replacement may be more cost-effective. Consider the age of the machine and the cost of parts versus a new unit.
Key Takeaways for Fixing Washing Machine Leaks
Fixing a leaking washing machine starts with safety, then smart diagnosis. Unplug the machine and shut off water supplies before any inspection.
By tracking when and where the leak happens, you can quickly narrow down the cause. Leaks during filling point to inlet hoses or valves. Leaks during drain point to pump or hose issues. Leaks when idle almost always mean a faulty inlet valve.
Most fixes like replacing hoses, cleaning filters, or swapping a door seal are doable at home. But for internal electrical issues, tub cracks, or control board problems, professional help is safer and more effective. Stay proactive with regular maintenance, and your washer will run leak-free for years.



