
Is your washing machine taking forever to fill? Does it pause mid-cycle or display a water-related error code like “IE”? The culprit is often not a broken part, but a clogged water inlet valve. Over time, mineral deposits, rust, sand, and sediment build up in the valve’s internal and external filters, restricting water flow. The good news? In most cases, you do not need to replace the valve. A thorough cleaning can restore full water pressure and prevent costly repairs.
Cleaning the water inlet valve is a straightforward DIY task that takes less than 30 minutes and requires only basic tools. This guide walks you through every step, from diagnosing a clogged valve to safely removing, cleaning, and reassembling the components. You will learn how to access hidden internal filters, dissolve tough scale with vinegar, and avoid common mistakes that lead to leaks or damage.
Diagnose a Clogged Inlet Valve
:max_bytes(150000):strip_icc()/repair-washing-machine-water-inlet-valve-1824606-hero-2493b12f2d0f46e98823bad7e5b0cd1d.jpg)
Before disassembling anything, confirm the issue is a blocked valve and not a supply or electrical problem. A clogged inlet valve typically causes slow or incomplete filling, especially on one temperature setting. If both hot and cold fill slowly, the issue is likely sediment in both lines or a system-wide pressure problem.
Recognize Common Symptoms
Look for these telltale signs of a restricted water inlet valve:
- Slow fill times: The drum takes several minutes to fill instead of 1–2
- Trickle flow: Water enters in a weak stream, not a steady rush
- Cycle pauses: The machine stops mid-wash waiting for water
- Error codes: LG models show “IE” (Inlet Error); others may flash fill indicators
- One-temperature failure: Only hot or cold water fails to fill, which points to a single valve side blockage
Rule Out Other Causes
Eliminate simpler issues first. Ensure both hot and cold water supply valves are fully open. Check household water pressure, as low pressure affects all fixtures. Inspect supply hoses for kinks or internal collapse. Listen for a faint click when starting a cycle, as no sound may indicate a failed solenoid. If water still trickles in after verifying these, the inlet valve filters are likely clogged.
Gather Tools and Supplies
Having the right tools ensures a safe, efficient cleaning without damaging parts. Most items are common household tools, but a few are specific to this repair.
Essential Tools
You will need an adjustable wrench or channel locks to loosen and tighten hose nuts. Needle-nose pliers are essential for gripping and removing small friction-fit screens. Have a bucket or shallow pan ready to catch residual water during disconnection. A soft-bristled brush, such as an old toothbrush, works perfectly for scrubbing screens. Q-tips or a fine pin help clear tiny internal passages in the valve body.
Cleaning Solutions
White vinegar is best for dissolving calcium, lime, and mineral scale. Dish soap and warm water remove grease and organic debris. A baking soda solution, mixed with 1–2 tablespoons per quart of hot water, loosens stubborn buildup. Toilet bowl cleaner should be used sparingly and only for extreme clogs. Never mix it with other chemicals.
Safety Gear
Rubber gloves protect your hands from grime and harsh cleaners. Safety goggles prevent chemical splashes or debris from entering your eyes. Absorbent towels placed under connections catch drips and protect your flooring.
Shut Off Power and Water Supply
Safety comes first. Working on a pressurized or live electrical system risks shock, leaks, or flooding.
Disconnect Power
Unplug the washing machine from the wall outlet. Do not rely on turning it off at the control panel, as this does not cut power to internal components.
Turn Off Water Valves
Locate the hot and cold water shutoff valves behind the machine. Turn both clockwise until fully closed. Most are lever-style; rotate 90 degrees to shut.
Relieve Line Pressure
Place a bucket under the hose connections. Slowly loosen the hose nuts with a wrench to release any remaining water. Keep towels handy, as some water will spill.
Move Machine for Access
Pull the washer away from the wall, leaving enough space to work comfortably. Be careful not to strain the hoses or damage flooring.
Remove and Clean External Screens

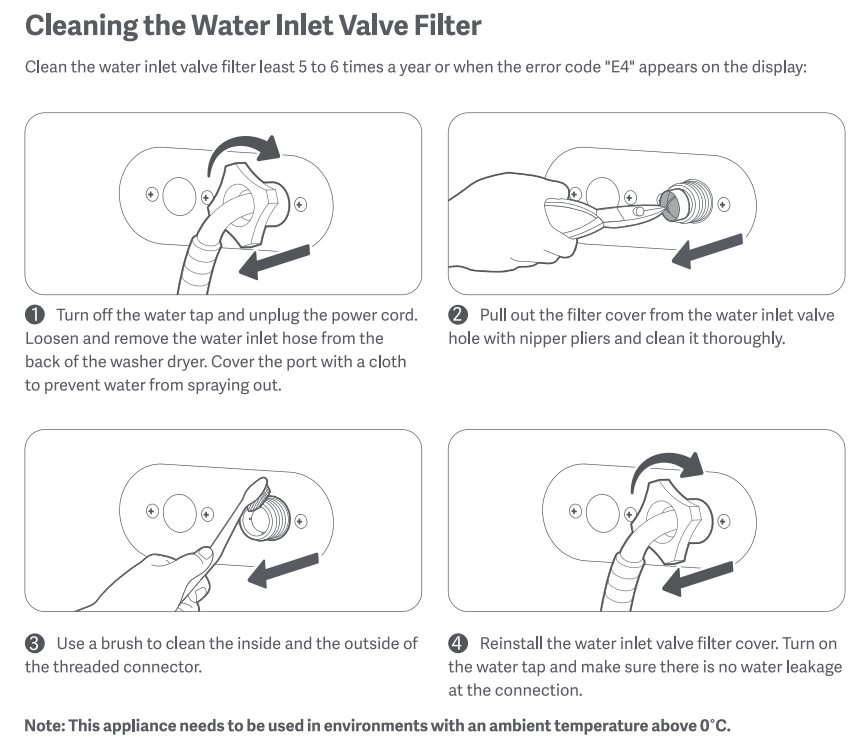
The most common clog site is the external filter screen located where the water hoses connect to the machine. These small mesh filters trap debris before it enters the valve.
Disconnect Supply Hoses
Use an adjustable wrench to loosen the hot (red/orange ring) and cold (blue ring) hose nuts. Remove both hoses and set them aside.
Locate the Filter Screens
Inspect the inlet ports on the back of the washer. Inside each port, you will see a small circular screen, metal or plastic, pressed into place.
Extract Screens with Pliers
Grip the edge of each screen with needle-nose pliers. Pull straight out. They are friction-fit, not threaded. If stuck, wiggle gently. Do not twist or force, as this can damage the screen.
Inspect for Buildup
Hold screens up to light. Look for white crust (mineral scale), rust, sand, or silt. In hard water areas, they may be completely blocked.
Soak and Scrub Screens
For light debris, rinse under running water and scrub with a toothbrush. For mineral deposits, soak in white vinegar for 2–4 hours, then scrub afterward. For heavy buildup, use a baking soda paste or a drop of toilet bowl cleaner, then rinse thoroughly after. Always wear gloves when using toilet bowl cleaner.
Reinstall Clean Screens
Push each screen firmly back into its port until seated. Ensure they sit flush and do not wobble. Misaligned screens can cause leaks or poor flow.
Clean Internal Valve Passages

If external screens are clean but fill problems persist, the blockage is likely inside the valve body. This is especially common in Whirlpool, Maytag, and some LG models.
Access the Valve Assembly
Remove the washer’s top or rear panel. Consult your manual for specific instructions. The water inlet valve is usually mounted at the back, with two solenoid coils and water lines attached.
Identify Internal Filters
Look at the water entry points on the valve body. Some models have tiny holes or a secondary mesh filter in the center, similar to a faucet aerator.
Clear Clogged Passages
Use a Q-tip to wipe away soft deposits. Gently poke holes with a fine pin or paperclip to dislodge sand or grit. Do not use sharp tools, as enlarging holes can ruin flow regulation and damage the valve.
Flush the Valve
If possible, disconnect the valve and flush it backward with water from a sink sprayer. This pushes out trapped debris from internal channels.
Inspect and Maintain Hoses and O-Rings

While the system is open, take the opportunity to inspect other components that affect water flow and leak risk.
Check Hose Condition
Look inside the hose ends for cracks, bulges, or loose rubber particles. Replace hoses every 3–5 years, even if they look fine. Old hoses can degrade internally and shed particles that clog valves.
Clean Hose Threads
Wipe the threaded ends with a damp cloth to remove grit that can damage seals.
Replace Worn O-Rings
Inspect rubber O-rings on hose connectors or valve inlets. If cracked, flattened, or brittle, replace them. Lubricate new ones lightly with plumber’s grease.
Reassemble and Test the System
Proper reassembly prevents leaks and ensures optimal performance.
Reconnect Supply Hoses
Attach hot and cold hoses to their correct ports. Hand-tighten first, then use a wrench to snug. Do not over-tighten, as this can crack plastic fittings.
Restore Water and Power
Slowly turn on both supply valves. Watch connections for drips. Tighten slightly if needed. Plug the machine back in.
Run a Test Cycle
Start a short wash cycle with no clothes. Monitor fill speed. Water should rush in within seconds. If flow is still slow, the valve may need replacement.
Verify No Leaks
Check all connections during the fill phase. Even a small drip can lead to water damage over time.
Prevent Future Clogs with Maintenance
Regular upkeep keeps your inlet valve clean and extends the life of your washing machine.
Clean Screens Every 6–12 Months
For normal water conditions, clean annually. For hard water, clean every 6 months. For well water, clean every 3–6 months due to high sediment content.
Install Inline Filters
Add a 100-mesh sediment filter to your washing machine supply lines. These inexpensive devices catch debris before it reaches the valve.
Use a Water Softener
In hard water areas, softened water drastically reduces scale buildup in valves, hoses, and drums.
Replace Hoses Proactively
Upgrade to braided stainless steel hoses rated for washing machines. Replace every 5 years, even if no issues appear.
When to Replace the Inlet Valve
Cleaning resolves 80% of slow-fill issues. But if problems persist, the valve may be faulty.
Signs You Need a New Valve
Watch for these indicators. No water flow after cleaning filters. One side fills while the other does not, despite clean screens. The valve makes a buzzing sound but will not open. There are visible cracks or leaks in the valve body.
How to Test Valve Flow
For a definitive check, remove the valve and connect it to a water source such as a laundry tub. Energize the solenoid using insulated connectors and a GFCI outlet. Measure output. Two gallons in 60 seconds (2 GPM) is normal. If flow is below 1.5 GPM, replace the valve.
Frequently Asked Questions About Cleaning Water Inlet Valves
How do I know if my water inlet valve is clogged?
The most common signs are slow fill times, trickle flow instead of a steady stream, cycle pauses waiting for water, and error codes like LG’s “IE.” If both hot and cold water fill slowly, the issue is likely in both lines or the overall water pressure.
Can I clean the inlet valve without removing it?
Yes, you can clean the external filter screens where the hoses connect without removing the valve. Simply disconnect the hoses, pull out the screens with pliers, and soak them in vinegar. For internal blockages, you will need to access the valve body through the rear or top panel.
What is the best cleaning solution for mineral deposits?
White vinegar is the best and safest option. Soak screens in vinegar for 2–4 hours to dissolve calcium and scale. For stubborn buildup, a baking soda solution works well. Only use toilet bowl cleaner for severe clogs, and always wear gloves and rinse thoroughly.
How often should I clean my washing machine inlet valve?
Clean inlet screens every 12 months under normal water conditions. Increase to every 6 months in hard water areas. If you use well water, clean every 3–6 months due to higher sediment content.
Will cleaning the valve fix error codes like “IE”?
Yes, in most cases. The LG “IE” error code specifically indicates a water inlet problem, often caused by restricted flow. Cleaning the screens and internal passages typically clears the error. If the code persists after cleaning, check water pressure or consider replacing the valve.
Key Takeaways for Cleaning Your Water Inlet Valve
Cleaning your washing machine’s water inlet valve is a simple, effective fix for slow fills and error codes. By removing and soaking the external screens, clearing internal passages with a Q-tip or pin, and maintaining hoses and O-rings, you restore full water pressure and avoid unnecessary repairs. The process takes less than 30 minutes and requires only basic tools like an adjustable wrench, needle-nose pliers, and white vinegar.
Always shut off power and water supply before starting, and relieve line pressure by loosening hose connections. Reassemble carefully, avoiding over-tightening that can crack plastic fittings. Test with a short cycle to verify improved flow. Make inlet valve cleaning a routine every 6–12 months based on your water quality, and your washer will run faster, cleaner, and last longer.



