
Is your washing machine filling with water but refusing to spin? Does it hum without moving, or trip your circuit breaker every time you start a cycle? These frustrating symptoms often point to motor failure, but before you spend hundreds on a replacement, you need to know how to check washing machine motor components properly. This guide walks you through step-by-step tests using basic tools like a multimeter, helping you determine whether the motor is truly faulty or if another part is to blame.
By the end of this article, you’ll know exactly how to test winding resistance, check for ground faults, inspect carbon brushes, and identify common misdiagnoses that could save you from unnecessary repairs.
Preparing Your Washer for Motor Inspection
Before touching any internal components, you must disconnect power completely. Unplug the washing machine from the wall outlet. If the outlet isn’t accessible, turn off the corresponding circuit breaker at your home’s electrical panel. Never rely on the control panel being in the “off” position.
Next, shut off the hot and cold water supply valves located behind the washer. Disconnect the inlet hoses and place a towel underneath to catch any residual water. Most rear-mounted motors require tipping the washer backward slightly, so protect your floor with cardboard and ensure the machine won’t roll or fall during inspection.
Locating the Motor for Testing
Motor access varies depending on your washer type. For front-loaders, remove the rear service panel (usually held by six to eight screws) to expose the motor, drive belt, and pump. This is common for LG and Samsung direct-drive models.
For top-loaders from Whirlpool, Maytag, or Kenmore, you’ll typically remove the front lower kick plate or the top control panel. Look for retaining clips or screws under the top lip. Once removed, you’ll see the motor positioned beneath the drum.
Many machines have a belt shield blocking motor access. Use a 5/16-inch socket wrench to remove the bolts securing this cover.
Removing the Drive Belt Safely
The drive belt connects the motor to the drum pulley, and it must be removed to test motor rotation and resistance accurately. Gently slide the belt off the motor pulley. Don’t cut it unless replacement is already planned, as a loose belt can cause similar symptoms to motor failure.
While the belt is off, inspect it carefully for cracks, fraying, or glazing (shiny spots indicating wear). A worn belt slips and reduces spin efficiency. Replacement belts typically cost under $30.
Testing for Mechanical Binding
A motor with seized bearings or internal damage won’t spin, even with perfect electrical supply. This quick mechanical test reveals faults that electrical testing alone won’t catch.
With the belt removed, try rotating the motor pulley or shaft by hand. If it spins smoothly and freely with no resistance, proceed to electrical tests. If the shaft is stiff, jerky, or won’t turn at all, the bearings are likely shot or the rotor is jammed. Listen for grinding or scraping noises, which indicate internal metal contact. A wobbly or loose pulley suggests worn end bearings, meaning failure is imminent.
If the shaft won’t turn freely, the motor is mechanically dead and no further testing is needed.
Testing Motor Windings with a Multimeter
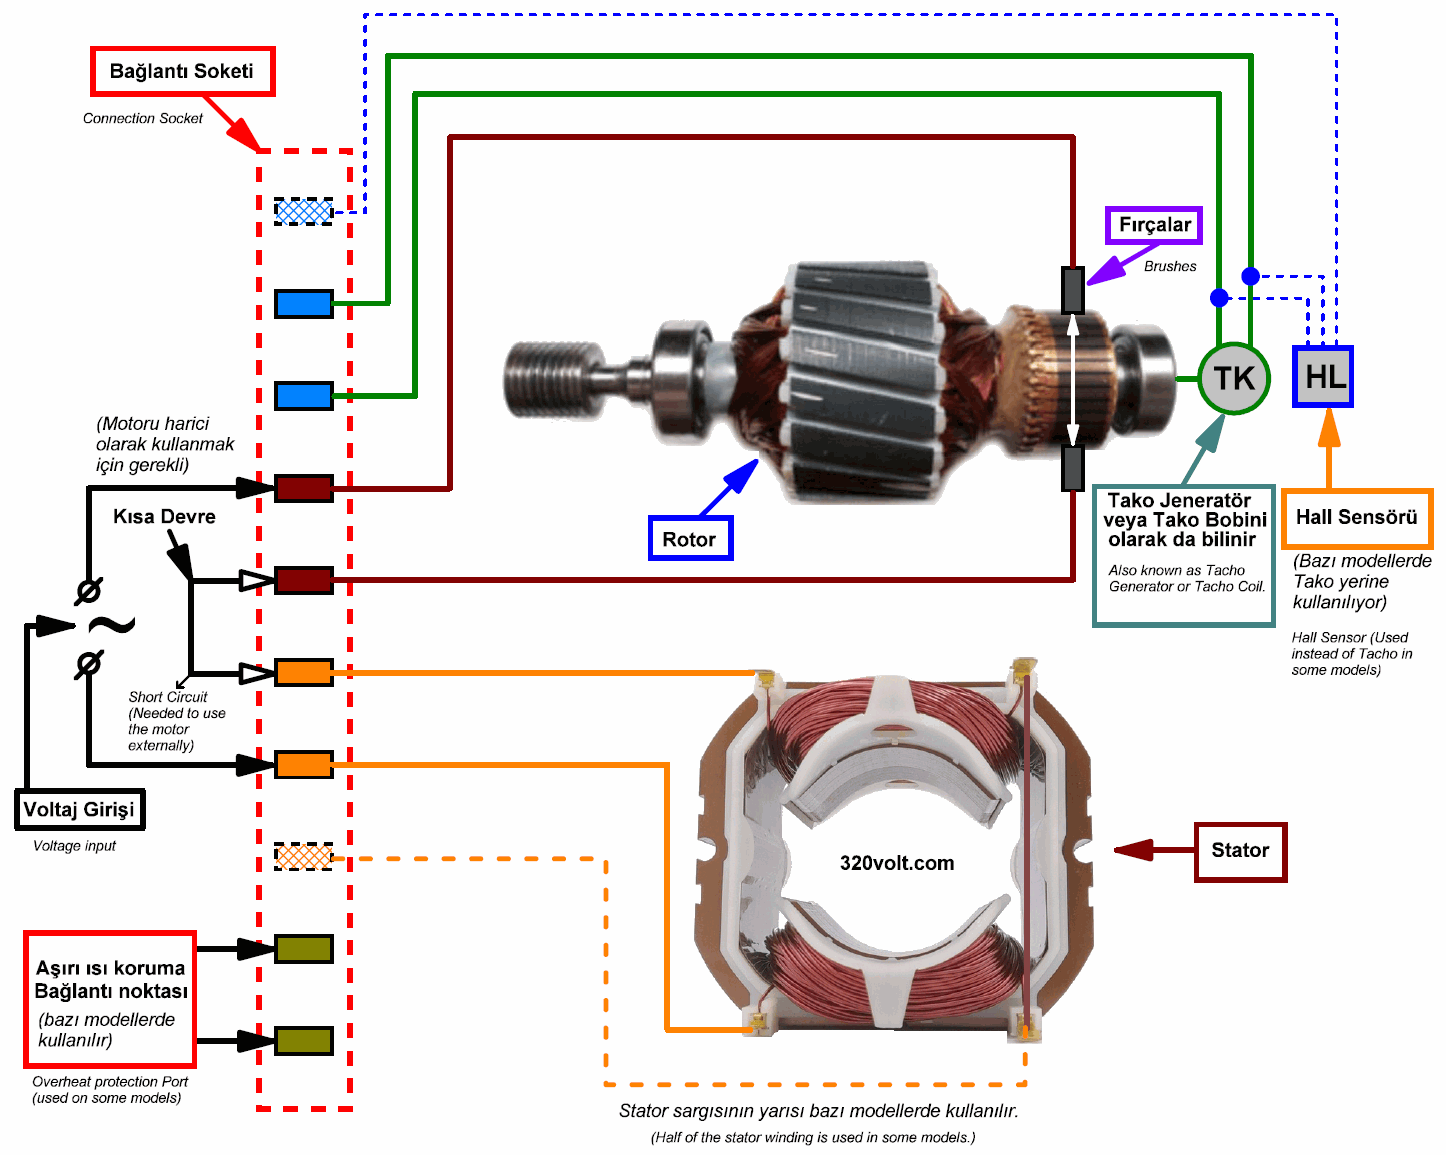
Electrical failure is one of the most common motor problems. A digital multimeter (available for $15 to $25) lets you check winding continuity, which is the core indicator of motor health.
Set your multimeter to the lowest resistance range (200 ohms). Touch the probes together to confirm it reads near zero, verifying tool accuracy. Disconnect the motor wires from the harness to ensure accurate readings.
For three-wire motors (common, start, and run terminals), measure between these pairs. Start to Common should read 100 to 300 ohms. Run to Common should read 50 to 150 ohms. Start to Run should equal the sum of those two values. For multi-wire field motors, test pairs like Black-White and White-Yellow, expecting 1.0 to 7.0 ohms per pair.
Infinite resistance (显示OL) indicates an open winding and a burned-out motor requiring replacement. Zero ohms indicates a shorted winding, which is dangerous and requires immediate replacement. Readings within specification mean the windings are intact.
Checking for Ground Faults

A grounded motor leaks electricity to the chassis, which trips breakers and poses serious shock risks. This test is essential for safety.
Set the multimeter to Continuity mode or use the highest Ohm setting. Place one probe on a bare metal part of the motor frame (clean off any paint if needed). Touch the other probe to every wire terminal individually.
No beep and infinite reading indicates good insulation and safe operation. A beep or low resistance reading indicates a ground fault, meaning the motor is unsafe and must be replaced immediately. A beep on the green ground wire terminal is normal and expected.
Testing the Speed Sensor

Modern washers use a tachometer (speed sensor) to monitor drum RPM. A failed sensor mimics motor problems, causing erratic spinning or stopping mid-cycle.
Locate the two red wires connecting to the sensor at the motor’s end. Set your multimeter to Ohms and connect probes to both red terminals. A reading of 70 to 71 ohms (or any finite value) means the sensor works properly. Zero ohms indicates a shorted sensor. Infinite (OL) indicates an open circuit and a dead sensor.
If the sensor fails, replace it only—the motor may still be perfectly good.
Inspecting Carbon Brushes
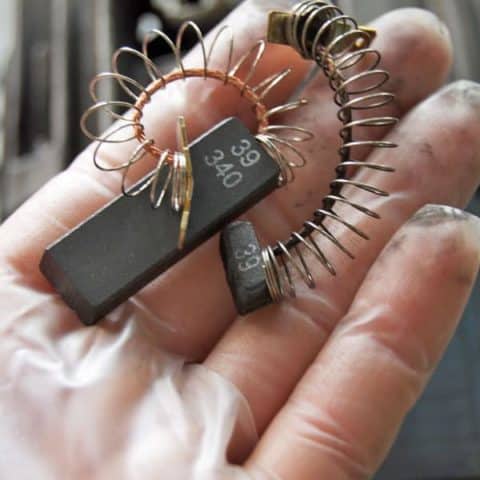
Carbon brushes wear down over time. When they become too short, they spark, splutter, and fail to power the motor effectively.
Unscrew the two brush caps on the motor housing and pull out each brush assembly. Check the remaining carbon block length. More than 15 millimeters is good. Ten to 15 millimeters means you should monitor and prepare for replacement. Less than 10 millimeters requires replacing the brushes.
Use the multimeter on Ohms mode to test the brush circuit. Connect to the blue and purple terminals (common colors). One to seven ohms is normal. Infinite or very high readings indicate poor contact or a broken lead, requiring brush replacement.
Identifying Burn Damage Inside the Motor
If tests are inconclusive, visually inspect the motor internals. Look for blackened or charred spots on the copper windings. Check for warped or melted insulation. If you smell burning when near the coils, that’s a definite indicator of thermal damage.
Any thermal damage means the motor is permanently failed and cannot be repaired. Inspect the commutator (the copper segments where brushes contact). Smooth and clean is good. Pitted, grooved, or covered in carbon dust indicates wear that may require cleaning or motor replacement.
Avoiding Common Misdiagnoses
Many problems diagnosed as motor failure aren’t motor issues at all. A failed shift actuator in Whirlpool, Maytag, and Kenmore top-loaders stops spinning and agitating while the motor tests perfectly fine. Watch for error code F7 E5 or symptoms like filling water but refusing to spin or agitate. The fix costs around $22, much cheaper than a $200 motor.
Check the lid or door switch as well. If the washer thinks the door is open, it disables the motor entirely. Bypass the switch temporarily (with power off, jump the wires together). If the motor runs, replace the switch.
Verify the drive belt and capacitor too. A broken belt prevents drum spinning. A failed capacitor causes a loud hum but no start. Test with a multimeter or replace if swollen.
Decision Matrix: When to Replace the Motor
Use this summary to guide your next steps after all tests are complete. If the motor shaft won’t spin or grinding noise is present, replace the motor. Infinite or zero winding resistance means replace the motor. Ground fault detected means replace the motor. If all tests pass but no spin occurs, check the control board, actuator, or switch instead. Brushes under 10 millimeters mean replace brushes only. A speed sensor showing 0 or OL means replace the sensor, not the motor.
If multiple tests fail, the motor is dead. Purchase an OEM or high-quality aftermarket unit matching your model number.
Reinstalling and Testing After Replacement
After replacing the motor, transfer all mounting hardware including shims, rubber isolators, and brackets from the old motor to the new one. These components ensure proper alignment and reduce vibration.
Reconnect wires exactly as they were attached. Double-check every connection—a reversed wire can damage the new motor. Secure the ground screw firmly.
Reinstall the belt and all panels. Slide the belt onto the pulleys, ensuring it’s seated properly. Restore water and power, then run a spin cycle with no clothes. Listen for smooth acceleration, no grinding or buzzing, and full RPM reached. If all is quiet and spinning strong, you’ve successfully fixed the problem.
Extending Motor Life with Proper Maintenance
Prevent future failures by cleaning your lint filter regularly. Even front-loaders have filters, and clogs trap heat, overheating the motor. Don’t overload the machine—excessive laundry strains the motor and bearings. Follow load guidelines in your owner’s manual.
Level your washer using a bubble level. An unbalanced machine vibrates excessively, damaging mounts and the motor shaft. Address unusual noises early—a slight hum or thump today could mean seized bearings tomorrow.
Key Takeaways for Checking Your Washing Machine Motor
Diagnosing a washing machine motor doesn’t require a professional technician. With a multimeter, basic tools, and systematic testing, you can confidently determine whether the motor is faulty or another component is causing the problem. Always disconnect power completely before inspection, test mechanically first, then electrically, and never skip checking the shift actuator on Whirlpool-family models. Most importantly, know when a repair is worth it and when replacement makes more sense. A properly maintained motor lasts 8 to 10 years, and with the right care, yours can too.
Frequently Asked Questions About Checking Washing Machine Motors
How do I know if my washing machine motor is bad?
Common signs include the washer filling with water but not spinning, a humming sound without movement, grinding or squealing noises, circuit breaker tripping, or a burning smell. Use a multimeter to test winding resistance and check for ground faults to confirm.
Can I test a washing machine motor without removing it?
You can perform some tests with the motor in place, but removing it provides more accurate results. You’ll need to access the motor, remove the drive belt, and disconnect wires for proper testing.
What does a reading of infinite ohms mean on a motor test?
Infinite resistance (显示OL) indicates an open circuit, meaning the winding is broken or burned out. This confirms the motor is failed and needs replacement.
How much does it cost to replace a washing machine motor?
Replacement motors range from $150 to $300 depending on your model and brand. However, sometimes only carbon brushes ($10 to $30) or a speed sensor ($20 to $50) need replacement, saving significant money.
What’s the difference between a motor problem and a shift actuator problem?
A motor problem affects all functions (agitate and spin). A shift actuator problem specifically prevents the transition between agitation and spin modes. Check for error code F7 E5 on Whirlpool models—it indicates a failed actuator, not a bad motor.



