
If your clothes are coming out less fresh than they used to, or you’ve noticed a musty smell lingering after every cycle, your washing machine filter might be the culprit. The filter traps lint, hair, coins, and debris before they can damage your drain pump, but when it gets clogged, everything from drainage to your laundry quality suffers. Most experts recommend cleaning your washing machine filter every 1 to 3 months, though the right schedule for your home depends on how often you do laundry, whether you have pets, and your water quality. This guide breaks down exactly when to clean, how to do it, and what signs indicate your filter needs attention right now.
Filter Cleaning Frequency Based on Your Household
:max_bytes(150000):strip_icc()/house-cleaning-schedule-for-every-day-3129149-v3-9d109dd0536a4ec2a7bac5cac688c852.png)
Standard Cleaning Schedule for Average Use
For most households running typical laundry loads, cleaning the filter every 2 to 3 months keeps the machine running smoothly. This quarterly schedule prevents lint, hair, and small debris from building up enough to restrict water flow or strain the pump. Even if your machine seems to be working fine, sticking to this routine helps maintain efficiency and prevents hidden mold growth inside the drum and hoses.
When to Clean More Frequently
Certain household situations require more attention. You should clean the filter every 4 to 6 weeks if your household runs daily laundry loads, has pets that shed heavily, or frequently washes bulky items like towels, blankets, and bedding. Pet hair and fabric fibers from large items form dense clumps that clog filters much faster than everyday clothing. Monthly cleaning ensures these materials do not reach the pump, where they can cause permanent damage and expensive repairs.
Hard Water Areas Need Extra Attention
If your home has hard water, mineral deposits can coat the filter mesh and housing, reducing water flow even when the filter appears clean. In regions with hard water, inspect the filter every 6 weeks and use a vinegar soak during cleaning to dissolve scale buildup and restore optimal performance. This extra step prevents the reduced efficiency that comes with mineral restriction.
Warning Signs Your Filter Needs Immediate Cleaning
Slow or Incomplete Drainage
Water remaining in the drum after the spin cycle completes is one of the most obvious signs of a clogged filter. A blocked filter restricts outflow, forcing the pump to work harder than normal. This delay is not just inconvenient, it can trigger error codes on digital displays or lead to motor burnout over time if the problem persists.
Lint and Residue on Clean Clothes
When the filter is full, trapped debris bypasses the trap and sticks to wet laundry during the rinse cycle. If you are finding lint balls, hair, or a gray film on clothes after washing, the filter is not capturing particles effectively and needs immediate attention. This means your laundry is not actually getting clean, despite appearing spotless.
Persistent Musty or Moldy Odors
A damp, clogged filter creates a perfect breeding ground for mold and mildew. These microorganisms thrive in trapped lint and standing water, releasing foul odors during or after washes. The smell often permeates your entire laundry room and can transfer to freshly washed clothes. Cleaning the filter eliminates the source and helps restore fresh-smelling laundry.
Unusual Noises During Drainage
Grinding, humming, or straining sounds during the drain phase often mean the pump is struggling against a blockage. While the issue could be deeper in the system, the first step is always to check and clean the filter since it is the most accessible and most common culprit.
Locating Your Washing Machine Filter
Front-Load Machine Filter Locations
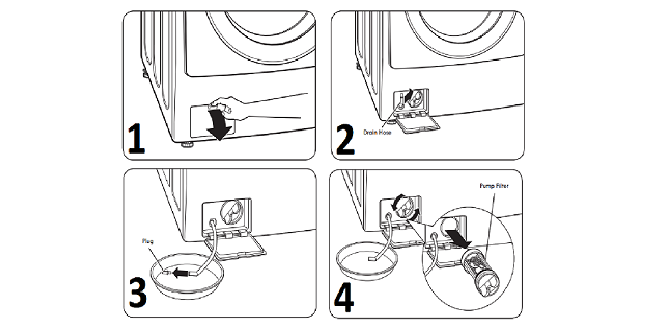
On front-load washers, the main filter is located behind a small access panel on the lower front of the machine, usually on the right side. The panel either pops off, slides down, or requires unscrewing. Behind it, you will find a twist-out cylindrical cap, which is the drain pump filter. Some models, particularly certain LG units, also have a water circulation filter hidden in the door gasket that should be checked during maintenance.
Top-Load Machine Filter Locations
In traditional top-loaders, the filter is often inside the center agitator. Remove the fabric softener cup or agitator cap to access a cylindrical lint trap with small pinholes. Other models have a removable screen along the top rim of the drum that simply lifts out for cleaning. High-Efficiency (HE) top-loaders use a self-cleaning pump system, but large objects like coins or hair ties can still jam the pump, so check the bottom front access panel if drainage problems occur.
Step-by-Step Filter Cleaning Process
Preparing Safely Before You Start
Before beginning, unplug the machine to prevent electrical hazards. Place thick towels or a shallow tray under the filter area since up to 2 cups of water may spill out during the process. For inlet filter cleaning, turn off the water supply valves at the wall to avoid leaks. Gather your tools including a soft brush or old toothbrush, long-nosed pliers for stubborn debris, and a cleaning solution of vinegar and water.
Draining Residual Water
Many front-loaders have a pull-out emergency drain hose located next to the filter. Remove the cap and let water flow into a bucket until it stops completely. If no emergency hose exists, open the filter slowly and allow water to drain into your prepared towels. Never force the filter out while water is still inside the chamber.
Removing and Inspecting the Filter
Twist the filter cap counterclockwise to remove it. Pull it out gently and inspect what you find. Common debris includes lint, hair, coins, buttons, and occasionally small socks. Use long-nosed pliers to extract stubborn items without damaging the filter mesh or plastic components.
Deep Cleaning the Filter
Rinse the filter under warm running water and scrub with a soft brush or old toothbrush. For heavy buildup, soak it for 10 minutes in a mixture of 1 cup white vinegar, hot water, and a few drops of dish soap. This dissolves soap scum, grease, and mineral deposits that water alone cannot remove.
Cleaning the Filter Housing
Do not skip this step. Wipe out the filter cavity with a damp cloth because debris often sticks to the walls and rubber seal, causing odors even with a clean filter. Check that the impeller spins freely if it is visible. A clogged housing defeats the entire purpose of cleaning the filter.
Reinstalling Correctly
Slide the clean filter back into the housing and twist clockwise until snug. Avoid over-tightening, which can crack the plastic housing or damage the rubber seal. Reattach the emergency hose if used, close the panel, and plug the machine back in.
Cleaning Other Machine Filters

Inlet Water Filters
Turn off the water supply and disconnect the inlet hose from the back of the machine. Remove the mesh screen from the connection point and rinse it under running water to clear sediment and mineral buildup. Reinstall the screen and reconnect the hose, then turn the water back on and check for leaks at the connection point.
Water Circulation Filter in Door Gasket
Pull back the rubber door seal and look for a small mesh trap in the folds. Remove debris by hand and wipe the area with a vinegar-dampened cloth. This filter prevents gunk from recirculating during wash cycles and should be checked every few months.
Monthly Drum Maintenance
While cleaning the filter, remove the detergent drawer and rinse it under warm water. Wipe the drum and door seal with a microfiber cloth. Run an empty hot cycle with white vinegar or a dedicated washing machine cleaner monthly to flush internal hoses and prevent buildup.
Troubleshooting Problems After Cleaning
Machine Still Will Not Drain
If drainage fails after cleaning the filter, the clog may be in the drain hose or household plumbing. Disconnect the hose and check for blockages inside. Clear any kinks and ensure the standpipe is not clogged with debris.
No Water Enters the Drum
This often points to a clogged inlet filter or kinked supply hose. Confirm the water valves are fully open and clean the inlet screen. If the problem persists, the pressure switch or water valve may need professional inspection.
Leaking From Filter Area
A leak usually means the filter cap is not tight enough or the rubber seal is damaged. Reinstall the filter ensuring it is flush against the housing. If the gasket is cracked or worn, replace it with a new seal from the manufacturer.
Persistent Odors Remain
If smells persist after cleaning, run a second empty cleaning cycle with a dedicated washing machine cleaner. Mold may have spread to the drum or internal hoses. Wipe the door gasket weekly with a vinegar solution to prevent recurrence.
Why Filter Maintenance Saves You Money
Preventing Expensive Repairs
A clean filter reduces strain on the drain pump and motor. Replacing a pump can cost $150 to $300, and motor repairs are even more costly. Routine filter cleaning helps you avoid these expenses entirely by preventing the debris buildup that leads to mechanical failure.
Reducing Energy and Water Costs
Clogs force the machine to run longer cycles to achieve proper drainage and rinsing. A clear filter ensures efficient operation, which can cut energy use by up to 15 percent and reduce overall water waste. Over time, these savings add up significantly.
Extending Your Washer lifespan
Regular maintenance can add 3 to 5 years to your washing machine’s life. By preventing corrosion, mold, and mechanical stress, you protect your investment and delay the need for a costly replacement. Most washers last 10 to 15 years with proper care, but only 5 to 7 years without it.
Frequently Asked Questions About Washing Machine Filter Cleaning
How often should I clean my washing machine filter if I have pets?
If you have pets that shed, clean the filter every 4 to 6 weeks. Pet hair binds with lint to form dense mats that clog filters much faster than regular laundry loads. Monthly checks prevent these clumps from reaching the pump and causing damage.
Can I use bleach to clean my washing machine filter?
Avoid bleach unless your owner’s manual specifically recommends it. Bleach can degrade rubber seals and plastic components over time. Stick to white vinegar, baking soda, or mild dish soap for safe and effective cleaning.
What happens if I never clean my washing machine filter?
Neglecting filter maintenance leads to slow drainage, poor wash quality, foul odors, and eventually pump or motor failure. The repair costs far exceed the 15 minutes required for routine cleaning. Clothes may also come out covered in lint and residue.
Do all washing machines have a user-cleanable filter?
Most front-loaders have an accessible filter at the bottom front. Traditional top-loaders often have filters inside the agitator. HE top-loaders may use self-cleaning systems but still have access panels for emergencies. Check your owner’s manual to confirm your model’s configuration.
Why does my washing machine smell even after cleaning the filter?
The odor may be coming from the door gasket, detergent drawer, or internal drum. Wipe the gasket weekly with vinegar, clean the detergent drawer monthly, and run an empty hot cycle with vinegar or machine cleaner to eliminate residue that causes smells.
Key Takeaways for Maintaining Your Washing Machine Filter
Cleaning your washing machine filter every 1 to 3 months is one of the simplest ways to protect your appliance and keep your laundry fresh. Adjust your schedule based on household size, pet ownership, and water hardness in your area. The process takes about 15 minutes and requires only basic tools like a toothbrush and vinegar solution. Watch for warning signs like slow drainage, lint on clothes, or musty odors, and address them immediately rather than waiting for your next scheduled cleaning. With consistent maintenance, you can extend your washer’s lifespan by several years while saving money on energy bills and costly repairs.



