
Is your washing machine shaking violently, failing to spin, or displaying unbalanced load errors? These frustrating symptoms often stem from a simple fix: calibrating the washing machine. Calibration resets the internal sensors that detect load weight, drum balance, and motor performance, which is especially critical after installation, moving, or replacing key components like the control board or motor.
Modern washers from Samsung, Whirlpool, Maytag, Kenmore, and related brands rely on precise sensor data to operate smoothly and efficiently. Without proper calibration, your machine may use too much water, vibrate excessively, or shut down mid-cycle. This guide provides step-by-step instructions for calibrating your specific washer brand and model.
Samsung Washing Machine Calibration

Samsung front-load and top-load washers use sensor-based load detection that requires calibration after installation, relocation, or part replacement. Follow the correct method based on your model control panel type.
Newer Samsung Models With Digital Display
If your Samsung washer has a modern digital screen with Start/Pause and Drum Clean buttons, follow these steps:
- Remove all clothes and close the door securely.
- Press and hold Start/Pause plus Drum Clean buttons simultaneously for 5 seconds.
- The display shows “Calibrating” or “Cb” indicator.
- The drum rotates back and forth for up to 4 minutes.
- When complete, the machine powers off automatically.
Success is confirmed when the display shows “0” or “Calibration Complete” before shutting down.
Older Samsung Models Without Drum Clean Button
For models lacking a Drum Clean button on the control panel:
- Turn the machine completely off.
- Press and hold Start/Pause plus Delay Start buttons together.
- While holding both buttons, turn the power back on.
- Continue holding until “Calibrating” appears on the display.
- Release the buttons and wait for the drum to rotate and stop.
This process takes approximately 3 minutes. The machine shuts off when calibration finishes.
Specific Samsung Model Variations
Front Load Type 1 (Temperature plus Delay End buttons):
- Empty the drum completely.
- Turn the machine off, then on again.
- Hold Temperature plus Delay End buttons for 3 seconds.
- The display shows “Cb” for calibration mode.
- Press and hold Start/Pause to begin.
- The drum rotates right and left for about 4 minutes.
- A “0” appears on completion, then the machine shuts off.
Front Load Multicontrol Models (Hand Icon Button):
- Remove all clothes from the drum.
- Turn the machine off and on.
- Hold the Additional Functions button (hand icon) for 3 seconds.
- Turn the dial to select the calibration option.
- Press the button with the “O” icon to start.
- The drum rotates clockwise and counterclockwise for approximately 3 minutes.
- The screen displays “Calibration Complete,” and the unit powers down.
Top Load Panel Model 1 (Wash Cycles plus Delay End):
- Empty all contents from the drum.
- With power on, hold Wash Cycles plus Delay End simultaneously for at least 3 seconds.
- Press Start/Pause to activate.
- The drum rotates right and left for about 4 minutes.
- A “0” appears on completion, followed by automatic shutdown.
Top Load Panel Model 2 (Water Level plus Delay End):
- Remove all contents from the drum.
- Hold Water Level plus Delay End simultaneously for at least 3 seconds.
- Press Start/Pause to activate.
- The drum rotates right and left for approximately 4 minutes.
- A “0” appears upon completion, followed by automatic shutdown.
Troubleshooting note: If calibration stops early or fails to start, recheck that transit bolts have been removed and that the machine is properly leveled. These are the most common causes of calibration failure on Samsung models.
Whirlpool, Maytag & Kenmore Calibration
Top-load washers from Whirlpool, Maytag, Kenmore, Amana, and Roper with a cycle selector knob and LED indicators require a precise dial sequence to enter calibration mode. This is especially important after replacing the motor, control board, suspension, or other major components.
Entering Diagnostic Mode (LED Method)
This universal method works on vertical modular drive (VMD) models:
- Set the selector knob to Normal (12 o’clock position).
- Rotate one full turn counterclockwise.
- Quickly rotate the knob using this sequence: 3 clicks right, 1 click left, 1 click right.
- All LEDs begin blinking to confirm entry into diagnostic mode.
You must complete this sequence within 6 seconds. If LEDs do not blink, reset by rotating one full turn counterclockwise and repeat the sequence faster.
Starting the Calibration Cycle
- Once LEDs are blinking, turn the knob 4 clicks clockwise.
- Stop when the Rinse LED lights up (this is the calibration selection).
- Press and hold Start for approximately 2 to 3 minutes.
- The machine runs an automated calibration cycle.
Success is confirmed when all LED lights turn completely off and the lid unlocks automatically.
Specific Model: Whirlpool WTW5000DWO
After replacing the washer plate and hub on this model:
- Ensure the drum is completely empty and dry.
- Follow the standard LED method described above.
- Turn the dial until the Rinse light is lit.
- Press Start and allow the cycle to complete automatically.
- Once the lid unlocks, the calibration process is complete.
This method applies to these model series:
- Kenmore: 110.2002201, 110.2110201, 110.2139201, 110.2510231, 110.2800201, 110.507201
- Maytag/Whirlpool: MVWC400XW, MVWX550XW, WTW4950XW, WTW5550XW, WTW5700XW
Calibration is mandatory after replacing the control board, motor, basket, suspension, capacitor, or shifter mechanism.
Reset vs. Calibration: Understanding the Difference
A system reset clears errors and reboots the control system, while calibration re-maps hardware sensors. Understanding when to use each procedure saves time and frustration.
Power Cycle Reset (Universal Method)
Use this to clear temporary errors before attempting calibration:
- Turn the selector knob three times counterclockwise until it stops at Normal (12 o’clock position).
- Unplug the washer from the power outlet.
- Wait exactly 2 minutes to allow capacitors to fully discharge.
- Plug the washer back in.
- Listen for a control panel chime confirming the system has rebooted.
This resets all settings to factory defaults and clears temporary glitch codes.
Lid Lift Reset (Whirlpool Family)
If standard reset fails on Whirlpool, Maytag, or Kenmore models:
- Unplug the washer and wait 2 minutes.
- Plug the washer back in.
- Within 10 seconds, lift and lower the lid exactly 6 times.
- Listen for a chime confirming successful reset entry.
This hardware reset method is model-dependent and may not work on all units.
How to Confirm Calibration Success
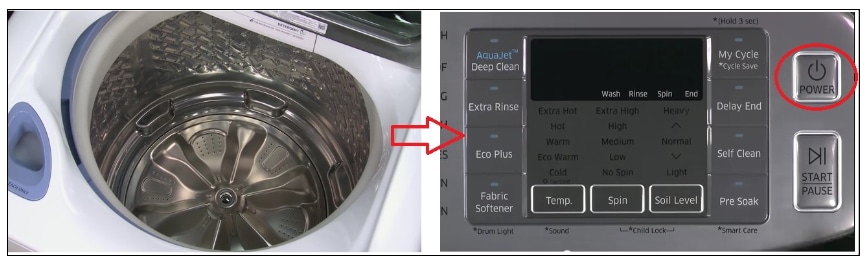
After running the calibration cycle, verify success using visual indicators and physical signs specific to your brand.
Visual Indicators by Brand
| Brand | Success Signal |
|---|---|
| Samsung | Display shows “0” or “Calibration Complete,” then powers off |
| Whirlpool/Maytag/Kenmore | All LEDs turn completely off, lid unlocks automatically |
Physical and Auditory Signs
- A distinct chime at the start or end of the cycle
- Lid lock disengages when complete
- Drum rotates smoothly left and right or clockwise and counterclockwise
- No error codes reappear after a test run
Performance Verification
Run a spin-only test cycle with no clothes to verify:
- Minimal vibration during operation
- No “Unbalanced Load” error messages
- Consistent drum speed throughout the cycle
- Correct water level adjustment in future loads
Failure signs include LEDs continuing to flash, no drum movement, persistent error codes, or the machine shutting down mid-cycle. These indicate mechanical issues beyond calibration, such as broken suspension or worn drive components.
When to Calibrate Your Washer
Calibration is not routine maintenance. It is required in specific situations to ensure proper sensor function and component communication.
Mandatory Calibration Scenarios
- New installation immediately after setup
- Machine moved to a new location
- Control board replaced
- Motor or drive assembly replaced
- Suspension or shocks replaced
- Washer basket or hub replaced
Calibration is the final step after any major repair or component replacement.
Signs You Need Calibration
- Excessive shaking during spin cycles
- “Unbalanced Load” error appearing on small loads
- Drum fails to spin or spins slowly
- Water levels seem incorrect (too much or too little)
- Noisy operation after repair or relocation
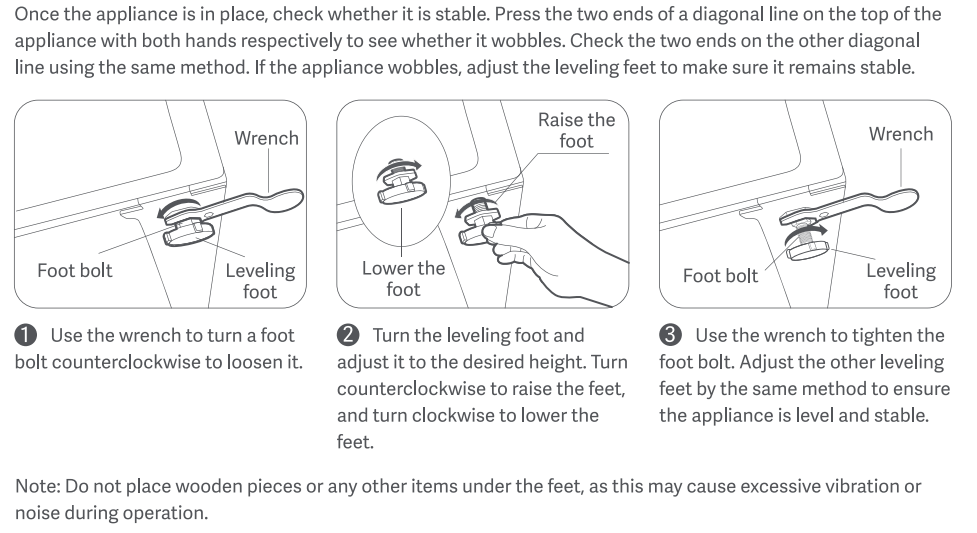
Pro tip: Always level the washer and remove transit bolts before calibrating. Calibration cannot fix physical instability caused by an unlevel machine or remaining shipping bolts.
Calibration Troubleshooting Tips
If calibration fails, these steps address the most common issues.
No Response to Button or Dial Sequence
- Check timing: The dial sequence must be fast, completed within 6 seconds.
- Reset and retry: Turn the knob fully counterclockwise and repeat the sequence.
- Verify model compatibility: Not all models support manual calibration.
Calibration Starts but Stops Early
- Transit bolts still installed: Remove all 4 bolts from the back of the machine.
- Machine not level: Adjust leveling feet until the washer is stable on all sides.
- Floor too weak: The washer needs a solid, flat surface. Avoid vinyl or wood flooring that flexes.
Error Codes Persist After Calibration
When error codes remain after successful calibration, investigate these potential hardware faults:
- Broken suspension shocks
- Worn drive belt
- Loose tub or basket
- Failed motor capacitor
- Defective control board
When to call a technician: If calibration fails twice after verifying all physical checks pass, internal component failure is probable and professional service is needed.
Final Takeaways for Washing Machine Calibration

Calibrating your washing machine takes just a few minutes but ensures optimal performance and extends component life. Always remove transit bolts before first use, level the machine on a stable surface, and run calibration after any major repair or relocation.
| Scenario | Action Required | Key Notes |
|---|---|---|
| New Installation | Calibrate immediately | Remove transit bolts first |
| After Moving | Re-level plus calibrate | Uneven floors cause failure |
| Control Board Replaced | Mandatory calibration | Machine won’t spin without it |
| Motor or Basket Changed | Required | Ensures balance and torque detection |
| Suspension Repaired | Calibrate | Load sensor depends on suspension |
| Error Codes (SUD, U5) | Try reset first, then calibrate | Reset clears temporary glitches |
| No Spin or Vibration | Calibrate plus check leveling | Often fixes both issues |
Whether you own a Samsung front-loader or a Whirlpool top-loader, following the correct model-specific procedure ensures your washer runs smoothly, uses water efficiently, and spins without excessive vibration. Keep this guide handy for future reference.
Frequently Asked Questions About Washing Machine Calibration
How long does washing machine calibration take?
Samsung models require approximately 3 to 4 minutes. Whirlpool, Maytag, and Kenmore models require 2 to 3 minutes. The machine automatically stops and shuts off when complete.
Do I need to calibrate my washer after moving it?
Yes. Whenever you move the washing machine to a new location, you must re-level it and run the calibration cycle. Movement can affect the sensor readings and cause vibration or spin problems.
Can I calibrate my washer with clothes inside?
No. The drum must be completely empty of all clothing, foreign objects, and water before starting calibration. Starting with a dry, empty drum ensures accurate sensor readings.
What happens if I don’t calibrate after replacing the control board?
The machine may not spin at all, or it will display persistent error codes. Calibration establishes communication between the new control board and the existing motor, drive assembly, and suspension components.
Why does my washer still shake after calibration?
Calibration cannot fix physical problems. If shaking persists after calibration, check that the machine is level, transit bolts are removed, and suspension components are not worn or broken. These issues require mechanical repair, not sensor recalibration.
Is calibration the same as resetting the washer?
No. A reset clears error codes and reboots the system to factory defaults. Calibration re-maps sensor data and hardware communication. Use reset first for minor glitches, and calibrate after hardware changes or major repairs.



