Is your GE washing machine not draining? Water pooling in the drum, a failed spin cycle, or even leaks under the unit can all point to one culprit: a faulty drain pump. The GE washing machine pump repair process is a common but crucial fix that restores full functionality and prevents water damage or mold growth. Whether you own a top-load or front-load model, diagnosing and replacing the drain pump is often a manageable DIY project, especially when you know the right steps.
This guide walks you through everything from initial diagnostics to full replacement, using only verified procedures and safety-tested methods. You will learn how to test for power, safely remove the old pump, install the correct replacement, and verify success, all without unnecessary disassembly or guesswork. By the end, you will be equipped to tackle this repair confidently, saving time and money on service calls.
Decode Drain Failure Signs

Standing Water After Cycle
If water remains in the tub after the wash cycle ends, the drain pump may not be functioning. This is the most common symptom of pump failure. On front-load models, this often triggers an error code like “F1” or “ND” and prevents the machine from entering the spin cycle. Top-loaders might simply skip spinning, leaving clothes soaked.
However, do not assume the pump is dead yet. Blockages in the drain hose, filter, or impeller can mimic pump failure. Always rule out clogs before replacing parts.
Unusual Noises During Drain
Grinding, humming, or loud buzzing sounds during the drain phase suggest mechanical resistance. A damaged impeller or foreign object like a coin or bra wire jammed inside the pump can prevent rotation. If the motor hums but no water moves, it is likely straining against a blockage or failed bearing.
Visible Leaks Under the Machine
Water pooling on the floor near the front or side often indicates a cracked pump housing or failed seal. Inspect around the pump area, especially after a cycle. Soapy residue or rust streaks are telltale signs of a slow leak. A leaking pump must be replaced immediately to avoid electrical hazards and floor damage.
Safety First: Power and Water Shutdown
Disconnect Power Completely
Before any work begins, unplug the washer from the wall outlet. Even if the machine appears off, capacitors in the control board can retain dangerous voltage. For extra safety, turn off the circuit breaker dedicated to the laundry room.
Never rely solely on the control panel being off. Always physically disconnect power to eliminate shock risk when handling wiring or metal components.
Shut Off Water Supply
Locate the hot and cold water valves behind the washer. Turn both clockwise until tight. Then, disconnect the fill hoses using an adjustable wrench. Loosen the connections just enough to break the seal, then finish by hand to avoid cross-threading upon reassembly.
Label hoses with tape (“H” for hot, “C” for cold) to ensure correct reconnection later.
Manage Residual Water
Even after draining, several cups of water remain in the pump and hoses. Place towels or a shallow tray underneath the work area. When removing hoses or the pump, expect spills. Have absorbent rags ready to contain messes quickly.
Tools Needed for Pump Replacement
Essential Repair Toolkit
You will need a few basic tools. A 3/8-inch socket with ratchet and extension handles mounting bolts. Adjustable pliers or slip-joint pliers work for hose clamps. A multimeter with narrow probes tests electrical continuity. A flathead screwdriver removes panels, and a magnetic screwdriver helps retrieve dropped screws. A spray bottle with water lubricates seals during installation.
For front-load models, add a door boot spring tool or zip ties. A small flat tool releases the gasket spring.
Correct Replacement Pump
Always verify the part number using your washer model number (found on a sticker inside the door or on the back). A common GE drain pump is Part # WH23X28418, but compatibility varies.
Buying from a reputable appliance parts supplier ensures you receive the correct pump with matching connector, mounting style, and seal type. Never use a universal pump unless it is explicitly rated for your model.
Test the Pump Before Replacing

Check for Blockages
On front-load models, access the pump filter behind the lower front panel. Turn the dial counterclockwise to open the trap door. Let water drain into a pan, then remove lint, coins, or debris. Spin the impeller with your finger. It should rotate freely.
On top-load models, tilt the machine back and inspect the pump visually if possible. Remove the drain hose and check for obstructions.
Perform Continuity Test
Unplug the washer. Disconnect the wire harness from the pump by pressing the locking tab. Set multimeter to continuity mode (Ω or beep symbol). Insert probes into the pump electrical terminals.
A beep or low resistance between 5 and 30 ohms means the motor winding is intact. No beep or OL reading indicates the pump motor is open and needs replacement.
This test confirms whether the internal coil has failed.
Live Voltage Test (Advanced)
Only perform this if you are experienced with electrical testing. Plug in the washer and enter diagnostic mode by pressing and holding Start, turning the knob 7 times, releasing Start, then turning the knob 12 more times until “Soak” and “Wash” lights illuminate. Press Start to begin the drain test (pump runs about 4 minutes). Set multimeter to AC Volts and probe the harness terminals while the pump is active.
Expect 108 to 132V. If voltage is present but the pump is silent, replace the pump. If no voltage is present, the issue is with the control board or wiring.
Replace Pump: Top-Load Models
Access the Pump Safely
Tilt the washer backward carefully. Prop it securely with a wooden block or sturdy box. Ensure the machine will not roll or fall during work.
Most top-load GE pumps are on the right side of the outer tub, protected by a metal cover.
Remove Old Pump
Remove three bolts securing the cover with a 3/8-inch socket. Note that the bottom bolt holds a ground wire. Do not lose it. Disconnect the wire harness by pressing the tab. Use pliers to compress the hose clamp on the drain hose. Slide the clamp up, then pull the hose off the pump outlet. Remove the three pump mounting bolts. Pull the pump down and out.
Inspect the rubber gasket and hose for cracks or wear.
Install New Pump
Wet the new pump seal with water from a spray bottle. This prevents tearing during installation. Align the pump with the tub opening and push firmly until flush. Reinstall the three mounting bolts, ensuring the bottom bolt secures the ground wire loop. Tighten securely but avoid over-tightening. Slide the drain hose onto the pump fitting until seated. Move the clamp back and tighten with pliers. Reconnect the wire harness and listen for the click. Replace the cover and secure with all three bolts, ensuring the ground wire is held by the lower bolt.
Return the washer to the upright position.
Replace Pump: Front-Load Models
Disassemble Console and Top Panel
Pull out the detergent dispenser drawer. Press the rear tab to remove it completely. Remove five screws in the dispenser housing. Lift the left side of the console and slide it right to release. Remove three screws along the top rear edge. Slide the top panel forward and lift off.
Set components aside safely.
Remove Door Boot and Lock
Use a flat tool to release the outer spring of the door boot (gasket). Peel the rubber away from the front panel lip. Remove two screws from the door-lock trim on the right. Remove two more screws securing the lock mechanism. Lift the tab and disconnect the lock assembly.
Handle the gasket carefully. It tears easily.
Take Off Front Bulkhead
Remove nine screws securing the front panel: one near dispenser, two on sides, three at bottom (tilt machine slightly to access). Release the air baffle tabs and slide it out. Lift the bulkhead slightly and pull forward. Unplug the door wire harness on the left side. This is critical.
Set the panel aside.
Swap Out the Pump
Confirm washer is drained via filter. Use pliers to compress hose clamps and slide them up. Remove hoses from the pump. Note the black hose notch orientation. Remove two top screws holding the pump. Disconnect the wire harness. Pull the old pump out.
For the new pump, inspect rubber hoses for kinks. Connect the wire harness first (easier access). Align pump with mounts and press into place. Secure with two screws. Reattach hoses with correct notch alignment. Slide clamps down and tighten.
Reassemble Front-Load Washer

Reinstall Bulkhead and Wiring
Reconnect the door wire harness on the left. Align bulkhead with plastic mounts. Insert screws from outer edges toward center. Guide the air baffle into slots.
Ensure all connections are secure before proceeding.
Refit Door Lock and Gasket
Reattach the door lock mechanism with two screws. Replace the plastic trim cover. Stretch the door boot back over the front metal lip. Use a spring tool or zip ties to reinstall the outer spring evenly.
A misaligned gasket causes leaks and door seal failures.
Restore Console and Top Panel
Slide the top panel into position and secure with three rear screws. Hook the console onto the two right-side tabs. Push left until it clicks into place. Install the five dispenser screws (larger ones in middle). Reinsert the detergent drawer.
Double-check all fasteners are tight.
Test the Repair Thoroughly
Run a Drain/Spin Cycle
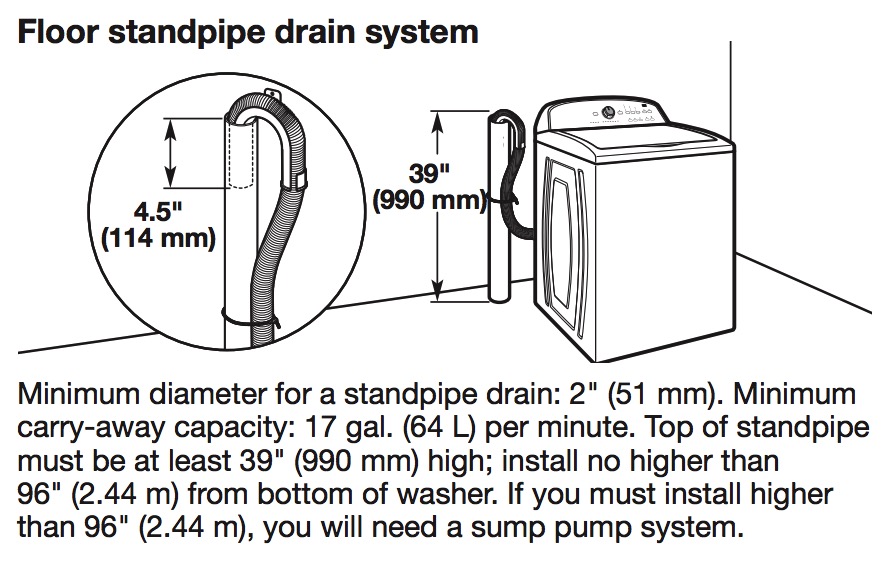
Return the washer to level position. Reconnect hot and cold hoses (tighten by hand, then with pliers, but do not over-tighten). Attach the drain hose to the standpipe. Ensure it is not pushed more than 6 inches in. Turn on water valves slowly to check for leaks. Plug in the machine.
Run a Drain/Spin or Rinse/Spin cycle.
Check for Leaks and Performance
Observe whether water drains completely. Listen for smooth pump operation without grinding. Inspect under the machine and around the pump area for leaks.
If the washer still will not drain, re-enter diagnostic mode. Test for voltage at the pump harness. Recheck hose routing and look for kinks.
Prevent Future Pump Failures
Clean Filter Regularly
For front-load models, clean the pump filter every 1 to 2 months. Remove hair, lint, and small objects. This simple step prevents 80% of clogs and reduces strain on the motor.
Check Pockets Before Washing
Coins, keys, pens, and paper clips can destroy impellers. Always check pockets and remove foreign objects before starting a load.
Inspect Drain Hose Annually
Ensure the drain hose has no kinks or crushing. Ensure it is not inserted too deeply into the standpipe (maximum 6 inches). Ensure it is looped high to prevent siphoning.
A poorly routed hose mimics pump failure.
Address Slow Draining Early
If drainage takes longer than usual, do not wait. Early intervention can save the pump motor from burnout due to prolonged operation under strain.
Key Takeaways for GE Washing Machine Pump Repair
A GE washing machine pump repair restores full drainage and spin performance, often in under an hour. With proper tools, safety precautions, and model-specific parts, this fix is well within reach for most homeowners. Always test before replacing, follow reassembly steps carefully, and verify results with a test cycle. Regular maintenance keeps your pump and your laundry routine running smoothly for years to come.
Frequently Asked Questions About GE Washing Machine Pump Repair
How do I know if my GE washing machine pump is bad?
Common signs include water remaining in the tub after a cycle, the washer skipping the spin cycle, grinding or humming noises during draining, and visible leaks under the machine. Error codes like F1 or ND on front-load models also indicate pump issues.
Can I replace the drain pump myself?
Yes, replacing a GE washing machine drain pump is a manageable DIY project. Top-load models take approximately 10 to 15 minutes. Front-load models require more disassembly but remain doable with basic tools and careful attention to reassembly steps.
What tools do I need for GE washing machine pump repair?
You will need a 3/8-inch socket with ratchet, adjustable pliers, a multimeter, screwdrivers, and a spray bottle for lubrication. Front-load models may also require a door boot spring tool or zip ties for reinstallation.
How much does a GE washing machine pump cost?
Replacement pumps vary by model but typically range from $50 to $150. Part # WH23X28418 is a common replacement. Always verify compatibility with your specific model number before purchasing.
How often should I clean my washing machine pump filter?
For front-load models, clean the pump filter every 1 to 2 months. This prevents debris buildup that causes clogs and extends the life of the pump motor.