
Is your Whirlpool washing machine leaving water in the drum after cycles? Are foul odors developing or strange noises occurring during operation? A clogged drain pump filter is likely the culprit, and this is one of the most common maintenance issues Whirlpool owners face. Cleaning the pump on your Whirlpool washing machine restores proper drainage, prevents water damage, and extends your appliance’s lifespan significantly. This step-by-step guide covers everything from safety preparation to reassembly, with model-specific instructions for both dispenser drawer and front panel designs.
Prepare Your Workspace Safely
Before starting any maintenance on your washing machine, prioritizing safety prevents accidents and electrical hazards. Unplug the washer directly from the wall outlet to eliminate any chance of electrical shock, especially when working near water components. Turn off both hot and cold water supply valves located behind the machine to prevent accidental flooding during the process.
Positioning the washer correctly makes the cleaning process much easier. Pull the appliance away from the wall to access the front panel comfortably. Tilt the machine backward approximately 10 to 15 degrees to reduce water spillage when you open the pump filter. Place a large, flat container such as a baking sheet or shallow bucket directly beneath the drain pump location. Have old towels and cotton cloths ready to catch drips and wipe wet surfaces. Wear gloves for hygiene, as the filter often contains grimy debris and odor-causing residue.
Locate Your Drain Pump Filter

Whirlpool washers typically have the drain pump filter at the front bottom of the machine, but access methods differ between models. Identifying your specific configuration prevents damage and ensures you open the correct compartment.
Models with Detergent Dispenser Drawer
Certain Whirlpool front-loaders hide the filter behind the detergent drawer. To access it, pull the drawer handle fully to open the dispenser completely. Locate the release tabs on both sides of the drawer. Push down on the right tab while pushing up on the left tab, then gently pull the drawer straight out. Once removed, you will see the round filter cap and a small black drain hose clipped nearby.
Models with Front Access Panel
Most Whirlpool washers feature a lower front panel covering the pump filter. For screw-held panels, use a screwdriver to remove 2 to 3 screws at the bottom. For clip-held panels, gently pry with a flat tool or your fingers until it releases. For drop-down panels, loosen the screws first, then lower the panel to expose the filter. Look for a round or oval filter with a handle.
Drain Residual Water Before Removal
Even after a complete cycle, several cups of water remain trapped in the pump system. Draining this water first prevents messy spills when you remove the filter. Locate the small black emergency drain hose near the filter, which usually sits in a retaining clip with a plug.
Place your container directly under the hose end. Release the hose from the clip and remove the plug to allow water to flow out by gravity. If the flow stops, gently push the hose inward to release any kinks restricting drainage. When finished, reinsert the plug, dry the hose thoroughly, and return it to the clip. Place a towel beneath the main filter area to catch any final drips.
Remove and Inspect the Filter

With most water drained, you can now safely remove the filter without creating a flood. Grasp the filter handle and turn it counterclockwise, continuing until it loosens completely. As the seal breaks, expect a final trickle of water, which is completely normal. Pull the filter straight out of the housing.
Most Whirlpool filters consist of two parts: an outer housing and a central strainer. Separate these pieces for thorough cleaning. Inspect the pump cavity behind the filter using a flashlight. Look for coins, buttons, hair, lint buildup, or signs of mold and slime. Check that the impeller inside the pump spins freely. If it is stuck, gently clear the obstruction with your fingers or a soft tool.
Examine the hollow flat washer and O-ring on the filter carefully. These seals prevent leaks during operation. Replace these components if they appear cracked, torn, or deformed.
Deep Clean the Filter and Housing
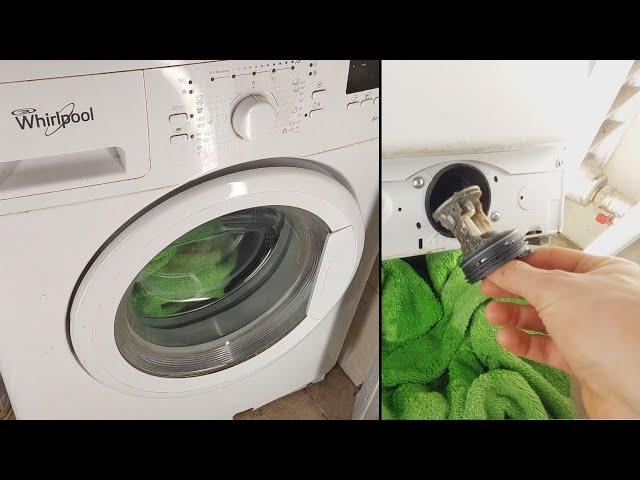
A dirty filter restricts drainage speed and causes unpleasant odors to develop. Cleaning both the filter and its housing seat restores optimal performance and prevents future issues.
Remove large clumps of lint, hair, and foreign objects by hand and dispose of them in a trash bag. Hold the strainer and housing under warm running water. Use a soft brush or old toothbrush to scrub the mesh screen, threads on the cap, and interior grooves and crevices thoroughly. Pay special attention to the filter housing inside the machine, wiping it clean with a damp cloth to remove stuck grime.
Allow all parts to air dry completely or pat dry with a clean towel. Reassembling while wet traps moisture and encourages mold growth.
Reassemble the Filter Properly
Correct reassembly prevents leaks and ensures the filter functions reliably for your next cleaning cycle. If your filter has two pieces, reattach the strainer to the housing by aligning the tabs until they click into place.
Apply a small amount of silicone grease to the O-ring and threads. This simple step reduces friction, prevents drying or cracking, and makes the next cleaning much easier. Avoid petroleum-based lubricants, as they degrade rubber seals.
Insert the filter into the opening and turn it clockwise. Tighten until it stops and the handle sits vertically. Do not force the filter, as overtightening damages threads or the seal. Verify the flat washer is intact and seated correctly, as a damaged washer is a common cause of leaks.
Restore Power and Test Operation
After reassembly, return the machine to working condition and verify everything functions properly. For drawer models, slide the dispenser back in by aligning both rails simultaneously and pushing until you hear a click. Pull it out to confirm it is locked in place. For panel models, reattach the front cover using screws or clips and ensure it sits flush.
Double-check that the black drain hose is secured in its clip and tucked into the cutout. Plug the washer back in, turn on the water supply valves, and push the machine fully into position. Run a short rinse or spin cycle to verify no leaks around the filter area, normal drainage speed, and quiet operation.
If your model has a filter indicator light, reset it per the owner is manual instructions, which usually involves holding a specific button combination.
Fix Common Post-Cleaning Issues

Even after thorough cleaning, problems may still occur. Use this troubleshooting guide to diagnose and resolve remaining issues.
Washer Still Not Draining
Check the emergency drain hose for kinks or clogs that restrict water flow. Push the hose slightly inward to release any bends. If draining still fails, remove the filter again and inspect the pump impeller for stuck objects or debris.
Water Leaking After Reassembly
The filter may be loose or the flat washer damaged. Retighten the filter clockwise until the handle is vertical. If leaking continues, inspect the hollow flat washer and O-ring for wear and replace if necessary.
Unusual Noises During Operation
Foreign items like coins may be lodged in the pump despite cleaning. Remove the filter and use a flashlight to check the impeller area. Spin the impeller manually, and if it does not move freely, clear the obstruction gently.
Error Codes Displaying
Blocked filters often trigger water flow error codes on digital displays. Clean the pump thoroughly, restart the machine, and see if the codes clear. Consult your manual for model-specific reset steps if needed.
Prevent Future Clogs with Smart Habits
Avoiding pump issues is simpler than fixing them. Implement these daily practices to keep your Whirlpool running smoothly.
Empty all pockets before washing clothes. Coins, keys, tissues, and hair ties are the top clog offenders. Make pocket-checking a habit before every single load. Use mesh laundry bags for items that shed excessive lint, such as sweaters, towels, and pet bedding, to trap fibers before they reach the pump.
Maintain a regular cleaning schedule based on your usage patterns. Clean the filter every 3 months for heavy-use households and every 6 months for average use. Set calendar reminders to stay consistent and prevent buildup.
Maximize Washer Performance Long-Term
Beyond filter cleaning, these maintenance practices extend your washer is life significantly. Run a cleaning cycle with affresh or a similar washer cleaner every 1 to 2 months to dissolve soap scum, mildew, and buildup in hidden areas like hoses and valves.
Inspect beneath the machine monthly for dampness or pooling water. Early detection prevents floor damage and costly repairs. Reapply silicone grease to the filter threads during every cleaning session. This 10-second step saves considerable time and frustration during future maintenance.
Frequently Asked Questions About Cleaning the Pump on Whirlpool Washing Machines
How often should I clean the drain pump filter on my Whirlpool washer?
Clean the drain pump filter every 3 to 6 months depending on usage frequency. Heavy-use households or homes with pets should clean every 3 months, while average households can extend to 6 months. Clean immediately if you notice slow draining, bad smells, unusual noises, or water flow error codes.
What happens if I never clean my Whirlpool washing machine pump?
Neglecting pump maintenance leads to drainage failure, odor development from accumulated debris, flooding risk from backed-up water, error codes triggering repair needs, and unusual noises during operation. Eventually, the pump can become severely clogged or damaged, requiring expensive professional repair or replacement.
Why is water leaking from my washer after cleaning the pump?
Water leaks after cleaning typically occur because the filter is not tightened sufficiently, the flat washer is damaged, or the O-ring is worn or missing. Retighten the filter clockwise until the handle is vertical, and inspect the seals for damage. Replace any worn components before running the machine again.
Can I clean my Whirlpool washer pump without pulling the machine out?
You can access the filter on most models without fully pulling the washer out, though having extra space makes the process easier. Ensure you have adequate room to tilt the machine slightly and place a container beneath the filter. Working in tight spaces increases the risk of water spills and makes inspection more difficult.
What tools do I need to clean the pump on a Whirlpool washing machine?
You need minimal tools for pump cleaning: a screwdriver for removing front panels, a flashlight for inspecting the pump cavity, and a soft brush or old toothbrush for scrubbing. Have containers ready for water drainage, towels for cleanup, and gloves for hygiene. Silicone grease is recommended for reassembly but optional.
Key Takeaways for Cleaning Your Whirlpool Washer Pump
Cleaning the pump on your Whirlpool washing machine is a straightforward maintenance task that delivers substantial benefits. The filter typically sits at the front bottom of the machine, accessible either through a dispenser drawer or front access panel depending on your model. Always unplug the washer and turn off water supplies before starting, and drain residual water using the emergency hose before removing the main filter.
Clean the filter and housing thoroughly with warm water and a soft brush, inspect the impeller for obstructions, and dry all components before reassembly. Apply silicone grease to the O-ring and threads for easier future removal. Test the machine after cleaning to ensure proper drainage and no leaks.
Maintain this routine every 3 to 6 months, check pockets before washing, and your Whirlpool washer will deliver reliable performance for years to come.



