
Your Kenmore washing machine won’t drain, is making grinding noises, or simply won’t start. These common problems often require opening the washer to inspect or replace internal components like the motor coupler, lid switch, or agitator cogs. Knowing how to open a Kenmore washing machine correctly saves you costly repair bills and prevents damage to your appliance.
This comprehensive guide walks you through every step, from safety preparation to reassembly, covering top-load, front-load, and Elite series models. You’ll learn which tools you need, how to remove the cabinet without breaking clips, and exactly what to check once you’re inside.
Essential Safety Steps Before Opening Your Washer
Working on a washing machine involves electrical components and water supply lines. Skipping safety steps risks shock, flooding, or injury. Always complete these preparations before touching any screws or panels.
Disconnect Power and Water Supplies
Unplug the washer from the electrical outlet. If the outlet is difficult to reach, turn off the circuit breaker that powers the unit instead. Never rely solely on the control panel power button.
Next, shut off both hot and cold water supply valves located behind the washer. This prevents accidental flooding when disconnecting hoses during disassembly.
Drain Remaining Water and Move the Unit
Place towels or a shallow bucket beneath the machine. Disconnect the drain hose from the standpipe and release the clamp securing it to the coupler. Some water will remain in the pump and hoses, so be prepared for spills.
Pull the washer away from the wall to create workspace. When tilting becomes necessary for motor or transmission access, place a towel or blanket beneath the unit to protect your flooring and provide stability.
Tools Required for Kenmore Washer Disassembly
Using the correct tools prevents stripped screws, broken clips, and unnecessary damage. Gather these items before starting your repair.
The essential toolkit includes a Philips head screwdriver for mounting screws, a flathead screwdriver for releasing clips and connectors, and a 1/2-inch square drive for agitator retainers. You’ll also need a 9/16-inch deep well socket for lower agitator bolts, a 1/2-inch socket for transmission bolts, and a 1/4-inch nut driver for motor screws.
Specialized tools like a spanner wrench and hammer are mandatory for the tub nut. A digital multimeter helps test electrical switches, while safety glasses protect your eyes during work.
Removing the Top Cover on Top-Load Kenmore Models

Top-load Kenmore washers use one of two methods to remove the top cover, depending on whether Whirlpool or LG manufactured your model. Identifying the correct method prevents unnecessary force or damage.
Method for LG-Manufactured Models
Locate the two screws on the back edge of the top cover, one on each side. Remove these screws with a Philips screwdriver. Before lifting the cover, release any cable ties securing the main wiring harness at the rear.
Lift the rear of the top cover slightly, slide it forward, then tilt it upward so the rear brackets clear the cabinet. Lean the cover safely against a wall. Remember to re-secure the wiring harness after service to prevent vibration damage to wires.
Method for Whirlpool-Made Models
Remove the end caps or lift trim covers on the top of the washer. Unscrew the two control panel screws, typically hidden under caps or located at front and rear edges.
Slide the control panel forward approximately one inch, then lift it up and over the rear of the machine to remove it completely. Some models allow partial lifting without full removal.
Removing the Cabinet on Direct Drive Models
With the top or control panel removed, you can now access the main cabinet. This step exposes the inner tub, motor, transmission, and suspension system.
Disconnect the Lid Switch
Locate the lid switch connector near the front of the cabinet. Unplug it from the harness, using a flathead screwdriver to release the locking tab if necessary.
Release Spring Clips and Tilt the Cabinet
Find the two spring clips at the rear corners connecting the cabinet to the frame. Pry these out gently with a flathead screwdriver.
Open the lid for clearance, then grasp the cabinet sides firmly. Place one foot against the base for leverage. Tilt the cabinet backward approximately 45 degrees, then lift it straight up off the frame.
The inner tub, motor, transmission, and suspension rods are now exposed for inspection or repair.
Accessing the Agitator and Internal Components
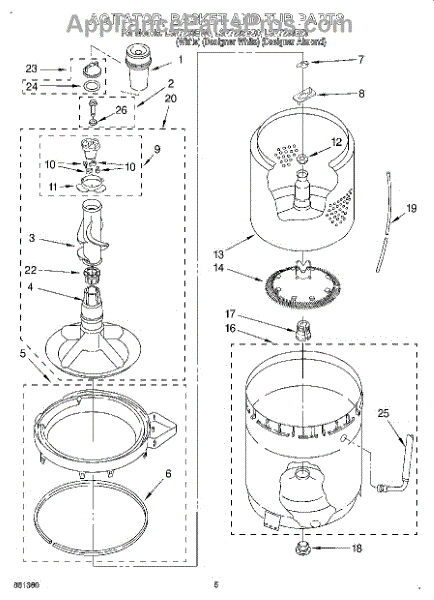
Removing the agitator provides access to worn cogs, the cam assembly, and the transmission shaft beneath. This step is necessary for diagnosing weak agitation or grinding noises.
Upper Agitator Removal
Lift off the agitator cap or fabric softener dispenser. Insert a 1/2-inch square drive into the center shaft and unscrew the retainer bolt. Lift the upper agitator section off the shaft.
Remove the retainer, spring, cam, and cog assembly. If a retaining ring is present, use a flathead screwdriver to release it before sliding it off.
Lower Agitator Removal
Pull out the bushing from the lower agitator shaft. Use a 9/16-inch deep well socket to remove the bolt securing the lower agitator to the transmission shaft. Lift off the lower section, then remove the spacer and plastic washer.
Worn agitator cogs cause weak agitation or grinding noises during wash cycles. Inspect the teeth for chips or excessive wear.
Opening Front-Load and Elite Kenmore Models

Front-load Kenmore washers like the Elite HE, Calypso, and Ultra Fabric Care series require front or top access depending on the repair needed.
Top Access for Elite Top-Load Models
Some Elite top-loaders use the same rear-screw removal method as LG-made models. Check the back of the top cover first before attempting other methods.
Front Panel Access for Front-Load Units
For door boot seal replacement, pump issues, or lock problems, remove the top cover first. Then unscrew the front lower access panel if your model has one.
Release the door boot clamp using a flat tool. Pull the boot forward to expose the drum, pump, and lock mechanism. A flashing “Lid locked” button often indicates a failed switch requiring access through the top or front panel for manual release or replacement.
Removing the Inner Tub and Tub Nut
Accessing the inner tub becomes necessary for bearing repairs, seal replacements, or tub removal. This procedure requires the agitator to be removed first.
Detaching Fill Components
Release the tabs holding the fill spout to the rear panel. Disconnect the bleach dispenser hose and release the tabs securing the tub ring. Lift the tub ring off the top of the outer tub.
Lifting Out the Inner Tub
Use a spanner wrench and hammer to loosen the tub nut by turning it counterclockwise. The nut is extremely tight, so a regular socket will not work. Unthread the nut by hand once loosened, then lift the inner tub straight up and out of the outer tub.
Servicing Motor, Pump, and Transmission Components

With the cabinet open, you can access the core mechanical parts responsible for agitation and spinning.
Drain Pump Removal
Release the retaining clips holding the pump to the motor. Pull the pump off the motor shaft. Disconnect wire connectors if needed for clearance.
Pump clogs cause “not draining” error codes. Check the impeller for debris or lint buildup.
Motor and Coupler Access
Use a 1/4-inch socket to unthread the motor mounting screws. Release the bottom mounting clip first, support the motor weight, then release the top clip. Set the motor aside and inspect the coupler.
A cracked or worn motor coupler prevents the transmission from turning even when the motor runs. This is a common failure point in Direct Drive models.
Transmission Removal
Tilt the washer onto a towel. Disconnect the wire retainer from the transmission housing. Unscrew the transmission mounting bolts using a 1/2-inch socket, then slide the transmission out of the assembly.
To remove the basket drive, turn the brake lever counterclockwise and pull it out.
Replacing Control Panel and Switches
Electrical problems often require replacing the lid switch or selector switch. These components are accessible after removing the top cover.
Lid Switch Replacement
Disconnect the wire connector using a flathead screwdriver to unlock it if necessary. Remove the 5/16-inch grounding screw, then unscrew the mounting screws.
Lift the lid, press the tab, and remove the old switch. Install the new switch under the main top, ensuring the actuator lever aligns precisely with the hinge arm. Reconnect wires and secure the ground wire.
After reassembly, test that the washer detects the lid is closed before attempting a cycle.
Selector Switch Replacement
Pull off the selector knob. Unplug the wire connector. Use a flathead screwdriver to release the locking arm, then rotate and remove the switch. Install the new switch by reversing these steps, ensuring it clicks securely into place.
Reassembling Your Kenmore Washer
Reassembly follows the reverse order of disassembly, but several critical steps ensure proper operation and prevent future problems.
Reinstalling Transmission and Motor
Insert the basket drive fully into the outer tub. Place the thrust washer on the transmission shaft, then slide the transmission in and tighten the mounting bolts. Reconnect the wire retainer.
Align the motor coupler prongs with the isolator holes, then slide the motor into position. Reposition the mounting clips and tighten the screws. Reconnect all wire connectors, then reinstall the pump on the motor shaft.
Reassembling Tub and Agitator
Lower the inner tub onto the drive block. Thread the tub nut clockwise and tighten securely using the spanner wrench.
Replace the plastic washer and spacer on the lower agitator shaft, then reposition the lower agitator and thread the bolt to secure it. Replace the bushing.
For the upper agitator, reinstall the cam and cog assembly, aligning the cogs with the cam. Insert the retainer and spring, then tighten with the 1/2-inch square drive.
Realign the tub ring and snap it into the outer tub. Reattach the bleach dispenser hose and reinstall the fill spout.
Securing Cabinet and Control Panel
Slide the cabinet forward under the base frame until the side notches align with the base frame tabs. Push fully in, ensuring it seats on all four locking tabs.
Reinstall the spring clips using a flathead screwdriver. Reconnect the lid switch wire connector. Snap the control panel back into place, reattach screws, and secure end caps.
For the top cover, align the side brackets with cabinet slots, slide forward until engaged, then push rearward to drop over the brackets. Secure with rear screws.
Critical Step: Re-anchor the main wiring harness to the cabinet using cable ties. Vibration can fray wires if left loose, causing future electrical problems.
Reconnecting and Testing Your Washer
Reattach the drain hose to the coupler and secure it with the clamp. Reconnect the hot and cold water supply lines. Turn on the water valves, then plug in the washer or reset the circuit breaker.
Running a Test Cycle
Select a spin-only or rinse cycle to verify proper operation. Check for leaks from hoses, the tub ring, or the pump. Listen for smooth spinning without grinding or unusual vibration.
Confirm the lid switch works correctly. The machine should stop or not start when the lid is open. Ensure the washer drains completely and displays no error codes.
If the washer shakes excessively, check whether shipping bolts were removed on new units or inspect suspension rods for damage.
Common Problems That Require Opening Your Kenmore Washer

Understanding symptoms helps diagnose issues before disassembly. Here are the most common problems and their likely causes.
A washer not spinning often indicates a failed motor coupler or transmission problem. Not draining typically means a clogged or failed pump. Grinding noises during agitation suggest worn agitator cogs that need replacement.
A flashing “Lid locked” button usually points to a faulty lid switch requiring replacement. Leaking during wash cycles may involve the tub seal, pump, or a cracked hose. Slow filling indicates a clogged inlet valve that may need cleaning or replacement.
Many Kenmore models feature built-in diagnostics. Try pressing specific button combinations like “Spin” and “Soil Level” simultaneously to access self-test modes before beginning disassembly.
Key Takeaways for Opening Your Kenmore Washing Machine
Opening a Kenmore washing machine requires the right tools, proper safety preparation, and model-specific procedures. Always disconnect power and water before starting, and use a spanner wrench for the tub nut.
Re-tie the wiring harness after every service to prevent vibration damage. Test your repair with a spin cycle before closing everything up completely. With these steps, you can troubleshoot and repair common issues like failed couplers, worn cogs, and malfunctioning switches, extending your washer’s life for years to come.
Frequently Asked Questions About Opening a Kenmore Washing Machine
How do I know if my Kenmore washer is made by Whirlpool or LG?
Check the model number inside the lid or on the rear panel. Whirlpool-made models typically use the “wig wag” mechanism and have mechanical fuses, while LG-made models often feature the rear-screw top removal method described in this guide.
Can I open my Kenmore washer without professional help?
Yes, most basic repairs like lid switch replacement, pump cleaning, and agitator cog replacement are manageable for DIYers with intermediate skills. However, transmission repairs or tub bearing replacements may require professional experience.
What is the most common part that fails in Kenmore washers?
The motor coupler is one of the most frequent failures in Direct Drive models. It connects the motor to the transmission and can crack or wear out over time, preventing the washer from spinning.
Do I need special tools to remove the agitator?
Yes, you need a 1/2-inch square drive for the agitator retainer and a 9/16-inch deep well socket for the lower agitator bolt. A standard socket set will not fit these specific fasteners.
How often should I perform maintenance on my Kenmore washer?
Inspect the motor coupler every three to five years. Clean the pump filter annually if your model has an accessible filter. Replace agitator cogs at the first sign of slipping or grinding noise.



