
Your washing machine won’t drain. Water pools in the tub, the cycle stalls, and laundry piles up. This common but frustrating issue usually stems from a clog in the drain system, but knowing how to fix a clogged washing machine drain can save you time, money, and a potential flood. The root cause is typically a blockage in the drain hose, pump filter, or pump itself, though plumbing issues like a blocked standpipe or poor venting can also be to blame. With basic tools and a methodical approach, most clogs can be cleared at home. This guide walks you through every step, from safely removing standing water to diagnosing internal blockages and preventing future backups.
Remove Standing Water Before Troubleshooting
Before inspecting any components, eliminate standing water to avoid spills and enable safe access to your machine. This step is non-negotiable for both safety and visibility.
Drain Water Using Gravity via the Drain Hose
The most efficient way to remove water is by using the machine’s own drain hose. This method leverages gravity and is far less labor-intensive than manual bailing.
Tools needed:
• A large bucket
• Towels for catching spills
• Optional: wet vacuum for residual water
Steps to drain the water:
1. Unplug the washing machine or shut off power at the circuit breaker.
2. Turn off the hot and cold water supply valves.
3. Locate the drain hose at the back of the unit and check for kinks.
4. Disconnect the hose from the wall standpipe if straightening doesn’t work.
5. Keep the hose end elevated above the tub level until ready to drain.
6. Place a bucket below, lower the hose end below the tub bottom, and let gravity pull the water out.
7. Raise the hose to stop flow, empty the bucket, and repeat until empty.
8. If water doesn’t flow, the clog is likely inside the machine.
Pro Tip: Use a wet vacuum on the hose end to extract trapped water and debris if gravity draining fails.
Inspect and Clear the Drain Hose
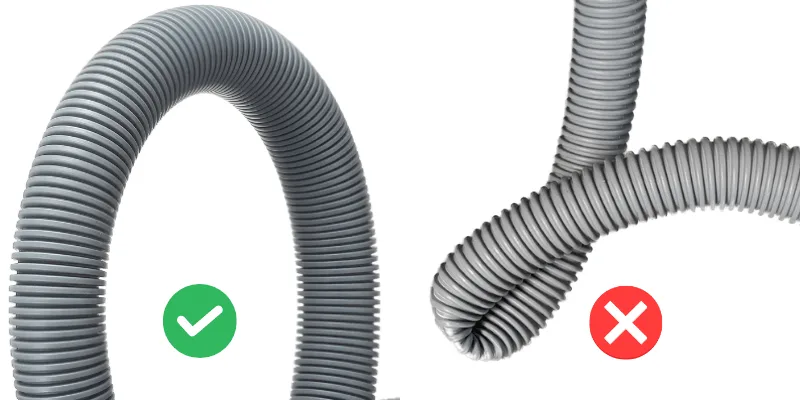
A blocked or kinked drain hose is the most common culprit behind drainage failure. This component is accessible and easy to check.
Check for Kinks and Crushes
Examine the entire length of the hose running from the machine to the wall. Sharp bends or pinches, often caused by pushing the machine too close to the wall, can stop flow completely. Straighten any kinks and test drainage again before proceeding.
Disconnect and Flush the Hose
Remove the hose from both the washer connection and the standpipe. Hold it over a bucket and flush water through it to dislodge lint, fabric scraps, or foreign objects. Look for debris exiting the hose.
Cleaning tips:
• Use a long bottle brush to scrub the interior walls.
• Avoid poking rods through the hose, which can damage internal walls or push debris deeper.
• A wet vacuum works well for pulling debris out rather than pushing it further.
Warning: Never reconnect a cracked or brittle hose. Replace it with a new drain hose rated specifically for washing machines.
Clean the Pump Filter

If the drain hose is clear, the clog is likely located at the pump filter. This component catches lint, coins, hair, and small objects before they reach the pump.
Locate the Filter Access Panel
Most front-loading machines have a small access door at the bottom front. Top-loader pumps may be under the cabinet or behind a rear panel. Consult your owner’s manual for the exact location. Place towels underneath to catch any residual water that may spill.
Remove and Clean the Filter
Open the filter cap slowly, as some water may escape. Pull out the filter and remove all accumulated lint, coins, hair, or small objects. Rinse the filter thoroughly under running water.
What to check:
• Examine the pump housing for additional debris that may have bypassed the filter.
• Spin the impeller (the fan-like piece inside the pump). It should rotate freely.
• If the impeller is stuck or broken, the pump likely needs replacement.
Maintenance Tip: Clean the filter every 4 to 6 weeks to prevent clogs from forming.
Test the Drain Pump
A faulty pump can mimic clog symptoms, so testing this component is essential when other areas are clear.
Listen for Pump Noise During Drainage
Start a drain cycle and listen carefully. If you hear humming but no water movement, the pump motor may be seized or the impeller jammed. No sound at all could indicate electrical failure.
Inspect for Leaks and Damage
Examine the area around the pump housing for water stains or pooling. Cracks or visible leaks mean replacement is needed. If the impeller is cracked or won’t spin freely, install a new pump that matches your exact model number.
Note: Some pumps are sealed units. Do not attempt to disassemble them.
Verify the Lid Switch on Top-Loaders
The washer won’t drain if it thinks the lid is open. This safety mechanism can fail and prevent proper drainage.
Test the Switch Manually
Press the lid switch plunger with your finger. You should hear a distinct click. If you hear nothing, the switch is likely broken. Use a multimeter to test continuity, or bypass it temporarily for testing purposes only.
Replace a Faulty Switch
A failed lid switch prevents both drain and spin cycles. Replacement is straightforward: disconnect power, remove the console or cabinet, unplug the old switch, and install the new one.
Check the Drive Belt on Older Top-Loaders
Belts power the pump in many top-loading models. A worn or broken belt can cause drainage failure.
Access the Pump and Motor
Remove the back or front panel as directed by your owner’s manual. Locate the rubber belt connecting the motor to the pump or transmission.
Inspect for Wear or Breakage
Check the belt for cracks, fraying, or complete breakage. A loose or snapped belt won’t spin the pump. Replace it with the correct size and ensure proper tension. Verify that all pulleys turn freely.
Pro Tip: Replace drive belts in pairs if both belts show wear.
Clear the Standpipe and P-Trap

When the machine itself is clear but water backs up, the home plumbing is the issue. This often happens in older homes or systems with long-term buildup.
Remove and Clean the P-Trap
Place a bucket under the U-shaped pipe below the standpipe. Unscrew the slip nuts and remove the trap. Clean out accumulated lint and sludge. If water flows freely through the trap after cleaning, the clog is deeper in the line.
Snake the Drain Line
Use a 3/8-inch drain snake with an articulated head. Insert it into the standpipe after removing the no-hub coupler. Feed the cable slowly, rotating clockwise. Expect resistance at bends around 12 inches; use a drop head auger to navigate turns gently.
Critical steps:
• Push the snake to at least 35 feet to clear the main line.
• Never force the snake. Kinking damages the tool and reduces its lifespan.
• Retract in reverse mode only, and do so slowly.
Reassemble and Test Properly
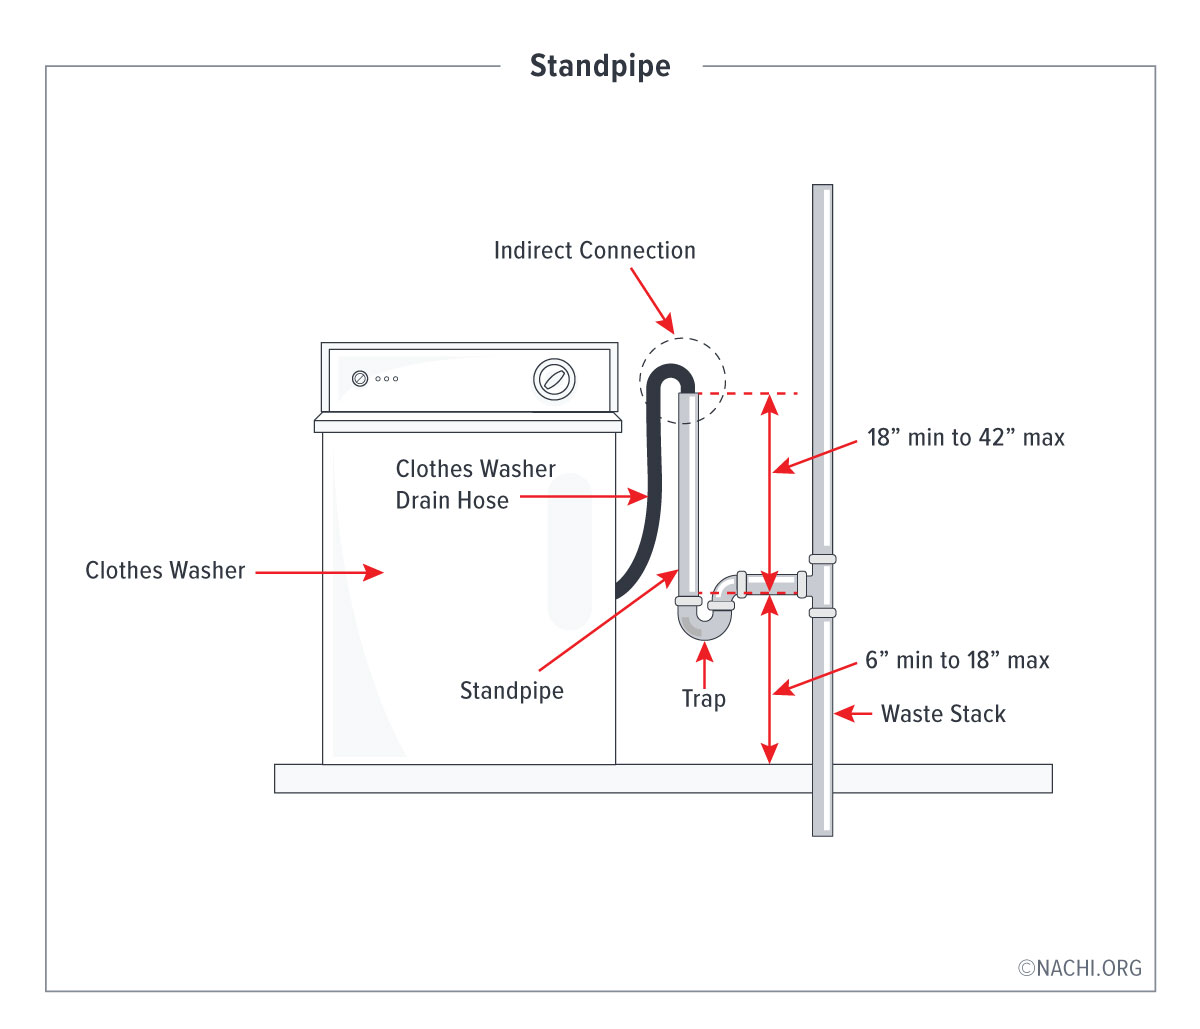
Improper reassembly can cause leaks or create siphoning problems that mimic a clog.
Reconnect with Correct Torque
Reinstall the P-trap with the U-bend facing downward to maintain the water seal against sewer gases. Reattach the no-hub coupler and tighten clamps to 60 inch-pounds using a torque wrench. Over-tightening cracks the rubber; under-tightening causes leaks.
Confirm Standpipe Specifications
Ensure your standpipe meets these requirements:
• At least 36 inches high
• 2 inches in diameter (1.5-inch pipes overflow easily)
• Has a 4-inch air gap between the hose end and pipe opening to prevent siphoning
Run a Test Cycle
Run the washer on the highest water level. Watch for leaks at all connections and confirm the tub empties completely. If water backs up, the main sewer line may need professional snaking.
Prevent Future Clogs
Regular maintenance stops most drainage issues before they start. A few simple habits can save you from future frustration.
Clean the Filter Monthly
Make filter cleaning a habit. A clean filter catches lint before it reaches the pump, extending the life of your machine.
Avoid Overloading the Drum
Stuffed drums restrict water movement and strain the pump. Leave space for clothes to tumble freely during the wash cycle.
Use Less Detergent
Excess soap creates suds that trap lint and reduce drainage efficiency. Use HE detergent in HE machines, and measure carefully.
Run Hot Maintenance Cycles
Once a month, run an empty hot wash with vinegar or a washing machine cleaner. This dissolves buildup in hoses and the pump.
Inspect Hoses Annually
Replace aging hoses every 5 years. Check for bulges, cracks, or soft spots. Consider upgrading to braided stainless steel hoses for added protection.
When to Call a Professional
Some issues go beyond DIY repair. Know when to escalate to protect your home and wallet.
Persistent Drainage Failure
If water remains after cleaning all accessible parts, the clog may be deep in the main sewer line beyond what household tools can reach.
Sewer Line or Vent Issues
Slow drains in multiple fixtures throughout your home suggest a main line blockage. A plumber can use a camera to locate the problem and clear it properly.
Electrical Problems
Burning smells, tripped breakers, or sparks mean stop immediately and call an appliance technician. Do not attempt further troubleshooting.
Recurring Clogs Despite Maintenance
This may indicate improper venting, undersized plumbing, or a failing pump requiring expert diagnosis.
Frequently Asked Questions About Fixing a Clogged Washing Machine Drain
Why does my washing machine drain slowly but not completely clog?
Slow drainage often indicates a partial blockage in the drain hose, pump filter, or standpipe. Lint and soap buildup accumulate over time, restricting water flow. Clean the filter first, then check the hose and plumbing.
Can I use chemical drain cleaners to clear a washing machine clog?
Chemical drain cleaners are not recommended for washing machine drains. They can damage rubber hoses and plastic components. Mechanical cleaning methods like snaking or brushing are safer and more effective.
How do I know if the drain pump is faulty versus clogged?
A clogged pump usually shows visible debris at the filter or hose. A faulty pump may make humming sounds without moving water, or it may leak. If cleaning all filters and hoses doesn’t resolve the issue, test the pump or replace it.
What happens if I don’t fix a clogged drain promptly?
Standing water can damage flooring, subfloor, and walls. It also promotes mold growth and creates breeding grounds for bacteria. The longer you wait, the more damage accumulates.
How often should I clean my washing machine filter?
Clean the pump filter every 4 to 6 weeks, or more frequently if you wash heavily soiled items frequently. Regular cleaning prevents buildup that leads to drainage problems.
Why does water back up into my laundry tub when the washer drains?
This typically indicates a clogged P-trap or standpipe issue. The water has nowhere to go, so it reverses flow into the lowest available opening. Clean the P-trap and snake the standpipe to resolve this.
Key Takeaways for Fixing Your Clogged Washing Machine Drain

Fixing a clogged washing machine drain is usually a straightforward process if you follow the right steps. Start with the easiest fixes: drain the water using gravity, check the hose for kinks, and clean the filter before moving to internal components like the pump or lid switch. Address plumbing issues like standpipe height and diameter to prevent repeat problems. Most clogs are caused by lint, small objects, or soap buildup, all of which are preventable with regular maintenance.
With regular maintenance, including monthly filter cleaning and annual hose inspections, your washer can run smoothly for years. Keep this guide handy for quick reference the next time drainage fails, because clean laundry shouldn’t come with a flood. If DIY methods fail or you encounter electrical problems, call a professional immediately to prevent further damage.



