
If your top loader washing machine smells musty, leaves brown flakes on clothes, or just doesn’t clean as well as it used to, sludge buildup is likely the culprit. This sticky, dark residue forms from a mix of detergent gunk, fabric softener residue, hard water minerals, and trapped lint. Over time, it clings to hidden areas like under the agitator, along the drum rim, and inside dispensers.
Left untreated, sludge can clog pumps, strain motors, and shorten your washer’s lifespan. But with the right methods and a little effort, you can fully clean sludge from a top loader washing machine and restore it to like-new performance. This guide gives you step-by-step solutions from quick monthly cleans to deep mechanical scrubbing using affordable, accessible tools.
Identify Sludge Buildup Early

Catching sludge early prevents costly damage and deep cleaning later. Know what to look for before it spreads to hidden areas of your machine.
Check for Visual and Olfactory Signs
Inspect your machine after a wash cycle. Dark, slimy residue on the drum walls or under the wash plate is a red flag. Brown or black flakes on your laundry, especially whites, means sludge is breaking loose from hidden areas. These flakes often come from the space between the metal and plastic layers of the agitator base.
A musty or moldy smell during or after use is another key indicator. This odor comes from trapped moisture and organic buildup in damp, dark zones like dispenser trays and the pump.
Monitor Performance Issues
Sludge doesn’t just look and smell bad. It impairs function. If clothes come out less clean despite using detergent, or if the machine makes unusual noises during spin, sludge may be weighing down the drum or clogging the pump.
Slow drainage or standing water after a cycle suggests debris in the pump filter or drain hose, often mixed with sludge. Address these signs immediately to avoid mechanical failure.
Choose the Right Cleaning Agent
Not all cleaners work the same. Match the chemical to the type of buildup for maximum effectiveness.
Use Vinegar for Mineral and Soap Scum
Distilled white vinegar dissolves hard water limescale and softens soap residue. Use 2 to 4 cups in a hot cycle to break down grime. For heavy buildup, pause the cycle after filling and let the vinegar soak for 60 minutes before resuming.
Never mix vinegar with bleach. This creates toxic chlorine gas that can cause serious harm. Use vinegar alone or in a separate cycle.
Apply Bleach to Kill Mold and Mildew
Chlorine bleach is the strongest disinfectant for eliminating mold, bacteria, and odors. Use 1 cup in the hottest, longest cycle with a 1-hour soak for maximum germ-killing power.
Ensure good ventilation and avoid mixing with vinegar, ammonia, or hydrogen peroxide. Bleach is ideal after a vinegar cycle if odors persist.
Boost Cleaning with Baking Soda
Baking soda deodorizes and adds mild scrubbing power. Use ½ to 1 cup in a second cycle after vinegar, or during the rinse phase. It neutralizes acidic smells and helps lift grime from drum surfaces.
For stubborn spots, make a paste with water and scrub manually with a soft brush.
Try Borax for Deep Deodorizing
Borax softens water, boosts detergent action, and eliminates deep odors. Combine ½ cup with vinegar (not bleach) for enhanced cleaning. Let it soak in hot water for one hour.
Wear gloves and avoid inhaling dust. Keep away from pets and children.
Use Commercial Cleaners Monthly
Products like Affresh or OxiClean are formulated specifically for washers. One tablet releases slowly during the cycle, breaking down residue without messy pouring.
Use the Clean Washer cycle if available. Do not mix with vinegar in the same run as this can reduce effectiveness.
Run a Routine Chemical Clean
Prevent sludge with simple monthly maintenance. This basic cleaning method keeps your machine fresh without disassembly.
Prepare for the Cleaning Cycle
Unplug if removing components. Remove any clothes or debris. Wipe the lid and exterior with a damp microfiber cloth.
Choose one agent: 2 cups vinegar, 1 cup bleach, or 1 commercial tablet.
Set the Correct Wash Settings
Select the hottest water temperature available (120°F or higher). Choose the largest load size and longest cycle type.
Pour the cleaner directly into the drum, not the dispenser, unless the product specifies otherwise.
Soak and Complete the Cycle
Let the machine fill. Pause the cycle and allow a 60-minute soak. This gives the solution time to penetrate grime.
Resume and let the full cycle complete, including rinse and spin.
Flush Residual Chemicals
After bleach or heavy vinegar use, run a second hot rinse cycle with no additives to flush out residue.
Wipe the drum dry with a clean cloth to prevent new moisture buildup.
Deep Clean With Disassembly
:max_bytes(150000):strip_icc()/how-to-remove-agitator-from-washing-machine-5211908-hero-1d1327a42ed94962af915e32891c5ab1.jpg)
For visible sludge, flakes, or persistent odors, remove and clean key components. This method reaches areas standard cycles cannot touch.
Remove and Soak Dispensers
Pull out bleach and fabric softener trays. Soak in a sink with hot water, 1 cup vinegar, and a splash of dish soap. Let sit 15 to 20 minutes. Scrub with an old toothbrush. Use a pipe cleaner to unclog siphon tubes and dispenser slots.
For fixed trays, pour heated vinegar into the cavity, wait 15 minutes, then scrub.
Take Off the Agitator Cap and Bolt
Pop off the center cap on the agitator using a flathead screwdriver. Underneath, you’ll find a 10mm bolt. Use a socket wrench to remove it.
Note: Some bolts are reverse-threaded. Turn clockwise to loosen. If unsure, try gentle counter-clockwise first.
Lift and Inspect the Agitator
Gently lift the agitator straight up. If stuck, wiggle slightly or apply light heat. Do not force it. This exposes the shaft and base where sludge and brown flakes accumulate.
Inspect the metal-plastic cavity in the wash plate. This is a common sludge source.
Scrub Hidden Areas Manually
Mix 1 cup vinegar, 1 cup water, and 1 teaspoon dish soap. Use a microfiber cloth, soft brush, or toothbrush to scrub inside the drum, top edge, agitator shaft and base, and underside of the agitator.
Use a pipe cleaner for small holes in the bleach dispenser.
Reassemble and Flush
Rinse all parts thoroughly. Dry before reinserting dispensers and placing the agitator back on the shaft.
Hand-tighten the 10mm bolt. Replace the cap. Run a hot cycle with 2 cups vinegar or a cleaning tablet to flush debris from the pump and lines.
Repeat if flakes still appear.
Perform Advanced Mechanical Cleaning

For chronic sludge, access the drum and housing. This level of cleaning requires mechanical aptitude but reaches the root cause.
Remove the Top Housing
Unplug the machine. Locate two screws at the rear top edge. Remove them.
Slide the top panel forward to disengage clips, then lift it off. Lean it against a wall to avoid damage.
Detach the Drum Assembly
With the agitator removed, locate the gray rubber gasket around the top of the inner tub. Remove screws or release latches holding the top ring.
In severe cases, remove the six 10mm bolts at the drum base arranged in a circle. Use a socket wrench.
Lift the drum carefully to access the space between inner and outer tubs.
Clean Between the Tubs and Base
Take the drum outside. Rinse with a hose or pressure washer. Scrub the drum base, support wheel, and wash plate layers with dish soap and a stiff brush.
Clean the outer tub interior to remove adhered sludge.
Reassemble with Care
Reinstall the drum, hand-threading bolts first to avoid cross-threading. Reattach the gasket and top ring.
Slide the top housing back into place and secure with rear screws. Reinstall the agitator and cap.
Run Verification Cycles
Run 2 to 3 empty hot cycles with a cleaning tablet or vinegar to flush out any remaining debris from hoses and pump.
Clean Key Components Separately
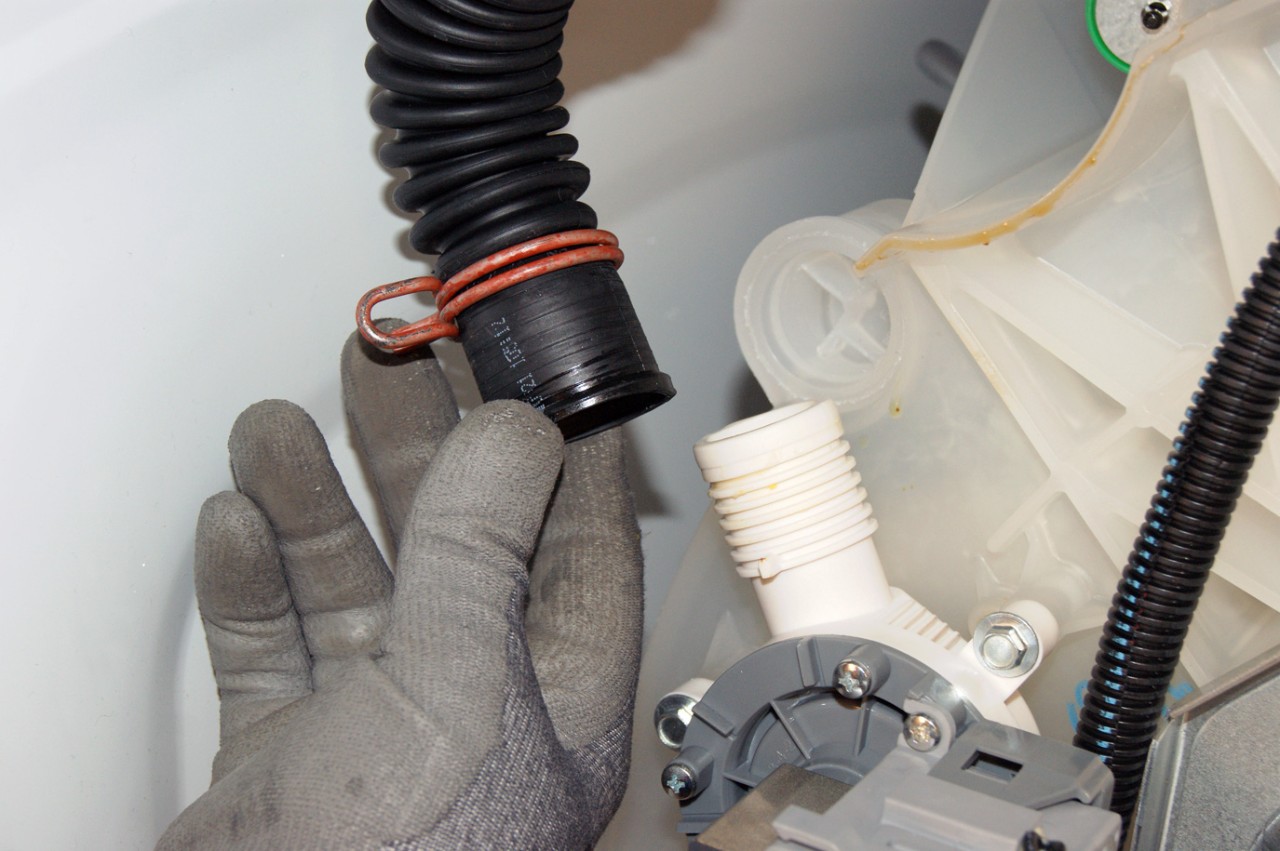
Target high-risk zones that trap sludge. These areas require manual attention beyond regular cycles.
Agitator
Remove monthly if you have pets or use heavy detergents. Scrub the hollow center and underside fins with a toothbrush. Clear clogged holes with a pipe cleaner.
Dispensers
Clean every month. Soak removable trays. For fixed ones, pour vinegar into slots weekly to prevent clogs.
Pump Filter and Drain Hose
Locate behind a front access panel. Place a towel and basin underneath.
Unscrew the filter and remove lint, coins, hair, and sludge. Flush the hose with water to ensure clear flow.
Check every 6 to 12 months.
Drum Rim and Top Edge
After each cleaning, push the drum to expose the upper rim. Wipe with a vinegar-soap solution and dry.
This tideline area rarely gets wet during normal washes, making it perfect for sludge accumulation.
Lint Filter
Wipe with a damp cloth monthly. Use vinegar and a toothbrush for stuck residue.
Prevent Sludge With Smart Habits
Stop sludge before it starts with simple daily and monthly routines. Prevention is easier than cure.
Leave the Lid Open After Every Use
This is the number one prevention tip. Open the lid to let air circulate and dry out the drum, seals, and dispensers. Moisture breeds mold. Dryness stops it.
Even 30 minutes helps, but leaving it open between loads is best.
Use Detergent Sparingly
Overuse is a leading cause of sludge. Follow the manufacturer’s dosage, often 1 to 2 tablespoons for HE machines.
In soft water areas, use even less. Excess suds do not rinse away and turn into gunk.
Avoid Fabric Softeners
Liquid softeners and dryer sheets leave a waxy coating that traps dirt and resists rinsing. This builds up fast.
Use ½ cup white vinegar in the rinse cycle instead. It softens naturally and prevents residue.
Run Hot Cycles Occasionally
Even if you mostly wash in cold, run a monthly hot cycle to dissolve accumulated oils and detergent.
Heat activates cleaning agents and keeps internal parts clear.
Follow a Maintenance Schedule
Consistency beats deep cleaning. Stick to this calendar for optimal performance.
• After Every Load: Leave lid open. Wipe wet rim.
• Monthly: Run cleaning cycle (vinegar, bleach, or tablet). Clean dispensers.
• Every 3 Months: Remove and soak agitator. Check lint filter.
• Every 6 to 12 Months: Inspect pump filter. Deep scrub drum rim and base.
• As Needed: Run extra rinse cycles for heavy soil.
Increase frequency in hard water or high humidity areas.
Troubleshoot Common Sludge Problems
Fix issues fast with targeted solutions. Understanding the cause helps you apply the right fix.
Brown Flakes on Clothes
Cause: Sludge under wash plate or deteriorating rubber seals.
Fix: Disassemble agitator and scrub between metal-plastic layers. Inspect seals for cracks.
Musty Smell Persists
Cause: Mold in dispensers or damp drum.
Fix: Run bleach cycle with 1-hour soak. Clean dispensers. Always leave lid open.
Poor Cleaning Performance
Cause: Detergent buildup or clogged pump.
Fix: Run Affresh or vinegar cycle. Clean pump filter and check drain hose.
Water Not Draining
Cause: Sludge and lint blocking pump.
Fix: Remove and clean pump filter. Flush drain hose with water.
Unusual Noises During Spin
Cause: Debris in pump or sludge imbalance.
Fix: Clean filter. Remove sludge from drum base. Check for foreign objects.
Know When to Call a Pro
Some issues go beyond DIY. Recognize when professional help is necessary.
Seek Professional Help If
• Sludge and odors return after mechanical cleaning
• Pump or motor makes grinding noises
• Leaks appear after reassembly
• You are uncomfortable removing the drum or housing
Technicians can diagnose pump failures, seal replacements, or internal corrosion that DIY methods cannot fix.
Frequently Asked Questions About Cleaning Sludge from Top Loader Washing Machines
How often should I clean my top loader washing machine to prevent sludge?
Run a cleaning cycle monthly using vinegar, bleach, or a commercial cleaner. Deep clean the agitator and dispensers every 3 months. Check the pump filter every 6 to 12 months.
Can I mix vinegar and bleach to clean my washing machine?
Never mix vinegar with bleach. This creates toxic chlorine gas that can cause serious respiratory harm. Use these cleaners in separate cycles, and ensure thorough rinsing between them.
Why do brown flakes appear on my clothes after washing?
Brown or black flakes come from sludge accumulating between the metal and plastic layers of the wash plate or agitator base. Remove the agitator and scrub these areas thoroughly to eliminate the problem.
What is the best cleaning agent for removing hard water deposits?
Distilled white vinegar is excellent for dissolving hard water minerals and limescale. Use 2 to 4 cups in a hot cycle. For severe buildup, allow a 60-minute soak before completing the cycle.
How do I clean under the agitator in my top loader?
Remove the center cap with a flathead screwdriver, then remove the 10mm bolt with a socket wrench. Lift the agitator straight up. Scrub the shaft and base with a vinegar, water, and dish soap solution using a toothbrush or pipe cleaner.
Why does my washing machine still smell musty after cleaning?
Musty smells persist when moisture remains trapped. Always leave the lid open after every use. Clean dispensers thoroughly and run a bleach cycle with a 1-hour soak for stubborn mold.
Key Takeaways for Cleaning Sludge from Top Loader Washing Machines
:max_bytes(150000):strip_icc()/clean-top-load-washing-machine-5073254-V1-4d57061f759a4c84a61cb797084649a7.png)
Cleaning sludge from a top loader washing machine is simple with the right approach. Start with monthly vinegar or tablet cycles, clean dispensers and the agitator every few months, and always leave the lid open between loads. These habits can extend your washer’s life to 14 years or more.
For stubborn sludge, deep cleaning with disassembly restores full performance. Target hidden areas like the wash plate cavity, drum rim, and pump filter. Use the correct cleaning agents separately, never mixing vinegar with bleach.
Stay consistent with maintenance and your washer will keep clothes fresh without the funk. If odors persist or mechanical issues arise despite your efforts, call a professional to prevent further damage.



