
Installing a Samsung washing machine correctly is essential for safe operation, optimal performance, and avoiding costly repairs down the line. Improper installation can lead to water leaks, excessive vibration, error codes like nF or 4E, or even damage to your floors and surrounding appliances. This step-by-step guide covers everything you need to know, from selecting the right location and removing transit bolts to connecting water lines, leveling the unit, and running your first test cycle. By following these manufacturer-backed procedures, you will have your Samsung washer installed securely and ready for years of reliable use.
Choose the Right Installation Location
Your washing machine needs a proper environment to function safely and efficiently. Selecting the right spot involves checking surface conditions, clearance requirements, and environmental factors.
Meet Surface and Environmental Requirements
Place your Samsung washing machine on a solid, level, and dry floor such as tile, concrete, or hardwood. Carpeted surfaces can cause the unit to shift during spin cycles, leading to unbalanced loads and error codes. Avoid slippery flooring entirely.
The installation area must stay above freezing (32°F / 0°C). Cold temperatures can freeze internal water lines and damage components. Keep the machine away from direct sunlight, high humidity, heat sources like water heaters or ovens, and enclosed spaces with poor airflow.
Check Clearance and Dimensions
Samsung front-load washers typically measure 24 to 30 inches wide and 27 to 34 inches deep. Always verify exact dimensions in your model’s manual before final placement.
Leave adequate clearance for proper operation: 6 inches behind the machine for hoses and ventilation, 1 inch on each side from walls or adjacent appliances, and enough space in front for the door to open fully. Front-load doors cannot be reversed, so plan accordingly.
If stacking with a dryer, use only Samsung-approved stacking kits designed for matching models.
Install a Drip Pan If Needed
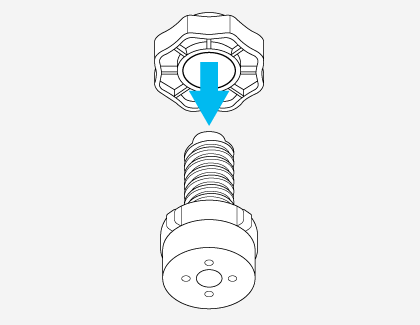
A drip pan provides essential protection against water damage, especially when installing on upper floors or over finished flooring.
Use a Drip Pan on Upper Floors
Choose a low-profile drip pan that maintains access to the pump filter, which requires regular cleaning. For specific models like the WA54R7200 series, ensure the center bulge is less than 5/8 inch tall to prevent motor contact and grinding noise.
If your drip pan exceeds this height, install leg rings (provided with some models) to raise the washer clearance and prevent component damage.
Unbox and Remove Transit Bolts

Proper unboxing ensures you have all necessary components and prevents damage during operation.
Inspect Contents and Packaging
After unboxing, remove all tape, foam, and cardboard. Open the drum door and check for internal packing materials. Verify all accessories are present including water inlet hoses (blue for cold, red for hot), drain hose, leveling feet, spanner wrench, plastic bolt caps, and hose guide clips.
Top-load models typically do not have transit bolts but may have shipping spacers that must be removed.
Remove Rear Transit Bolts (Front Load Only)
Front-load washers have 3 to 4 metal transit bolts on the back panel that stabilize the drum during shipping. Failure to remove these causes severe vibration and internal damage.
Use the supplied spanner to loosen and remove each bolt completely. Insert plastic caps into the empty holes to seal them. Store bolts and spacers in the detergent drawer or tape them under the machine for future use if you need to move the unit.
Connect Water Supply Hoses

Proper water supply connection prevents leaks and ensures correct temperature functionality.
Use New, Steel-Braided Hoses
Always use brand-new water hoses. Reusing old hoses significantly increases leak risk. Steel-braided hoses offer superior durability compared to standard rubber options.
Check that rubber washers are seated inside each connector. Missing washers are a leading cause of leaks. Do not use Teflon tape or sealant on connections as Samsung warns this can damage fittings.
Connect the blue connector to the cold water valve and the red connector to the hot water valve. Crossed lines trigger error codes including nF, 4E, or nF2.
Follow Safe Connection Steps
Shut off water valves at the wall before beginning. Connect hose ends to the valves, open briefly into a bucket to flush debris, then close. Hand-tighten connections to the wall, then turn an additional two-thirds of a turn with a wrench without overtightening.
Attach the other ends to the washer matching colors (blue to cold, red to hot). Hand-tighten, then wrench-tighten slightly. Lay hoses straight without kinks or twists.
Turn the water back on and inspect all four connection points for leaks before proceeding.
Set Up the Drain Hose Correctly
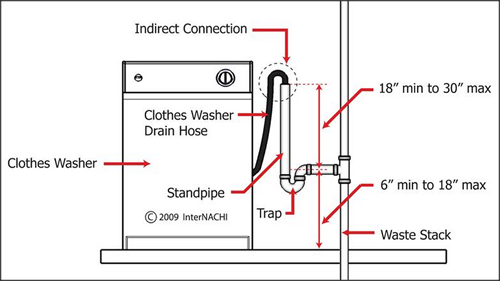
Proper drain hose installation prevents siphoning, drainage issues, and water backflow.
Choose the Right Drain Method
Two approved methods exist for draining your Samsung washer.
For draining over a sink or basin edge, position the hose spout 24 to 35 inches from the floor. Use the plastic hose guide to form a loop and secure it to the wall with a hook to prevent siphoning.
For draining into a standpipe or laundry tub, ensure the standpipe height is 39 to 96 inches from the floor. Insert the hose only 6 inches into the pipe. Deeper insertion causes siphoning and poor drainage. Secure the hose with zip ties to prevent it from popping out during spin cycles.
Prevent Siphoning in Sink Installations
If connecting to a sink waste, route the hose upward first above the sink’s overflow level. Secure the hose guide high on the wall to create an air gap that stops backflow.
Never let the drain hose touch standing water in the sink or tub as this can siphon dirty water back into the drum.
Level the Washing Machine
An unlevel washer causes excessive vibration, noise, and component wear.
Stabilize Front-Load Models
Place hands on opposite top corners and gently rock the machine diagonally. If it rocks, adjust the front leveling feet. Turn clockwise to lower and counter-clockwise to raise. Repeat until the machine does not rock in any direction.
Level Top-Load Washers Accurately
For top-load models, fill the tub with water just below the pulsator. Observe the water line around the pulsator. If it is off-center, adjust the front feet until the water is even. Alternatively, place a bubble level on top of the machine and adjust until the bubble is centered both front-to-back and side-to-side.
Lock All Leveling Feet
Once level, tighten the locking nut under each foot until flush with the base. This prevents the legs from shifting during operation. Verify all four feet make full contact with the floor.
Install Leg Rings (If Required)
Some models require leg rings when installed on drip pans to prevent motor contact.
Prevent Motor Rub on Drip Pans
If using a drip pan with a raised center (over 5/8 inch), lift the machine slightly and unscrew each leveling foot. Slide the leg ring onto the foot and reattach it to the machine. Tighten fully. Repeat for all four legs to raise the washer enough to clear the pan without motor contact.
Plug In and Power Up Safely
Electrical connections must meet specific requirements for safe operation.
Use a Proper Electrical Outlet
Connect the power cord directly to a dedicated 120V, 60 Hz outlet with a three-prong grounded plug. The circuit must be protected by a 15-amp fuse or circuit breaker.
Do not use extension cords, power strips, or multi-plug adapters. Never remove or modify the third prong as grounding prevents electrical shock. Wait to power on until after confirming all water connections are leak-free.
Run Calibration and Test Cycle
Calibration optimizes your washer’s performance and ensures accurate sensing.
Activate Calibration Mode
Calibration ensures proper drum balance, load sensing, and water usage. Run it after installation or moving the unit.
Ensure the drum is completely empty. Press and hold Temp and Delay End buttons simultaneously for 3 seconds. The display shows “Cb,” “CLB,” or “CV.” Press Start/Pause. The drum rotates back and forth for approximately 3 minutes. When complete, the display shows “En,” “End,” or “0.”
Perform a Rinse and Spin Test
Leave the drum empty with no detergent or clothing. Select the Rinse + Spin or Drain and Spin cycle. Close the door and press Start.
Monitor for normal water fill sounds, smooth spinning, no leaks under or behind the machine, and no vibration or error codes. If leaks occur, slightly tighten hose connections without overdoing it. If vibration persists, recheck transit bolt removal and leveling.
After the cycle, wipe the door seal and detergent drawer to remove factory residue.
Troubleshoot Common Installation Errors
Knowing how to identify and fix installation issues prevents extended downtime.
Fix Water Supply Errors
Error codes nF, nF2, 4E, and 4E2 indicate water supply problems. Common causes include crossed hot and cold hoses, kinked supply lines, water valves not fully open, or clogged inlet filters. Double-check hose connections, straighten any bent lines, and ensure valves are completely open.
Stop Vibration and Noise
Excessive vibration usually stems from remaining transit bolts (front load), an unlevel machine, loose locking nuts, or missing leg rings on drip pan installations. Recheck that all transit bolts were removed, verify leveling by rocking the unit, and ensure the machine is not touching walls or other appliances.
Resolve Drain Issues
Poor drainage or siphoning occurs when the drain hose height is incorrect, the hose is inserted too deeply into the standpipe (more than 6 inches), or kinks restrict water flow. Check hose height (24 to 35 inches for sink edge, over 39 inches for standpipe), verify insertion depth, and ensure the hose is secured with zip ties.
Maintain Your Samsung Washer
Regular maintenance extends your washer’s lifespan and prevents problems.
Prevent Long-Term Problems
Use only HE detergent in front-load models to prevent oversudsing. Run the Self Clean or Pure Cycle monthly to prevent mold and odors. Clean the pump filter every 1 to 3 months on front-load models. Keep the door seal dry and wipe it after each use. Leave the door and detergent drawer open when the machine is not in operation.
Connect to the SmartThings app for cycle alerts, remote start, and maintenance reminders.
Key Takeaways for Installing Your Samsung Washer
Proper installation sets the foundation for years of reliable performance. Always remove transit bolts from front-load models before operation, as failure to do so causes severe vibration and damage. Use new steel-braided hoses and ensure correct hot/cold connections to prevent error codes like nF or 4E. Level the machine carefully and lock the feet to prevent shifting during spin cycles. Run calibration after installation to optimize performance, then test with an empty Rinse and Spin cycle to verify no leaks or errors. Following these steps avoids 90% of common post-installation problems and ensures your Samsung washer operates quietly and efficiently.
Frequently Asked Questions About Installing a Samsung Washing Machine
Do I need to remove transit bolts from my Samsung front-load washer?
Yes, you must remove the 3 to 4 metal transit bolts from the back panel before using your front-load Samsung washer. These bolts secure the drum during shipping and will cause severe vibration and internal damage if left in place. Use the supplied spanner to remove them and save them for future moves.
What error codes indicate water supply problems during installation?
Error codes nF, nF2, 4E, and 4E2 indicate water supply issues. These typically appear when hot and cold hoses are crossed, supply lines are kinked, water valves are not fully open, or inlet filters are clogged. Check all connections and ensure valves are completely turned on.
How high should the drain hose be positioned?
For sink or basin drainage, position the hose spout 24 to 35 inches from the floor. For standpipe drainage, the pipe must be 39 to 96 inches from the floor. Insert the hose no more than 6 inches into the standpipe to prevent siphoning.
Can I stack any Samsung washer with a dryer?
Only Samsung front-load washers can be stacked with dryers. Top-load models cannot be stacked. You must use a Samsung-approved stacking kit designed for matching models, and the dryer must always be positioned on top.
How do I run calibration mode on a Samsung washing machine?
Press and hold the Temp and Delay End buttons simultaneously for 3 seconds with an empty drum. The display shows “Cb,” “CLB,” or “CV.” Press Start/Pause. The calibration cycle runs for approximately 3 minutes, and the display shows “En,” “End,” or “0” when complete.



