
Installing a washing machine drain pipe correctly prevents costly water damage, foul odors, and plumbing code violations. When your washer pumps out 15 to 20 gallons in under 5 minutes, the drain system must handle rapid discharge without backups or siphoning. A poorly installed pipe leads to slow draining, sewer gas entry, and potential contamination of your clean water supply. This guide covers every critical step, from selecting the right pipe size to connecting the drain hose, using only professional plumbing standards and code requirements.
By the end, you will know exactly how to install a washing machine drain pipe that meets code, prevents clogs, and keeps your laundry room odor-free for years.
Choose the Correct Pipe Size and Material

Use 2-Inch Diameter Pipe for Code Compliance
Always use 2-inch diameter pipe for your washing machine drain. Most plumbing codes mandate this size because it handles the high-volume discharge from modern washers without risking clogs or overflow. A smaller 1.5-inch pipe may seem adequate but creates bottlenecks when lint, detergent residue, and water volume combine during drainage cycles.
The entire drain system must remain 2 inches from the standpipe through the horizontal line to the main stack. Reducing the size downstream creates transition points where backups occur.
Select PVC or ABS with Proper Adhesives
Two common materials work well for drain pipes: PVC (white) and ABS (black). Each requires specific adhesives for a watertight seal.
PVC needs purple primer and PVC solvent cement. ABS requires ABS-specific black glue and no primer. If connecting ABS to PVC, use a special ABS-to-PVC bonding adhesive designed for transitions. Standard glues will not create a lasting seal between different materials.
Always dry-fit all pieces before applying adhesive. Mark alignment lines on pipes and fittings so you can quickly reassemble them after gluing.
Install a P-Trap to Block Sewer Gases

Why a P-Trap Is Required
A P-trap is mandatory in any washing machine drain installation. It holds water to create a seal that blocks sewer gases like methane and hydrogen sulfide from entering your home. Without this water seal, you will smell rotten eggs and face potential health hazards.
Never use an S-trap. This configuration is illegal in most areas because it can siphon dry and break the seal.
Choose Threaded Traps for Easy Maintenance
Opt for a threaded P-trap instead of a glued one. Threaded traps allow you to unscrew and clear clogs without cutting pipes. This matters for future maintenance when lint, socks, or debris create blockages deep in the trap.
If you glue the trap, any severe clog may require cutting and demolition to repair.
Prevent Dry Traps in Low-Use Situations
If your washing machine sits unused for weeks, the water in the trap evaporates and breaks the seal. Pour 2 to 3 cups of water down the drain every month if the machine is idle. This simple step keeps the trap sealed and odors out.
Build a Code-Compliant Standpipe
Standpipe Must Be 2 Inches in Diameter
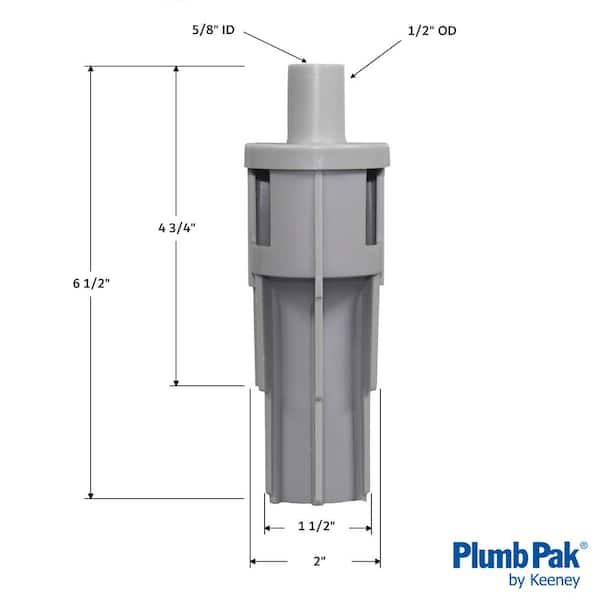
The standpipe is the vertical pipe receiving the washing machine drain hose. It must be 2 inches in diameter without exception. A smaller pipe restricts flow and causes overflow during high-speed spin cycles.
Set Correct Height Between 18 and 30 Inches
The top of the standpipe must sit 18 to 30 inches above the trap weir (the highest point inside the trap). This range prevents siphoning while allowing gravity to assist drainage.
The minimum 18 inches prevents trap siphoning. The maximum 30 inches follows Uniform Plumbing Code standards. The ideal range is 20 to 24 inches, providing a safety margin and reliable performance.
Do not exceed 30 inches unless your specific washer manufacturer specifies a higher pump rating. Some manufacturers allow up to 96 inches, but that refers to hose elevation, not standpipe height.
Maintain an Air Gap at the Top
The drain hose must not be sealed or submerged in the standpipe. Leave the top open to create an air gap. This prevents backflow into the washer and protects your potable water supply from contamination.
Position the Drain Box at Proper Height
Mount Box Between 36 and 42 Inches High
If using a drain box (a pre-assembled unit with hot/cold valves, trap, and knockout), install it 36 to 42 inches above the finished floor. For easiest access to supply valves and connections without moving the washer, 42 inches is recommended.
Remove the Knockout Before Use
The drain outlet in the box has a plastic knockout that must be removed before connecting the drain line. Tap it with a hammer and flathead screwdriver to crack it, then use pliers to twist and pull it out.
Secure the knockout with tape or string first so it does not fall into the pipe and cause a hidden blockage.
Once removed, connect the P-trap below and route the horizontal drain line with proper slope.
Ensure Proper Pipe Slope for Fast Drainage
Maintain 1/4 Inch per Foot Slope
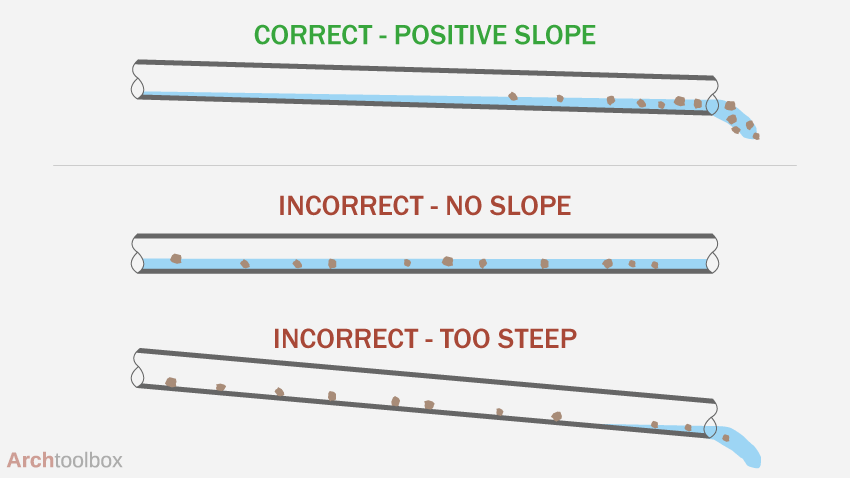
The horizontal drain pipe must slope 1/4 inch for every foot of run (approximately 2% gradient). This ensures gravity pulls water and solids smoothly toward the main stack.
For example, a 4-foot run requires exactly 1 inch of drop from start to end. A 7-foot span needs 1.75 inches of drop.
Avoid Flat or Overly Steep Pipes
Too flat (less than 1/4 inch per foot) causes water to flow too slowly, leading to sediment buildup and clogs. Too steep (more than 1/2 inch per foot) makes water rush ahead of solids, leaving debris behind that creates blockages.
Use a torpedo level to check slope during installation. Support pipes every 3 to 4 feet with straps to prevent sagging over time.
Connect to a Vent System to Prevent Siphoning

Venting Is Required by Code
A vent pipe is essential. Without it, negative pressure during drainage siphons water out of the P-trap, breaking the seal and allowing sewer gases to enter. You will hear gurgling sounds and smell unpleasant odors.
Use a 1.5-Inch Vent Pipe
The vent line can be 1.5 inches in diameter, even when the drain is 2 inches. It must connect to the main vent stack or use an Air Admittance Valve (AAV) if allowed by local code.
If tying to the main stack, the vent must rise vertically and extend at least 12 inches above the roofline. AAVs (like Studor vents) are mechanical check valves that let air in but not out. They help when roof access is limited, but not all jurisdictions permit them.
Connect the Washing Machine Drain Hose Correctly
Insert Hose 6 to 8 Inches into Standpipe
The washer drain hose should extend 6 to 8 inches into the standpipe. This depth prevents splashing while maintaining the air gap required by code.
Never seal the hose with tape or clamps. Doing so creates a siphon risk and violates plumbing code.
Do Not Insert Too Deeply
If the hose goes deeper than 8 inches, it may create a siphon effect, causing water to be sucked out of the trap or back into the washer. Keep the insertion depth within the 6 to 8 inch range.
Secure with a Hose Hook or Bracket
Use the plastic hose hook provided with the washer or a drain box to hold the hose in place. This prevents it from popping out during high-pressure drain cycles.
Route the Hose with Proper Elevation
Maximum Hose Height: 96 Inches
The highest point of the drain hose loop must not exceed 96 inches (8 feet) above the bottom of the washer. Exceeding this overloads the pump, leading to poor drainage or premature pump failure.
Most washers handle 34 to 48 inches reliably, but always check your model is manual for specific requirements.
Prevent Kinks and Sharp Bends
Route the hose smoothly without kinks, sharp bends, or crushing under the machine. A bent hose restricts flow and causes slow draining. Tuck it behind the washer neatly and use a zip tie to bundle it with supply lines if needed.
Follow Dry-Fit and Gluing Best Practices
Dry-Fit All Pipes Before Gluing
Always dry-fit every section of pipe before applying adhesive. This ensures proper alignment and length. Mark the joints with a pen so you can realign them during gluing.
Prime and Glue with a Quarter-Turn
For PVC, apply purple primer to the pipe and inside the fitting. Then apply solvent cement to both surfaces. Insert the pipe and twist 90 degrees to spread the glue evenly. Hold for 15 to 30 seconds to prevent slippage.
This twist ensures a watertight seal and full contact between surfaces.
Support Pipes and Protect Studs
Strap pipes every 3 to 4 feet to prevent sagging. Install metal protection plates on studs where pipes pass through. This prevents drywall screws from puncturing the pipe later during wall repairs.
Diagnose and Fix Common Drain Issues
Washer Backs Up? Check These First
If water overflows or drains slowly, inspect the P-trap for clogs (lint, socks, debris). Verify the slope using a level to check for flat or reverse sections. Check venting; a blocked vent causes gurgling and slow drainage. Ensure the hose is not inserted too deeply in the standpipe.
Sewer Smells? Refill the Trap
Dry traps cause sewer smells. Pour water down the drain to restore the seal. If it dries again quickly, check for evaporation or siphoning due to poor venting.
Mold Inside Washer? Check Hose Length
If your washer has mold or musty smells, the drain hose may extend more than 4 inches beyond the elbow bracket inside the machine. This creates a dark, moist space where mold grows. Trim or reposition the hose so it connects within 4 inches of the bracket.
Maintain Your Drain System Long-Term
Flush Monthly with Vinegar
Every month, pour a gallon of hot water mixed with 1 cup of white vinegar down the drain. This dissolves soap scum, mineral deposits, and organic buildup.
Clean the Drain Hose Quarterly
Remove the hose from the washer and standpipe every 3 to 4 months. Rinse it out to remove lint and sludge. Reinstall securely with a clamp if needed.
Inspect for Leaks and Odors
Check under the machine and around the trap for drips. Smell for sewer gases. Address issues immediately to prevent water damage or health hazards.
Frequently Asked Questions About Installing Washing Machine Drain Pipes
What size pipe is required for a washing machine drain?
A 2-inch diameter pipe is required by most plumbing codes. This size handles the high-volume discharge from modern washers without risking clogs or overflow. Never use 1.5-inch pipe for the standpipe or drain line.
How high should a washing machine standpipe be?
The standpipe must be 18 to 30 inches above the trap weir. The ideal height is 20 to 24 inches, which prevents siphoning while staying within code limits. Never exceed 30 inches unless specified by your washer manufacturer.
Can I install a washing machine drain myself?
Yes, connecting the drain hose and installing a pre-fabricated drain box are suitable for competent DIYers. However, cutting into main drain stacks, modifying vent systems, or rerouting major plumbing lines often require professional knowledge and permits.
Why does my washing machine smell like sewer gas?
Sewer smells indicate a dry P-trap or venting problem. The trap water seal has evaporated (if unused) or been siphoned out by poor venting. Pour water into the drain to refill the trap, and check that the vent is not blocked.
What happens if the drain hose is too high?
Exceeding 96 inches (8 feet) of hose elevation overloads the washer pump, causing poor drainage or premature pump failure. Keep the highest point of the hose loop between 24 and 34 inches for best results.
Key Takeaways for Installing Your Washing Machine Drain Pipe
A properly installed washing machine drain pipe prevents clogs, odors, and water damage. Use 2-inch diameter pipe throughout the system, maintain a 1/4 inch per foot slope, and always install a P-trap to block sewer gases. Vent the system properly to prevent siphoning, and keep the standpipe height between 18 and 30 inches.
Whether you are using a standpipe or a drain box, every detail matters. Follow these specifications, and you will pass inspection while building a system that works efficiently for years.



