If you’re moving, replacing, or relocating your Samsung washing machine, knowing how to disconnect it properly is essential. Skipping steps or rushing the process can lead to water damage, electrical hazards, or costly internal damage. The key to a successful disconnect lies in following a precise sequence: cut power, shut off water, drain residual water, and secure the machine for transport. This guide walks you through each step with model-specific insights for Samsung units.
You do not need to be a technician to disconnect your washer, but you do need the right tools, a clear plan, and attention to detail. Whether you are doing it yourself to save $150 or more on professional services or preparing for a DIY move, this step-by-step walkthrough covers everything from shutting off water valves to securing hoses for transport.
Cut Power Before Touching Any Hoses

Electrical safety is your first priority when disconnecting a Samsung washing machine. Never work on a plugged-in machine, as even standby modes carry electrical current that can cause shock.
Unplug From Wall Outlet
Start by pulling the power cord from the wall outlet. This is the fastest way to disconnect power. If the outlet is behind the unit, gently pull the washer forward just enough to reach it. Avoid yanking the cord, as this can damage the outlet or the cord itself.
Switch Off Circuit Breaker
If the outlet is not accessible or your laundry area has a dedicated circuit, turn off the correct breaker in your electrical panel. This ensures no accidental power surge during disconnection. Confirm it is off by attempting to start the machine. It should not respond.
Secure the Power Cord
Once unplugged, wrap the cord neatly around the back of the machine. Use a zip tie or tape to hold it in place. For non-detachable cords, place a towel inside the drum and tuck the cord in to prevent rattling during transport.
Shut Off Water Supply to Prevent Flooding

Leaving water lines open risks flooding your laundry area. Samsung models require both hot and cold supply lines to be closed before proceeding.
Locate Hot and Cold Valves
Find the two shut-off valves behind the washer. They are usually mounted on the wall or floor. One controls hot water, often marked with red. The other controls cold, often marked with blue. Turn both clockwise until tight.
Verify Valve Function
If a valve leaks or will not close fully, do not proceed. Attempting to disconnect pressurized lines will cause immediate flooding. Repair or replace faulty valves before continuing with the disconnect process.
Relieve Line Pressure
After closing the valves, briefly open the washing machine inlet ports after disconnecting hoses to release trapped pressure. Have a bucket ready, as some water will spray out. This prevents unexpected spills when you remove the hoses.
Drain Residual Water From the Machine

Even after a complete cycle, water remains in hoses, the pump, and the filter. Skipping this step guarantees a mess when you tilt or move the unit.
Place Towels and Buckets
Lay thick towels around the base of the machine. Position buckets under the water inlet connections at the back of the machine, the drain hose exit point, and the front drain filter access panel. This setup catches drips and prevents floor damage.
Empty the Drain Filter
Samsung washers store water in the front-mounted drain filter. Skipping this step causes a gush of two to three gallons when tilting the unit.
Open the small access flap at the bottom front. Check for an emergency drain tube. Pull it out, remove the cap, and let water drain into a shallow bowl. Once drained, unscrew the main filter cap slowly. Water will flow, so use a large bucket. Clean debris from the filter, then reinstall and tighten securely.
Disconnect Water Inlet Hoses Carefully
With power off and water drained, remove the supply hoses using the correct technique to avoid damaging the fittings.
Gather Required Tools
You will need channel locks or an adjustable wrench, a bucket, and labels or tape for hose identification. Having these tools ready prevents trips back to the toolbox.
Remove Hoses From Wall First
Position a bucket under each valve. Use pliers or channel locks to turn the hose fitting counter-clockwise. Let remaining water drain into the bucket. Cap or plug the open valve ends if leaving them exposed for any length of time.
Disconnect From Machine
Place another bucket behind the washer. Unscrew the hose from the machine inlet ports using the same counter-clockwise motion. If the hose is stuck, twist the entire hose gently to break the seal rather than forcing the fitting.
Inspect and Store Hoses Properly
Check the rubber washers inside each fitting. Replace them if cracked or flattened. Label hoses hot and cold to avoid mix-ups during reinstallation. Tape both ends to the back of the machine, facing upward to prevent drips during transport.
Remove the Drain Hose Without Making a Mess
The drain hose carries wastewater to the standpipe and always holds residual water that must be emptied.
Pull From Standpipe
Gently lift the hose out of the wall drain. Do not yank it, as it may be stuck from dried detergent residue. Wiggle it free if needed.
Drain Remaining Water
Lower the hose end into a bucket. Gravity will empty most of the water inside. Let it sit for 30 seconds to ensure complete drainage.
Secure for Transport
Tape the hose to the back of the washer. Alternatively, bundle it with the power cord using a zip tie. Ensure the open end faces up to minimize any remaining leaks.
Reinstall Transit Bolts Before Moving
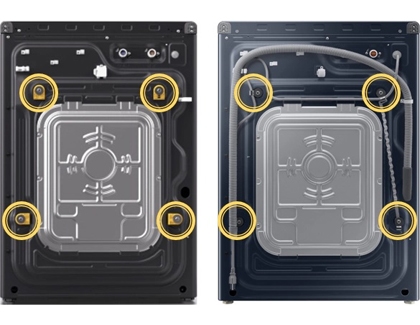
Samsung washers have suspension systems that require stabilization during transport. Without transit bolts, the drum can shift and cause serious internal damage.
Locate Transit Bolt Holes
On the back panel, find the pre-drilled holes designed for shipping bolts. These lock the drum in place during movement. The holes are usually clearly marked.
Insert and Tighten Bolts
Retrieve the original transit bolts, typically stored in a compartment or kept after initial installation. Insert one bolt into each hole. Use an electric screwdriver or wrench to tighten all bolts evenly. Ensure they are secure before moving the machine.
Missing Bolts: Temporary Solutions
If bolts are missing, consult your model manual for alternatives. Some users insert stiff foam between the drum and casing, but this is not a long-term solution. Order replacement bolts online using your model number for the safest option.
Prepare the Washer for Moving
Now that the machine is drained and secured, get it ready for transport to prevent damage during the move.
Wrap for Protection
Cover the washer with moving blankets or thick towels. Wrap tightly with stretch film to prevent shifting. Avoid covering vents or control panels with plastic, as these areas need airflow.
Use Proper Lifting Technique
Tilt the machine slightly and slide a hand truck underneath. Secure it with straps. Two people should lift if no dolly is available. Pull from opposite sides to keep the machine balanced and prevent dropping.
Final Check Before Moving
Confirm the power cord is secured, all hoses are taped up, transit bolts are tight, drain filter is closed, and no tools or rags are left inside the drum. This checklist prevents surprises during the move.
Disconnect a Dryer If Moving Both Units
Many users move washers and dryers as a pair. Here is how to safely handle the dryer disconnection.
Electric Dryer Steps
Unplug the dryer from the wall. Disconnect the vent hose at the wall using a screwdriver to loosen the clamp. Wear a mask, as dryer vents collect lint that can irritate lungs. Bundle the cord and vent with a zip tie.
Gas Dryer Precautions
Unplug the electrical cord. Shut off gas at the valve by turning the lever 90 degrees to be perpendicular to the pipe. Do not disconnect the gas line yourself unless trained. Contact your gas provider for safe removal if needed.
Vent Hose Inspection
Replace kinked or crushed aluminum hoses with rigid metal ducting. Never use plastic or foil vents, as they are fire hazards. Clean lint buildup before reinstalling to maintain proper airflow and safety.
Reconnect and Test After Moving

When you reach your destination, reverse the disconnection process but do not skip verification steps.
Reinstallation Steps
Position the washer, leaving space for hose movement. Reconnect hot and cold hoses with washers inserted. Insert the drain hose into the standpipe. Do not seal it tightly. Plug in the power or restore the breaker. Remove transit bolts before running the first cycle. This is critical.
Test for Leaks and Function
Turn water valves back on. Run a short rinse cycle. Watch all connections for drips. Confirm the machine fills, agitates, and drains properly. This verification prevents water damage from undetected leaks.
Avoid Common Disconnection Mistakes
Even careful users make errors. Here is how to prevent the most frequent issues.
Forgetting the Drain Filter
Leaving it full leads to a massive spill when tilting the machine. Always drain it first, even if you think the machine is empty.
Skipping Transit Bolts
Internal damage from drum movement is not visible immediately, but it shortens the machine lifespan significantly. Always reinstall transit bolts before any transport.
Mislabeling Hoses
Connecting hot to cold or vice versa affects wash performance and can damage heating elements. Label hoses clearly during disconnection.
Pushing Drain Hose Too Far In
A tightly jammed drain hose causes siphoning, leading to water backing up during the cycle. Leave it loose in the standpipe.
Tools and Supplies Checklist
Gather these items before starting your disconnect project.
Tools:
• Channel locks or adjustable wrench
• Pliers or vice grips
• Screwdriver for vent clamps
• Electric screwdriver for transit bolts
Supplies:
• Two to three thick towels
• Two 5-gallon buckets
• Zip ties or tape
• Labels or marker
• Moving blankets and stretch film
• Shallow bowl for emergency drain
Frequently Asked Questions About Disconnecting Samsung Washing Machines
Can I disconnect my Samsung washing machine myself without professional help?
Yes, you can disconnect a Samsung washing machine yourself. The process takes 30 to 60 minutes for first-timers. Following the proper sequence of power off, water off, drain, disconnect, and secure prevents damage. Professional services cost $150 or more, so DIY saves significant money.
Do I need to drain the filter before moving my Samsung washer?
Yes, absolutely. Samsung washers have a front-mounted drain filter that holds residual water. Failing to drain it results in two to three gallons of water spilling when you tilt or move the unit. Always empty this filter before transporting the machine.
What happens if I move my washing machine without transit bolts?
Moving a washing machine without transit bolts allows the internal drum to shift freely. This can damage the suspension system, dampers, and outer tub. The damage may not be immediately visible but will cause excessive vibration, noise, and premature machine failure. Always reinstall transit bolts before any transport.
How do I label my water hoses to avoid confusion during reinstallation?
Before disconnecting water inlet hoses, use tape or labels to mark them as hot and cold. Most Samsung machines have color-coded connections, with red indicating hot and blue indicating cold. Clear labeling prevents performance issues and potential heating element damage from reversed connections.
Should I turn off the circuit breaker or just unplug the washing machine?
Both methods work, but unplugging is the simplest approach for most situations. If the outlet is behind the unit and difficult to reach, or if you have a dedicated laundry circuit, turning off the circuit breaker provides complete power isolation. This is the safest method for ensuring zero power flow during disconnection.
Key Takeaways for Disconnecting Your Samsung Washing Machine
Disconnecting a Samsung washing machine is safe and manageable when you follow the right sequence. Always cut power first, then shut off water supply, drain residual water from the filter, disconnect hoses, reinstall transit bolts, and secure everything for transport. Each step protects your home, your appliance, and your wallet.
The most critical mistakes to avoid are forgetting to drain the filter, skipping transit bolts, and mislabeling hoses. These errors cause flooding, internal damage, and performance problems after reinstallation. Take your time with each step, and do not skip the verification process when reconnecting at your new location.
After reinstallation, always test for leaks and ensure transit bolts are removed before running the first cycle. With this guide, you have everything needed to move your washer like a professional.